Hashiwokakero, often abbreviated to Hashi, and also sometimes called Bridges, is a logic puzzle originating from Japan. It’s played on a square board, the size of which determines the level of difficulty.
In a hurry? Jump to: Rules / Tips / Worked Example / Video Tutorial / Download Free Puzzles / Books
The puzzle comprises of numbered circles representing islands. Here’s an example of a small Hashi board:
The objective of Hashi is to connect all the islands by drawing a series of bridges between them, following certain rules:
Here’s what our earlier example puzzle looks like once it’s been solved:
Solving Hashi puzzles is all about using logical deduction and elimination to figure out where bridges can and cannot go.
Here are some tips on how to approach solving Hashi before we work through an example from beginning to end.
Working through a puzzle from start to finish is the best way to understand it. Remember, although each puzzle only has one correct solution, you can reach that solution different ways. The path presented here is not necessarily the quickest or most efficient, it is simply a way of demonstrating the tips above.
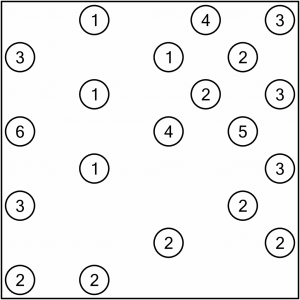
This is the puzzle we are going to solve. It’s a level 1 puzzle, so pretty easy but sufficient to demonstrate the general method. It doesn’t require complex chains of logic to reach the solution.
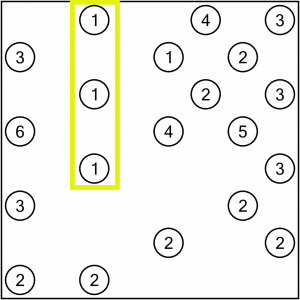
The first step is to look for the easy wins, and straight off there’s that nice column of three 1s. We can never connect two 1s together because doing so would separate them from the rest of the islands, which isn’t allowed. The bottom 1 of the three has two possible connection options: the 3 to its right, or the 2 below it. We can’t choose either yet.
The other two 1s though, only have one possible connection each – both to their right. There’s simply nowhere else to connect them, so we can draw those bridges in and get underway.
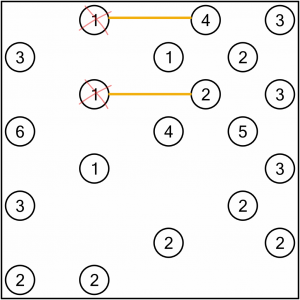
Because we know that those two 1s are ‘complete’ (they have all their connections), we can cross them out and move on.
There is another 1 in this puzzle, but it has two connection options so we cannot build a bridge to it yet.
Instead, let’s look at the 3 in the top right corner. We know that a 3 in a corner must have at least one bridge in each direction, so we can draw those in next.
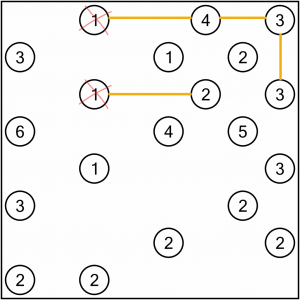
Drawing in those bridges doesn’t complete any islands yet, but it’s all about limiting our placement options.
While we’re looking at islands with limited connection options, we have another one from our list in the Tips section above: the 6 on the left-hand side. A 6 on an edge must have two bridges in each direction. We’ll draw those in next.
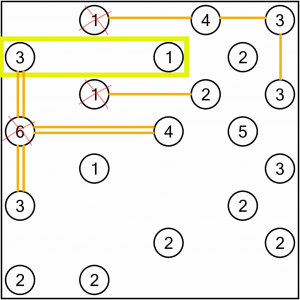
We’ve completed the 6 so can cross it out. We’ve opened up the board quite a lot. The 3 and 1 highlighted here must be connected – there’s no other means of getting a third bridge into that 3.
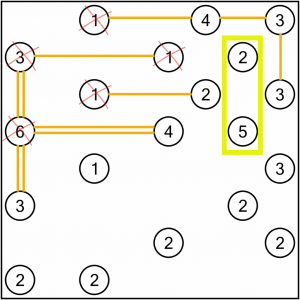
Completing the 1 means we can now connect up this 2 to its right. We’ve eliminated one of its placement options, so it has to connect to the 5 below.
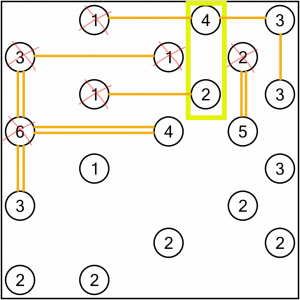
We can now consider the 4 and 2 highlighted. The only place the 2 can connect to get its second bridge is to the 4 above it.
We also know we have to connect the 4 to the 2 because it still requires two more bridges, and we can only put one more between it and the 3 to its right.
In easy level puzzles like this, you’ll often see multiple signals for a bridge placement. As the puzzles get harder, the signals get fewer.
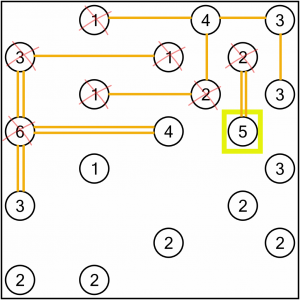
Where next? Let’s look at this 5. It’s got two bridges so it needs three more. There are only two more islands to which it can connect (the 4 and the 2), so we can deduce that we need to build at least one bridge to each. One of them will obviously get a second bridge, but we don’t know which yet.
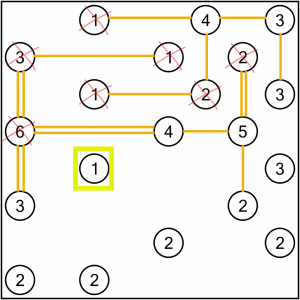
Those new bridges have cut off this 1 from the 3 on the far right-hand side. It must connect to the 2 below it…
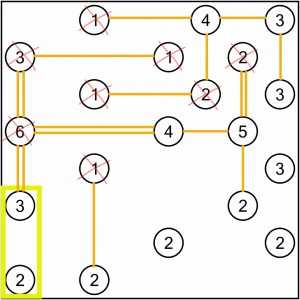
…like this. That in turn means we can connect this 3 and 2 together, since we’ve just cut off the only other option for the 3.
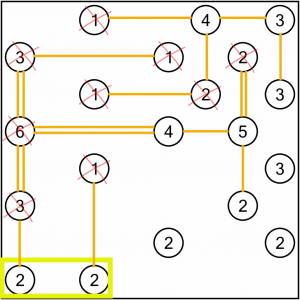
Now that the 3 is complete, the 2 we just connected up must connect to the other 2 - nowhere else for it to go.
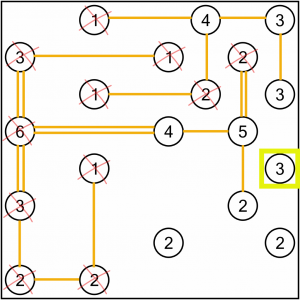
Nearly there. Now we have to do something about this 3. It’s got two directions it can be connected in, and it’s going to need at least one bridge each way, so we’ll draw them in.
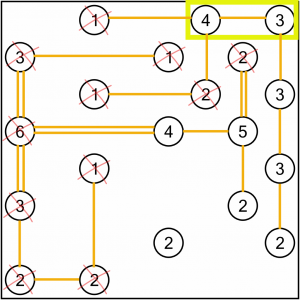
We can also put in the final bridge to complete this 4 and 3. We know it has to go here because there’s nowhere else left to put the final bridge for the 4.
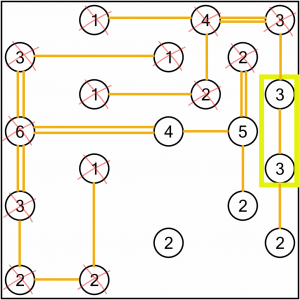
Completing the 3 in the top right-hand corner means we know we must add another bridge here, to complete both these 3s.
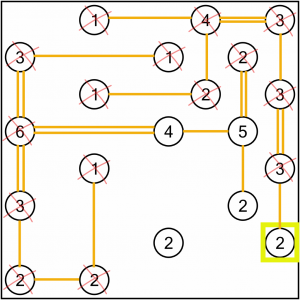
In turn that allows us to complete this 2, which must connect to the other 2 to its left since it has nowhere else to go.
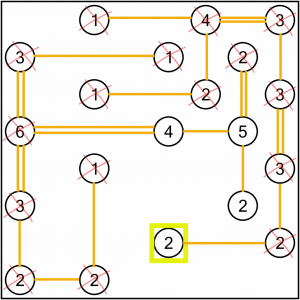
That 2 must now connect to the 4 above it…
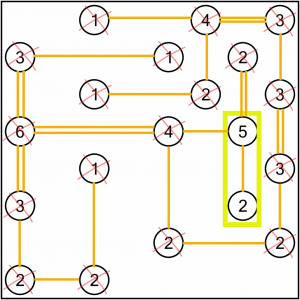
…leaving just the 5 and 2 which must take an additional bridge.
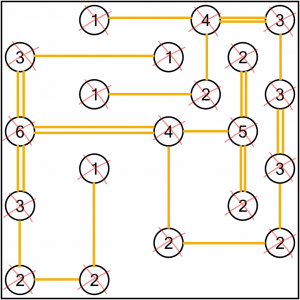
And that’s it - we’re done!
How did you get on? Did you get ahead of me and solve the puzzle by yourself? Ready to have a go at some more? Read on…
We’ve put together a taster of four puzzles for you, including the example above. You can download and print the PDF below. Solutions are included, but no cheating!
Want to try your hand at Hashiwokakero? We have options! There's Puzzle Weekly Presents: Hashiwokakero, which includes 120 puzzles (one per page) over seven levels of difficulty. It's amazing value.
We sometimes also include Hashi in our free Puzzle Weekly magazine – you should totally sign up for that if you haven’t already, because who doesn’t want at least 28 free puzzles every week?
You can also find four levels of Hashi puzzles in our Jumbo Adult Puzzle Book – which happens to include more than 500 puzzles of 20 different varieties.
If you have a Kobo eReader with stylus, you can grab our Hashiwokakero For Stylus Devices, which is designed specifically for it.