Mazes are a fascinating kind of puzzle. Completely unlike symbol-based teasers such as sudoku or suguru, they present a different kind of challenge to the brain. According to at least one neuropsychobiology study, solving mazes activates a network within the brain from the visual to parietal regions. Working these puzzles even activates subcortical and cortical motor areas — areas normally associated with movement and coordination. To the brain, solving a maze on paper is like walking through a real, physical labyrinth.

Looking for some good mazes that will challenge even the smartest brain? Look no further! Mazes for Smart People is our collection of 100 huge mazes. With five levels of difficulty and four maze types, it will keep you busy for hours.
How can we go about solving mazes? Are there tricks and techniques that make the process easier? Or must we resign ourselves to trying every path, every twist and turn, until we eventually emerge at the exit? The brute force approach will work, and for some people that’s enough. Smarter minds seek efficiency though.
Fortunately there are techniques we can employ to help us find the solution more quickly. However, these methods are only ever an aid to brute force. There is no single magical method that will always lead you to the correct solution first time. Mazes are not sudoku and cannot be solved first time with logic alone. A well-designed maze always requires a little bit of trial and error. It’s all part of the fun.
With that said, let’s dive in and look at five different methods you can use to solve almost any maze.
Let’s begin by saying right now that this method won’t work with all mazes. At Puzzle Genius we design our mazes in such a way to completely negate this method. Are we evil? No, we just want to make good mazes that present a real challenge! Not all maze-setters are so conscientious.
Here’s a simple maze, typical of the kind you might find in a kids activity book.

If we begin at the start of the maze, we are immediately faced with a choice — left or right? If we go right, we have another choice — down or straight on? And on it goes. The maze has been front-loaded with branches, designed to confuse you from the off.
But what happens if we start at the end? There’s only one possible path, and we can follow it for more than half the puzzle before we get to a branch — in the blue circle below:
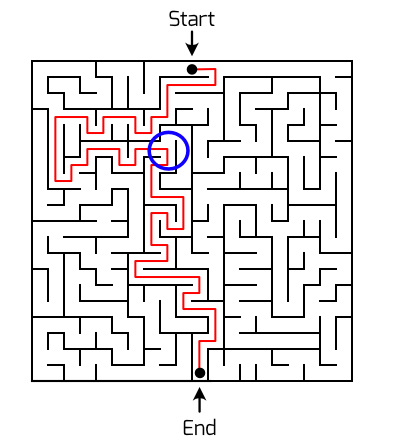
After that there are only three more choices to make before we reach the goal. In each of those decisions it’s easy to see the correct path and where there is a dead end, because we are so close to the end of the maze.
Lots of mazes are designed this way — front-loaded with branches designed to confuse you at the start. This example is a very simple maze, but even more complex mazes can suffer from this ‘problem’ (in quotes because not everyone will see it as a problem — some may say it’s an opportunity).
Starting at the end then, is a technique that’s always worth a try.
This is probably the most well-known method for maze-solving. It’s usually suggested for physical labyrinths like the corn mazes favoured by farmers around the world, or the box hedge mazes found in the gardens of stately homes.
The technique is simple: when you enter the maze, place your right hand on the wall to your right (or left hand on the wall to the left), and keep it there as you move through the maze. Eventually you should come to the exit.
We say should because this theory, while sound, does not work in all mazes. It will only get you through a maze that can be deconstructed into a single line. By which we mean a maze that you could draw in one go without taking your pen off the page.
The maze in the example above, for instance, is a single-line maze. Another way of thinking of this type of maze is to imagine that it is made from a giant piece of spaghetti — or a long rope if you prefer. You could lay down your pasta, shaping it and twisting it around the corners until you had created the maze.
Here’s a super-simple maze that you can try this technique on:

The first thing to note is that this is a single-line maze. You can put your finger on the top right corner and trace around every line of the maze without lifting it off. You could, given a long enough piece of spaghetti, recreate this exact maze without breaking it (though you would need do make some tight folds as you doubled it back on itself).
The reason the hand on the wall technique works with a maze like this is because it is made from one path, you can effectively trace your way around the whole maze in one go.
Here’s how that looks on our example. If we pictured ourselves walking into this maze from the top and placing our right hand on the right-hand wall and tracing a line with it as we went, this is the line we would draw:
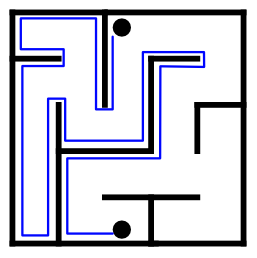
Is it efficient? Well, it’s clearly not the quickest route through the maze. But did it work? Hell yeah! Maze solved.
Had we started with the left-hand, we would have gone the quicker way — but hindsight is a wonderful thing and is of no help when starting our journey through a real, complex maze.
Remember, this technique only works on mazes that can be constructed from a single line. It won’t work on any that include islands, like this for example:
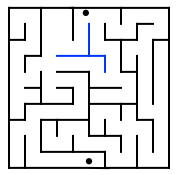
Depending which side you started on, you could potentially find yourself going round and round the blue island forever! Islands like that are common in physical labyrinths, placed there purposely to defeat this simple but effective maze-solving technique.
This can be a time-consuming method, but it will always produce a clear path through the maze by the end of the process. The technique is simple enough — starting at the end of the maze, block off every dead end you find. Eventually only the one-true path will remain.
A visual example will make this clearer. Let’s begin with this simple maze:

Starting from the bottom we can block off dead ends. We could do this two ways - either by simply barring them with a line, or by filling them in. We’ve done both ways here for demonstration purposes.
The method you use is a personal preference. Filling in dead ends makes it easier to see the remaining path, but it’s obviously more time-consuming and uses more ink or graphite!
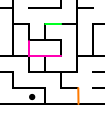
As you get more practice with this technique you’ll find you can trace dead-ends back quite some way and block off several with a single stroke, rather than blocking every one individually. For example, these pink blocks are unnecessary - the green block takes care of all those little dead ends in one go.
As you can see, dead-end pruning is still a rather brute-force technique for finding your way through a maze. It’s fool-proof, but time consuming.
This is essentially a variant of dead-end pruning. Consider the following maze:

Notice anything in particular?
If you look carefully, you’ll find that almost half of the maze is a complete dead-end! We can trace a wall from one side of the maze to the other, effectively creating a sub-maze in which the correct path cannot possibly pass.
This is an exaggerated example to make a point — it’s rare to find such obvious sub-mazes. However, it is not uncommon to find large chunks of a maze that are one huge dead-end that can be cut out.
Here’s another thing to look out for:

This time we don’t have a clean break between two parts of the maze, but we almost do, and that in itself is very helpful.
We can draw a line from the left to the right with just a single break in it. That means the path through the maze must go through that break. We can therefore split this maze into two sub-mazes.
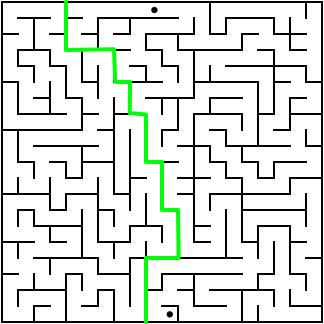
If you ever read the story of Hansel and Gretel, this final method will make perfect sense to you. In the fairytale, our two heroes set out into the woods to escape the house of the evil witch armed only with some stale bread to help them find their way. By dropping a trail of crumbs as they went, they were able to see the paths they had already tried, and thus discount them every time they had to make a new choice about which direction to take.
We can use the same method to solve any maze. Instead of breadcrumbs we draw a line as we make our way through the maze, showing the path we have already taken.
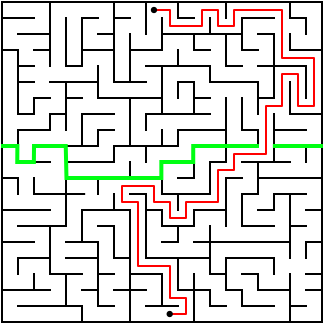
At first glance this may sound like the hand on the wall method, but whereas that technique prescribes a very strict path through the maze (and can be confounded by islands, bridges and tunnels), the Hansel and Gretel method is more freeform and will always work, provided we follow one simple rule: never take a path we have already been down twice. The reason is simple: if we’ve been there and back, it must be a dead end.
This method leaves the choice of direction at every junction up to us. We can try to head in the general direction of the exit, rather than follow every twist and turn. And if we see that a particular path is a certain dead end, we aren’t obliged to trace our way around it anyway, the way we would with the hand on the wall approach.
Here’s an example of drawing a Hansel and Gretel path through a simple maze:
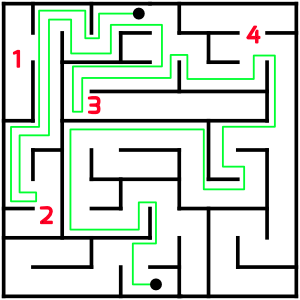
Were we to use the hand on the wall method, we would have had to trace our way around the obvious dead-end number 1, and we would also have had to trace our line right to the end of the dead end number 2. With this approach we could just turn right around and retrace our steps. Similarly we could avoid dead ends 3, 4, and so on, continually working towards the exit.
If we come to a junction where we have to choose between a route that already has a breadcrumb line and one that doesn’t, we should choose the one that doesn’t.
Again, provided we never take a path with two breadcrumb lines, we will always find the exit, even in mazes with islands.
So there you have it — five different ways to find your way across a maze. Which is best? Which one should you use? Ultimately it’s down to you. If you want a guaranteed solution with maximum efficiency, then Hansel and Gretel is the way to go.
If, on the other hand, you enjoy the unknown and like working your way around blindly, but want to simplify the puzzle to make your life a little bit easier, then dead-ending or sub-mazing is your friend.
All the example mazes used in this tutorial were, by necessity, very, very simple! If you’d like to try some techniques on a proper maze, then you can download and print a Puzzle Genius maze below. This is a level one maze, similar to those you’ll find in Mazes For Smart People. If you get stuck, we’ve also provided the solution to download in a separate PDF. Good luck!
Level 1 Practice Maze — Solution
Right click or long-tap and Download Linked File or click or tap to open in a new window then choose Print from your browser.