In part one of this tutorial we began looking at sudoku from the first principles. If you’ve never tried sudoku before, we’d recommend going back and reading that page because it covers the basic foundations.
Here in part two we are going to move on to full-sized 9x9 grids - the kind you’ll find in most books, including ours (though we do have some bigger versions for the more adventurous).
Here’s an empty 9x9 sudoku grid:
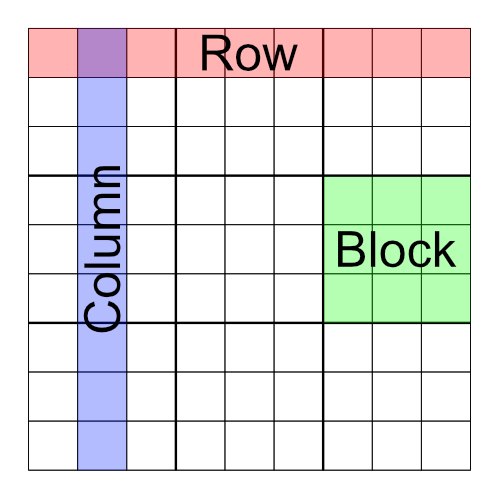
It’s just like the little 4x4 grid we looked at before, only bigger. The grid uses all the single-digit numbers from 1-9. Each row, column, and block must have each number 1-9 once, and only once.
Now let’s look at a real puzzle. This is an easy one - a one-star puzzle from our Pocket Sudoku - Classic range.
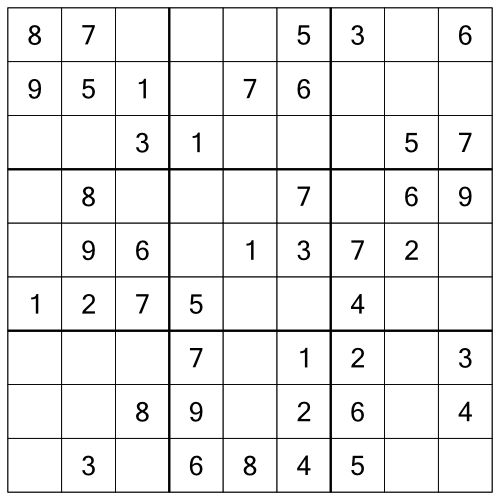
If you are new to sudoku, then at first glance a puzzle like this can look a bit intimidating. All those empty cells! What’s more, on closer inspection you might notice that unlike the little grids we looked at in part one, this one doesn’t have any rows, columns, or blocks with just a single empty cell.
Fear not. This really is an easy puzzle, and we’re going to deconstruct it to see why.
When we say deconstruct, we mean literally. We are going to break the puzzle apart and turn it into smaller bite-sized chunks that are much simpler to solve.
There are two ways we can break apart a sudoku grid. The first is by splitting it into three equal parts horizontally, along the thick lines, like this:
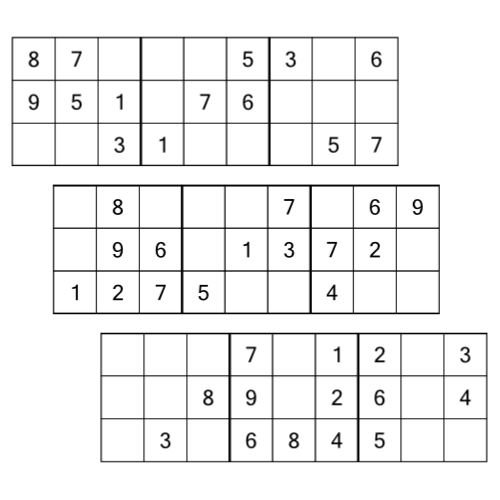
We call each of these horizontal sections a rack. As with everything in sudoku, different puzzle designers have different names for things. Rack is pretty common, and it’s what we stick with here at Puzzle Genius, but you might see racks referred to as ranks or even (confusingly) rows, in other places.
Looking back at the original grid above, you’ll see there are thicker lines running top to bottom as well. Splitting the grid vertically along those gives us three stacks, like this:
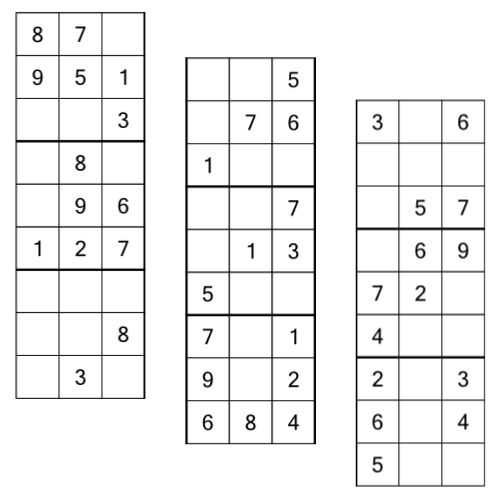
Again, different folks may have different names. We stick with stacks.
Now obviously we aren’t going to physically cut out a sudoku puzzle and chop it up like this. But thinking of a grid as smaller racks and stacks makes it easy to tackle the puzzle because we’re only looking at three rows, columns, or blocks, at a time
To see how using racks and stacks is helpful, let’s work through our example puzzle, starting with the top rack.
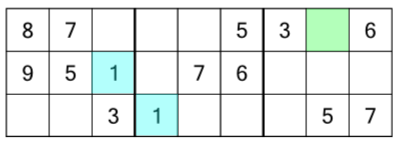
Step one of solving this grid is to look at where all the number 1s are in this first rack. There are two of them already filled in for us (highlighted here in blue). The first is in the first block and middle row. The second is in the second block and bottom row. We know every block and every row has to contain every number, once. So in this rack, logic tells us we need to put a number 1 somewhere in the third block, and somewhere in the top row. And guess what? There’s only one empty cell that falls in both the last block and top row. We have to put a 1 there. Like this:
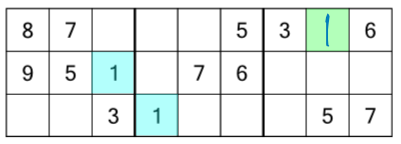
We can repeat this step, this time looking for number 2s. But there aren’t any number 2s in this rack, you say. And you’re right! No need to worry, we can move on and look for number 3s.
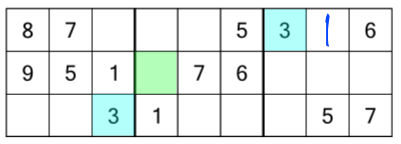
There’s a number 3 in the first block and bottom row, and one in the last block and top row. We must be missing a number 3 in the middle block and middle row. And again, there’s only one empty cell in that block and row (the green one), so we have to put a 3 in it, thus ensuring each row and block has a single number 3.
As you’ve surely figured out by now, we look for number 4s next, but there aren’t any. The number 5 already appears in each row and block, so we move on to the 6s. And here we have a bit of a problem:
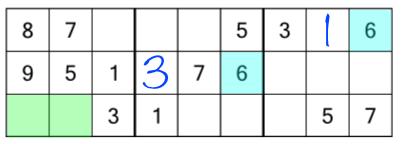
There are two 6s, and logic has narrowed down the possible homes for the third to two cells. Which one is correct? Right now we don’t know. We never guess in sudoku, because if we get it wrong we won’t know straight away and by the time we realise there’s an error in the grid, it will be far too late to work out where we made a mistake and we’ll have to start over. What then, are we to do? Simple: we carry on looking for the next numbers. We’ll come back to the 6s later. Right now we can check the 7s (they are all present already), and then the 8s:
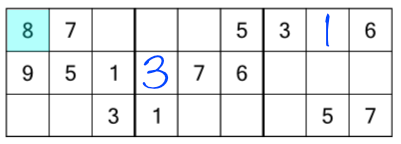
There’s only one 8, so we can’t draw any conclusions about where to put the others yet. The same is true of the 9.
We’ve done all we can with this top rack (for now), so we can move on to the second rack and repeat the process.
There’s a 1 we can fill in in the top row of the rack, but the 2s are inconclusive, and we don’t have enough 3s, 4s or 5s to work those out yet. Once again, the 6s present us with a minor dilemma:
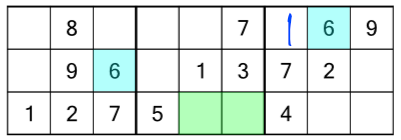
With a 6 in the middle row and first block, and one in the top row and last block, we know we have to add one somewhere to the bottom row and middle block. There are two empty cells there, but unlike the first rack, this time we can work out which is the correct place. How? By looking at the puzzle as a whole again:
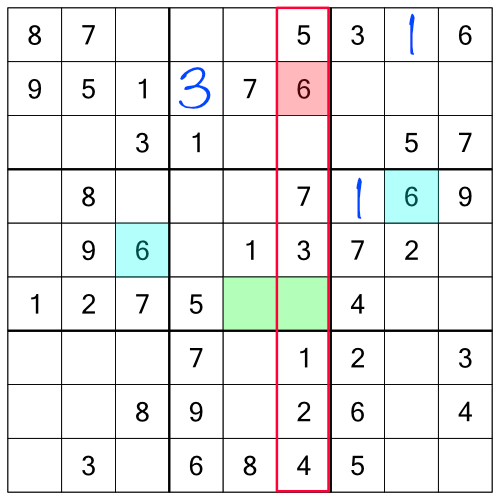
Looking at the entire grid allows us to consider not just the row and block, but also the column. And look - of the two cells we could consider for the 6, one of them is in a column that already contains a 6, so we know we can’t put it there. That only leaves one possible place for our missing 6:
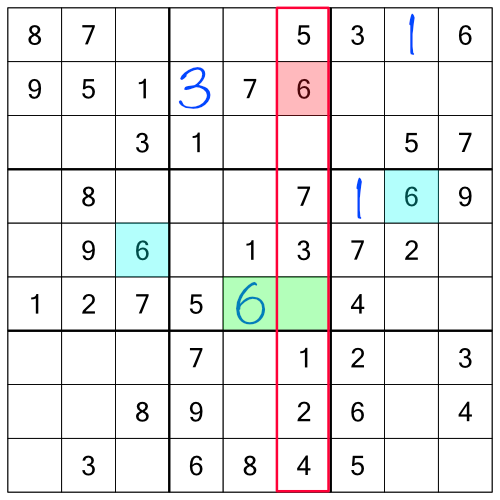
The 7s are all present and correct, and we only have one 8 so can’t do anything with that. The 9 in the middle row and the 9 in the top row tell us we need to put a 9 in the bottom row (middle block), and now we've only one free place to put it, so we can fill that in:
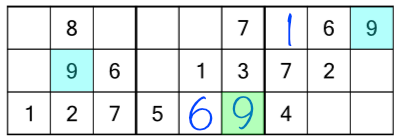
We do the whole process again for the bottom rack, where we find a missing 3 and 8.
This is what the grid looks like after working through the three racks:
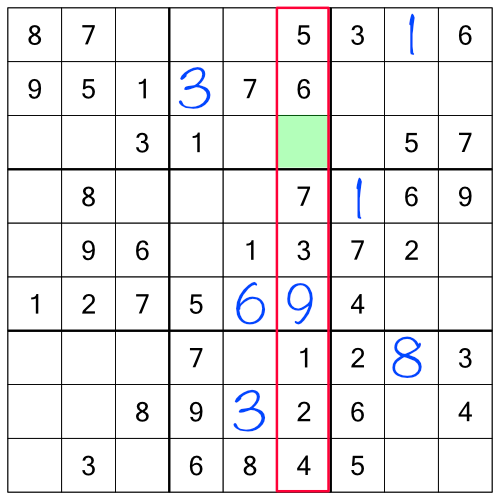
Working through the racks has allowed us to fill in enough empty cells that there’s now a column with just one number missing - a nice easy one to fill in. We also have an easy block to complete:
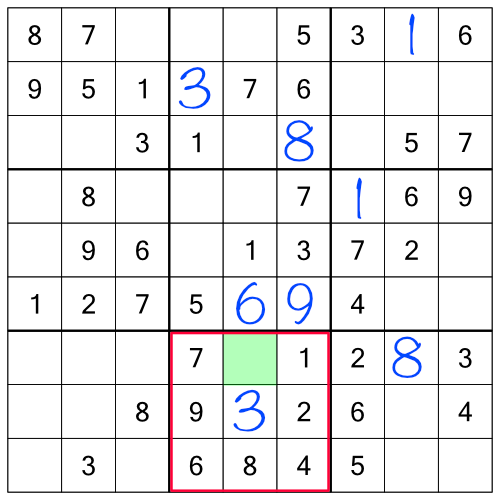
Here’s what the puzzle looks like so far:
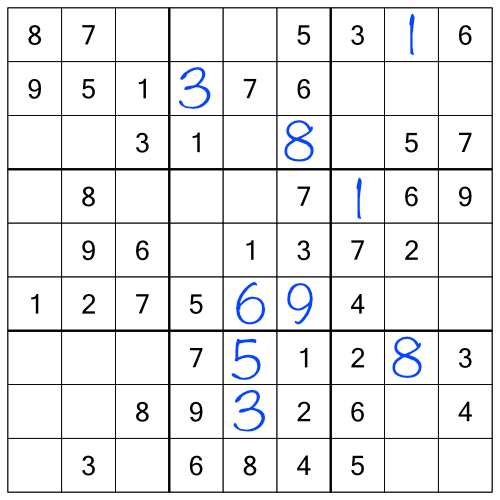
With the racks done, we can turn our attention to the stacks. The principle is exactly the same - take each stack in turn and work through the numbers to see what we can fill in. First up, the 1s in the left-most stack:
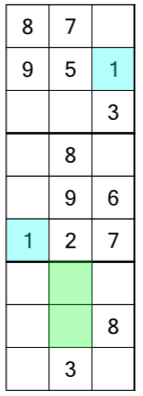
With a 1 in the top block and right column, and another in the middle block and left column, we know we have to find a place to put a 1 in the bottom block and middle column. There are two free cells there, so which do we go with? Once again, we can look at the whole grid to tell us:
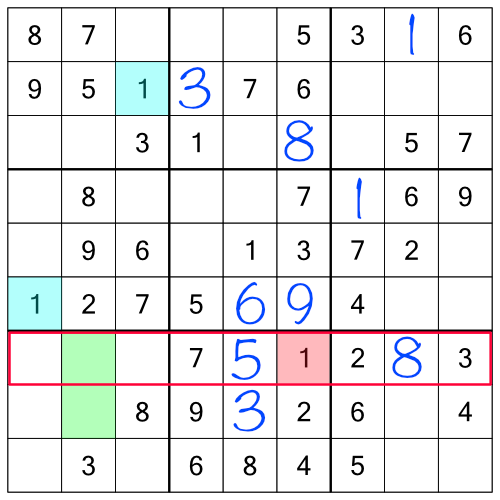
One of those rows already has a 1, so that only leaves one possible empty cell to put our missing 1.
After going through all the stacks using everything we’ve learned so far, our grid looks like this:
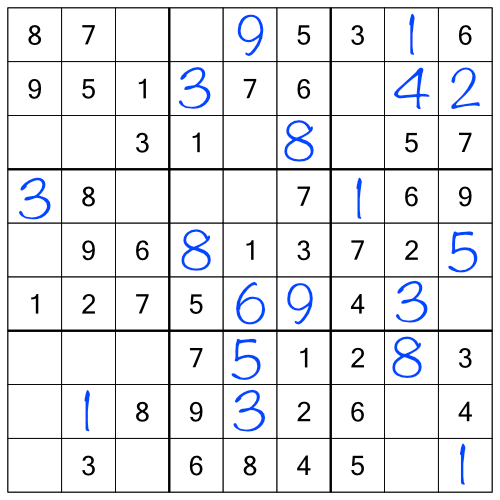
We’ve made some impressive progress, but obviously we’re not done yet. So how do we move forward? We could go back and go through the racks again. Having added in some extra numbers by working the stacks, we will almost certainly find that re-doing the racks will yield more answers. Indeed repeatedly working through racks and stacks might get us all the way to the end.
Before we do that though, looking at the puzzle as a whole shows us there are some easy cells to fill in - single free cells within rows, columns, blocks, or a combination:
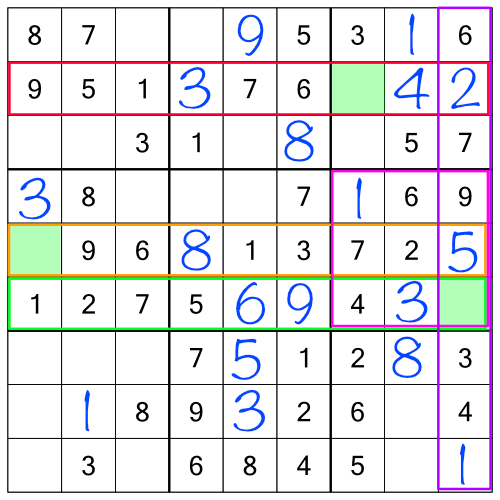
Filling all of those in makes the grid look like this:
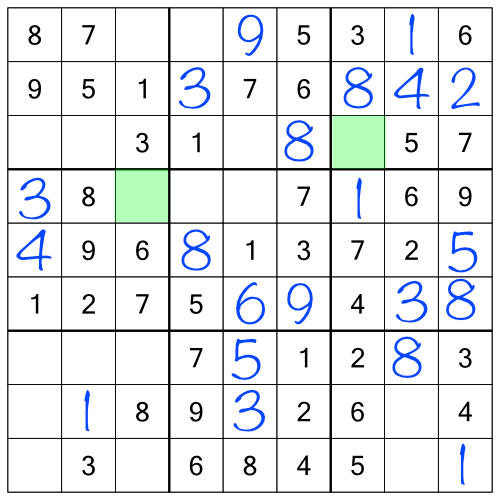
Now we’ve got even more single free cells to fill in. I said this was an easy puzzle! If we filling those, we get to this:
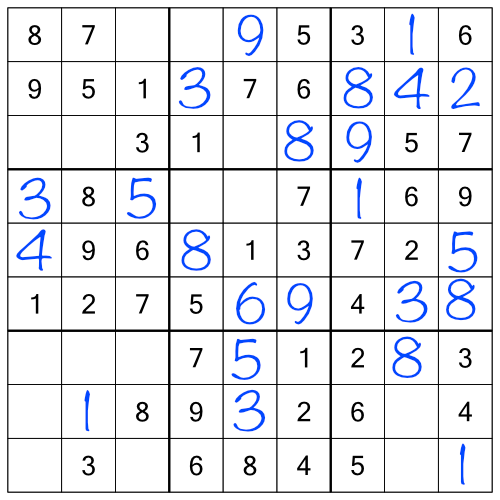
With no more single free cells, we can go back and work the ranks and stacks. At this late stage in the puzzle, we’ll find that often filling in a number as we work through the racks and stacks provides us with some easy single free cells we can fill in as well along the way.
Following everything we’ve covered so far, by re-working the racks, stacks, and single free cells, we can quickly complete the puzzle.
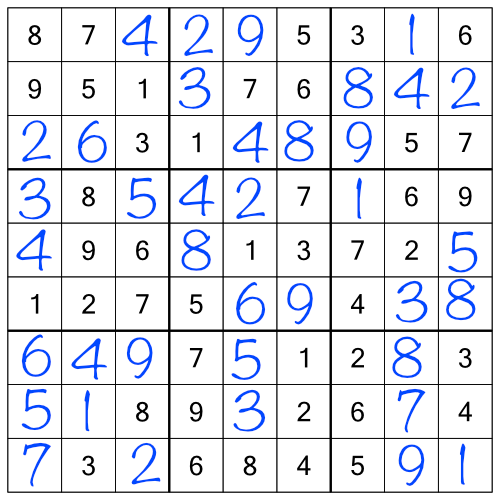
Congratulations! You now know enough sudoku to complete easy-level puzzles. Of course, there’s more to sudoku than just checking racks and stacks. Anything harder than easy-level grids will require some extra techniques.
To reach intermediate level, we are going to have to take things a little further. Part three of this series dives into a new technique that will take your sudoku-solving skills to a whole new level.
In the meantime, if you want to practice what you’ve learned so far, we’ve put together some easy puzzles you can download and print out, along with the solutions in a separate PDF.
And of course, we have loads and loads more puzzles in our books. Our Pocket Sudoku - Classic series is perfect for beginners. With five different levels of difficulty, you’ll find plenty of easy puzzles like the example we’ve just looked at. And as you learn more techniques, the higher levels will keep you busy too. All in a beautifully decorated, pocket-sized book you can slip into a pocket or bag and take anywhere.
9x9 Sudoku Easy Practice — Grids
9x9 Sudoku Easy Practice — Solutions
Right click or long-tap and Download Linked File or click or tap to open in a new window then choose Print from your browser.