Tetromino is a logic puzzle that originated in Japan. The puzzle consists of a rectangular or square grid with symbols in some of its cells. The symbols used are triangles, diamonds, squares, and circles.
In a hurry? Jump to: Rules / Tips / Worked Example / Video Tutorial / Download Puzzles / Books
The goal of the puzzle is to divide the grid into regions, each comprising exactly four cells – known as tetrominoes – and each containing two symbols. And yes, tetrominoes are the same shapes you find in Tetris. For reference, here are the possible tetromino shapes:
Tetrominoes can be flipped and / or mirrored, giving more possibilities. For the purposes of this tutorial, we will refer to these tetromino shapes as I, L, T, O, and S (in the order above).
Here’s what a simple Tetromino grid looks like:
The grid must be divided up according to the following rules:
Here is the what the example puzzle from earlier looks like once it's been solved:
Tetromino is a logic puzzle, but one that leans very heavily on spatial awareness. Although you can use pure logic to solve it, there’s no denying that good spatial awareness and an ability to ‘see’ patterns really helps. Without it, you will find you may have to make certain assumptions, even educated guesses, especially early on in a puzzle. The chains of logic, even in small puzzles, can get long and complex, so although we don’t usually recommend trial-and-error as a solving approach, sometimes you may find it easier to just try what you think is a likely scenario by pencilling it in, rather than attempting to hold the entire chain in your head.
Having said that, here are some tips to help you get started.
Let’s put some of those tips into practice by working through a puzzle from start to finish. Theory is all well and good, but sometimes just seeing a puzzle get solved can be far more helpful. Please remember that although there is only one valid solution to the puzzle, there are lots of ways of reaching it. This example is just one way, intended to show some solving techniques; it's not necessarily the best or fastest way.
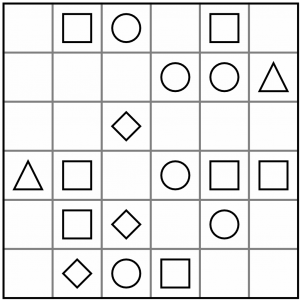
This is the puzzle we are going to work on. It’s a Level 1 puzzle, so nothing too taxing – just enough to get our teeth into and try some solving techniques.
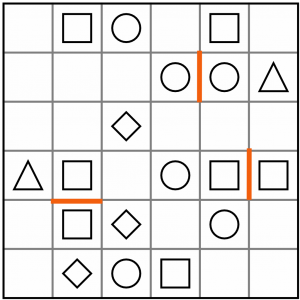
Before anything else, we can immediately draw in line segments between adjacent squares containing the same shape. As every tetromino must contain two different shapes, we know the same shape cannot appear twice in a tetromino. In this puzzle there are two sets of squares and a pair of circles that need to be separated in this way.
We’ve got our first clues on the board and we’re off to the races.
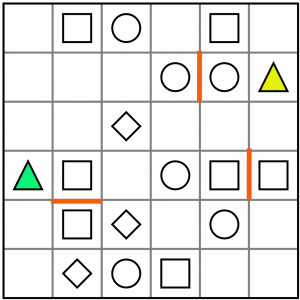
At this point it’s worth having a quick count up of the symbols. Keeping tabs on how many of each symbol are on the board, and how many have been incorporated into tetrominoes, can help spot likely pairings.
On this puzzle we have seven squares, six circles, three diamonds, and two triangles.
The low number of triangles gives us a good place to start looking for pairings. If we consider the green triangle, the only possible symbols it could be paired with in a tetromino shape are squares or diamonds. There are no circles within reach. The yellow triangle could pair with a circle or several squares, but not any diamonds. The common denominator is the square. Squares also happen to be the most abundant shape on the board, so it is a reasonable conclusion that the two triangles are paired with two squares.
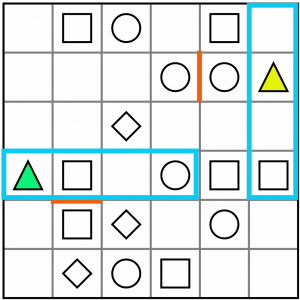
We’re going to have to chain some logic together here to figure out which tetromino shape the triangles and squares have been paired together in. First, let’s consider the I.
The yellow triangle could indeed fit in an I tetromino with a square. The green one though, could not. If we tried to turn the I horizontally, as is shown here, we’d be getting a circle into the bargain, which isn’t allowed. Vertically, there are no squares available. We can rule out the I tetromino.
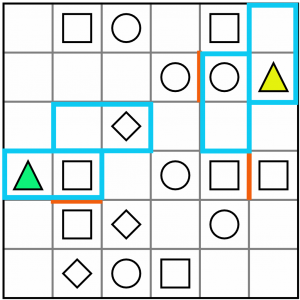
It doesn’t look like there’s any way to fit either of them into a valid S tetromino with a square…
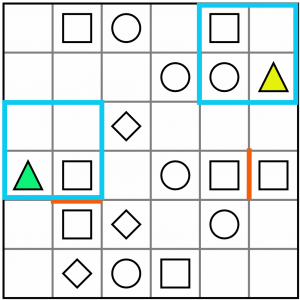
…and an O works for the green one, but not the yellow one.
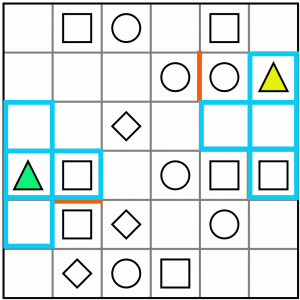
At first glance it looks like a T tetromino works for both triangle/square pairs. But there’s a problem. Can you see what it is?
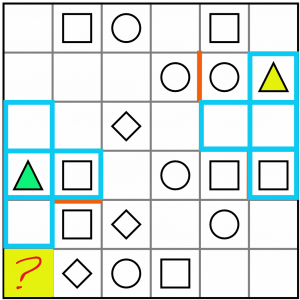
The problem is this yellow cell in the corner. If we placed the T tetromino over the green triangle, we would be orphaning this cell – there would be no possible way to incorporate it into another valid tetromino, given the concentration of shapes to its right.
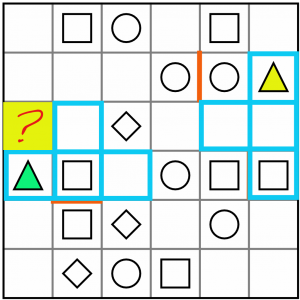
If we turned the T tetromino this way around, we’d just be moving the problem to this yellow cell – it would become orphaned.
We can rule out the T as the tetromino for the triangle/square pairing.
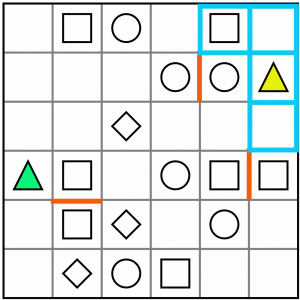
That just leaves the L shape, which works for both green and yellow triangles. But we don’t yet know which way it will be drawn. For example, for the yellow one it could be drawn like this…
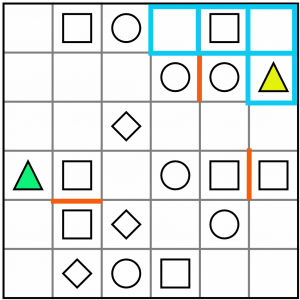
…or this.
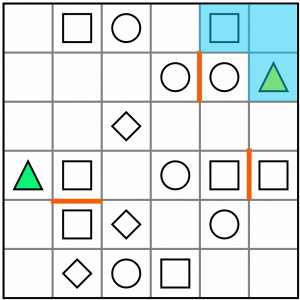
What we do know, is that in either case, these three cells form part of the L shape, so we can shade them in.
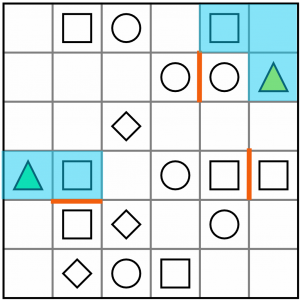
We can do the same for the green triangle. You can see for yourself that there are several ways we could draw an L tetromino over that and its paired square. All we know for sure is that these two cells form part of it, so we’ll shade those in. (In case you're wondering, we can discount the lower of the two squares, because if we used that we would once again be orphaning the bottom left-most cell).
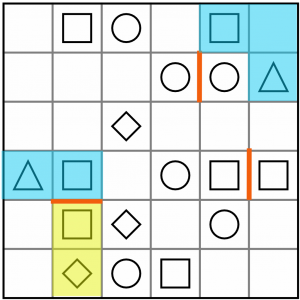
We’ve added some useful constraints to the board now. If we consider this square and diamond (yellow), the two empty cells immediately to their left, and the fact we are hemmed in by that partial L (blue) above, and work through the options, we come to the conclusion that the only way to complete this corner of the board is with the O tetromino…
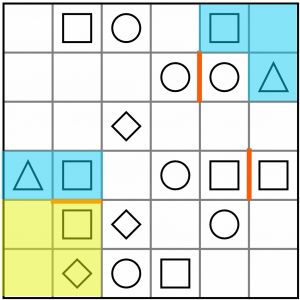
…like this. Anything else would either leave orphaned cells or would put too many shapes into a tetromino. This is the only valid option here.
Let’s take stock of our symbol counts. Still on the board, waiting to be paired up, we have: six circles, four squares, and two diamonds. Simple mathematics tells us we need to pair two of the circles with the diamonds, leaving the other four to be paired with the squares.
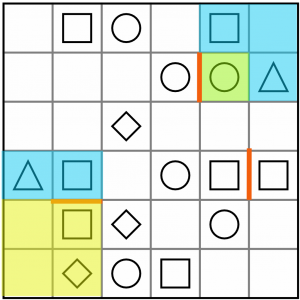
Of all the symbols left on the board, this circle (green) is the most promising because it is the most constrained. It’s hemmed in on two sides by the partial (blue) L tetromino, and on one side by the line we drew in because it cannot be paired with another circle. In other words, we know the tetromino it is part of must extend into the only remaining adjacent cell – the one below it. So we can fill that in now.
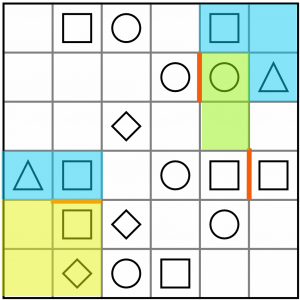
Where next? We could continue to the left, taking in the diamond, but that would be an L tetromino and we’ve already got that accounted for with our triangle/square pairing.
We could continue to the right and then down, making an S tetromino, but if we follow through on that, we end up not being able to fit the other circle/square pairs into S shapes.
In fact, working through all the constraints, we have only one way to take in a square, not use a tetromino we’ve already used, not orphan any cells, and complete the other circle/square pairs, and that’s to use a T tetromino…
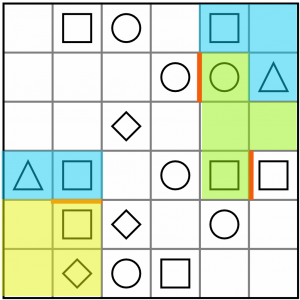
…like this.
Now we have even more constraints on the board, and we know we can pair up three more squares and circles with T tetrominoes.
But before we go looking for them, we can complete the blue L at the top right, because we’ve only one place left to extend it now.
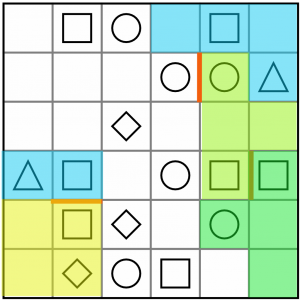
This T in the bottom right takes care of another square/circle pair, and removes the risk of any orphan cells in the corner.
Given the proximity of the circles to the remaining squares and diamonds, we can make an educated guess about which shapes go together. It seems most likely that the two circles on the outer edges both go with the squares adjacent to them, leaving the two diamonds to pair up with the circles on the inside of the board. Let’s draw the last two T tetrominoes in next.
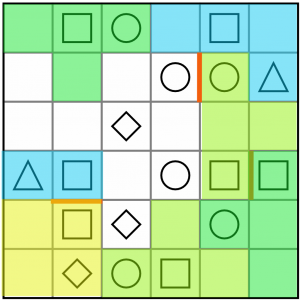
At this point you can probably ‘see’ how the rest of the board is filled in. We can complete the other (blue) triangle/square L tetromino, as there’s only one place for that to go that won’t orphan any other cells.
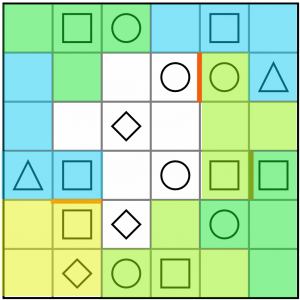
Now it’s easy to see that our last two pairs must be S shaped tetrominoes. It’s like doing a jigsaw!
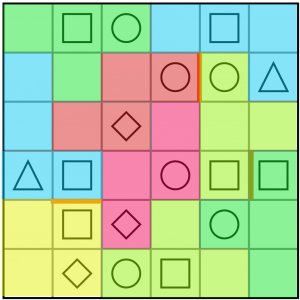
And that’s it, we’re all done!
Phew, how did you get on? Did you race ahead and finish the puzzle before reading the tutorial to the end? Are you a spatial awareness wizard, eager to place more tetrominoes? Or are you in need of some practice? Either way, we’ve got plenty more puzzles for you. Read on to find out more…
We’ve put together a taster of four puzzles for you, including the example above. You can download and print the PDF below. Solutions are included, just in case you get stuck.
When you’re ready for even more Tetromino, we have you covered. Our Tetromino: Volume 1 contains one hundred unique puzzles, one per page so you’ve plenty of room for notes.
If you have a Kobo device (with stylus), we have Tetromino specifically designed for solving on screen, too, in our Tetromino For Stylus Devices.
You can also find four levels of Tetromino in our Jumbo Adult Puzzle Book, which includes more than 500 puzzles of twenty different varieties – amazing value!
As if all that were not enough, we include seven levels of Tetromino in Puzzle Weekly from time to time. Puzzle Weekly is our free weekly magazine – find out more, and get your copy, here.