Suguru is a captivating number puzzle. At first glance it looks like a broken Sudoku grid. But whilst it shares some commonalities with its more well-known cousin, Suguru is a different kettle of fish altogether. If you’re new to Suguru, have a look at our tutorial here to get started.
One of the techniques that’s fundamental to solving harder Suguru puzzles is elimination by implication. We are going to look at some examples.
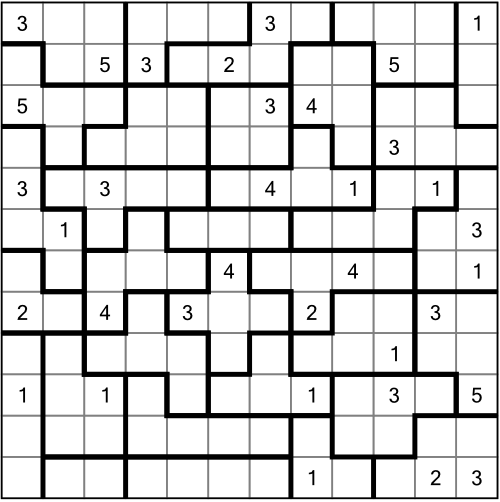
To start us off, we’re using a puzzle taken from A Year of Suguru (Easy to Intermediate) - the puzzle is from June 14 if you have the book and want to play along, and complete the rest of the puzzle yourself.
Here’s the grid as presented in the book:
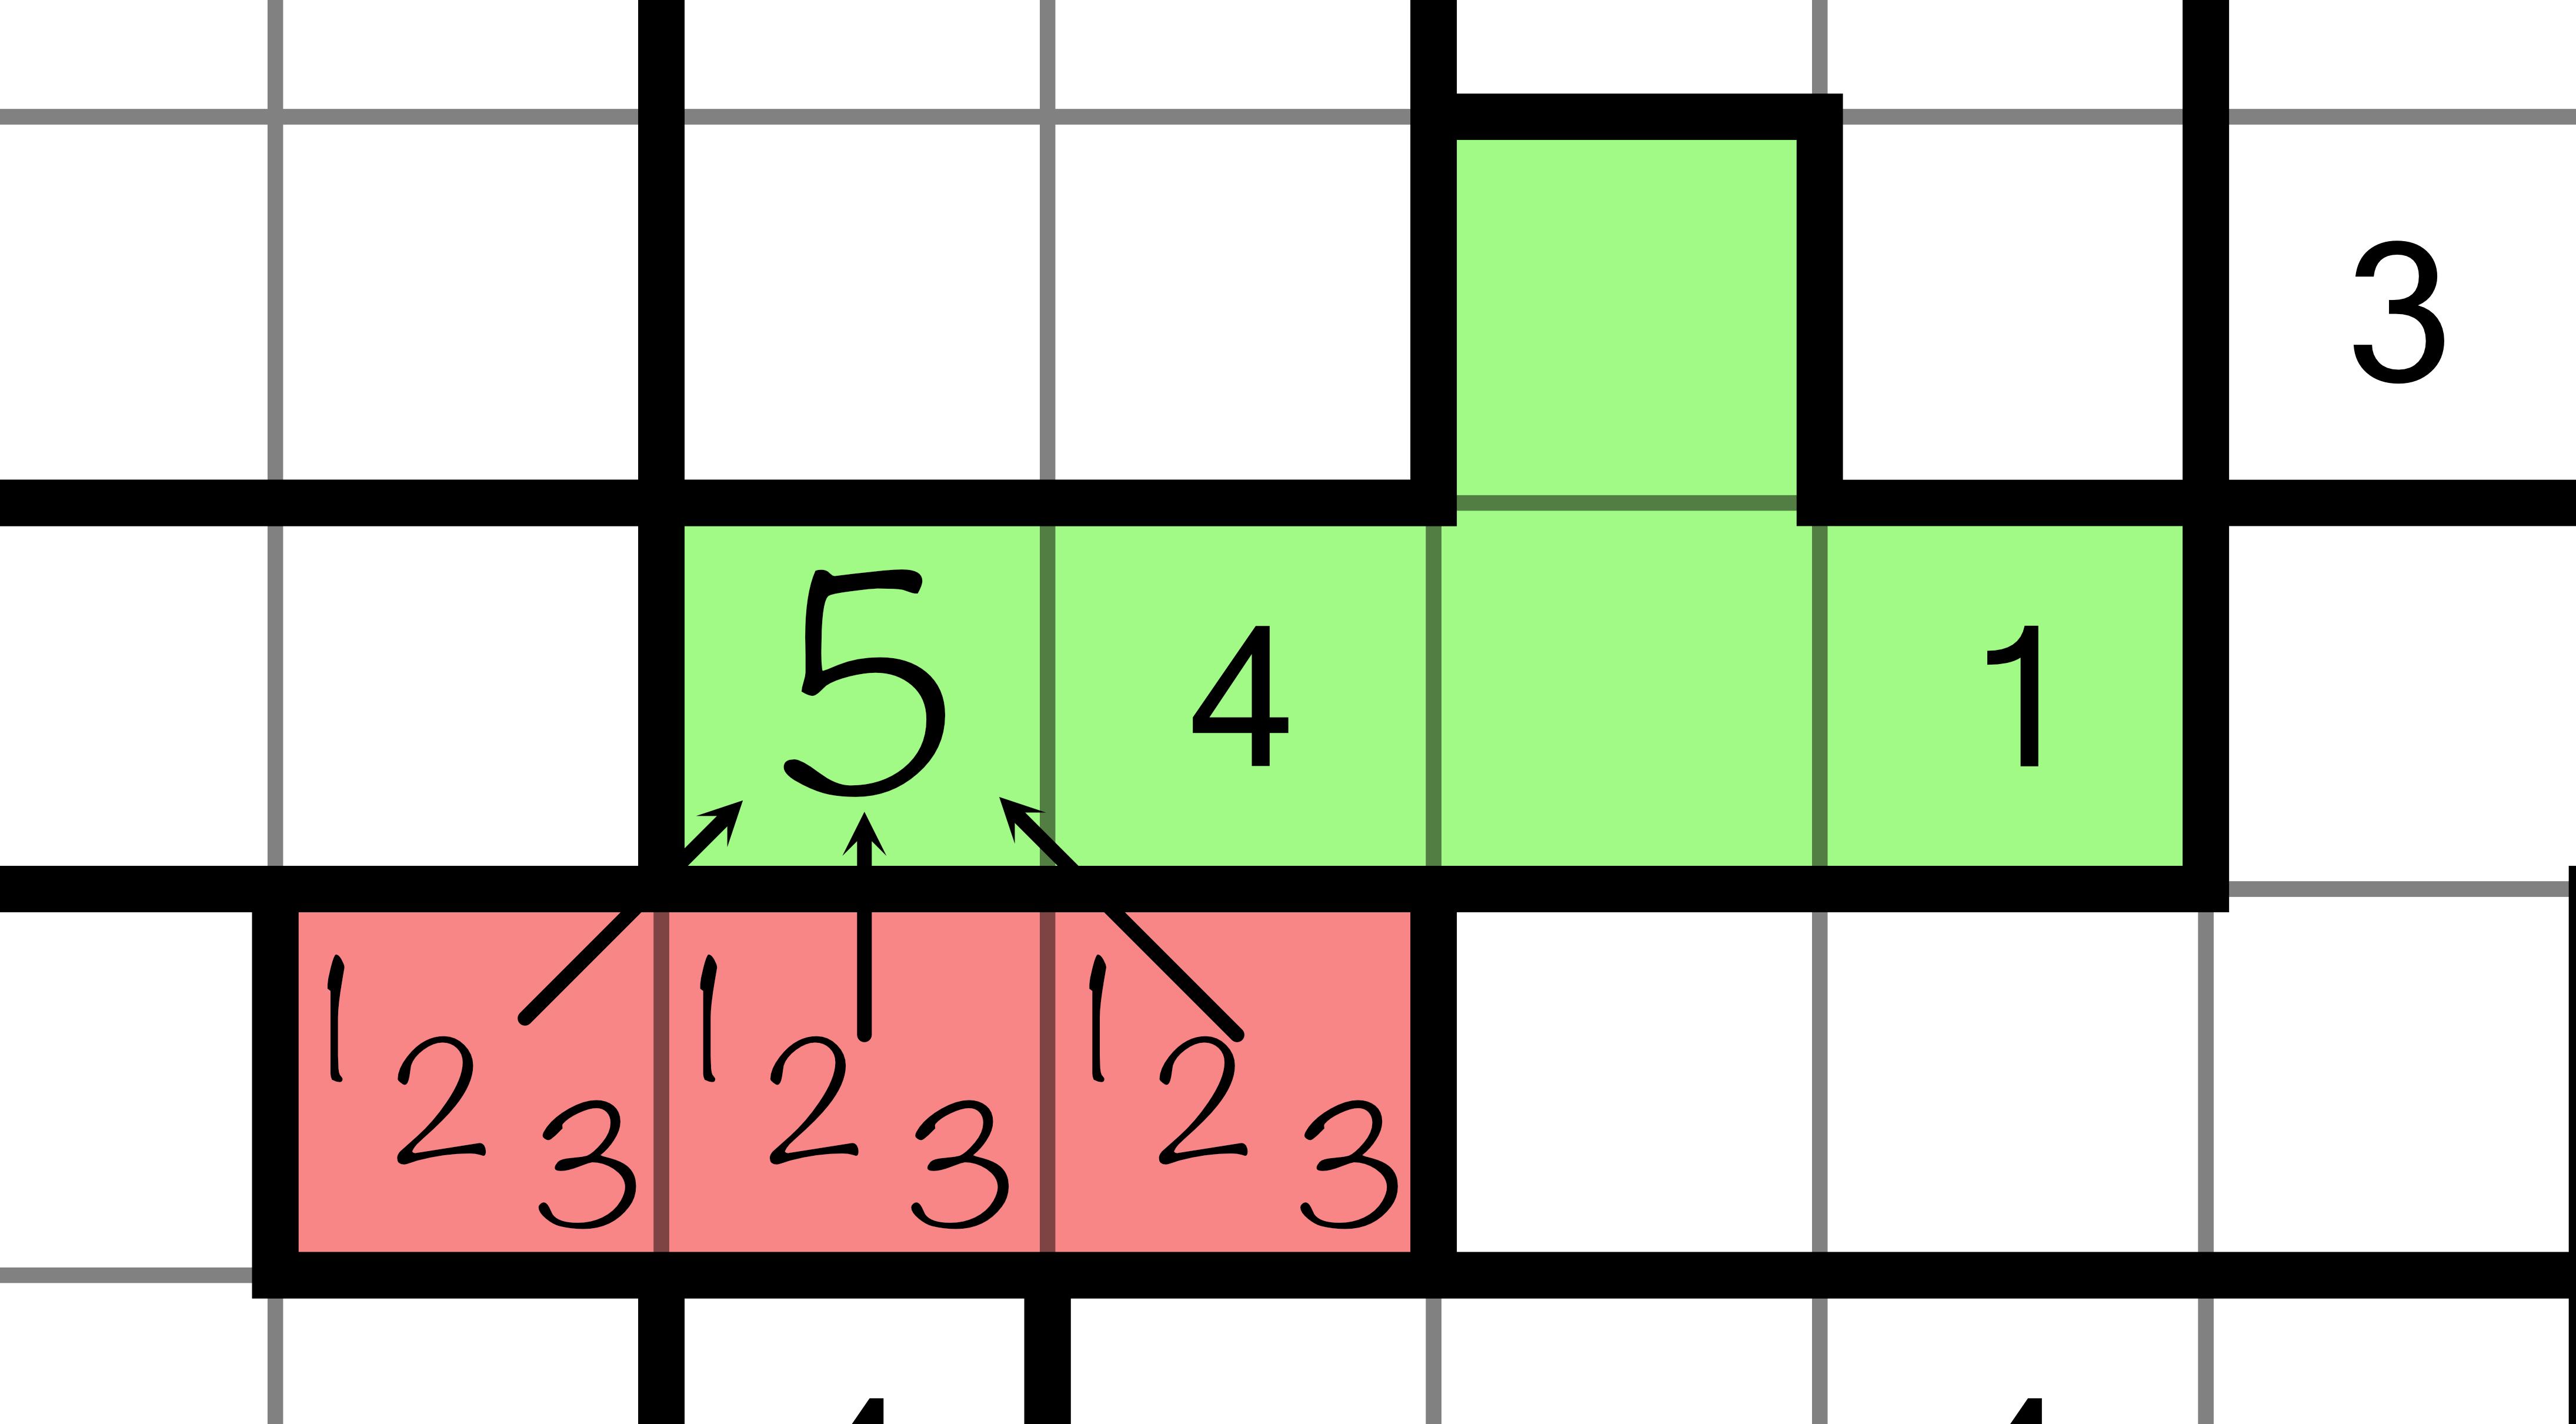
Let’s begin with an interesting example near the middle of the puzzle. I’ve highlighted two regions, green and red. The red region has no clue numbers in it at all, but we can still use it to solve the green cell with the ? inside:

We can solve this cell purely through implication. We know that the red region must contain the numbers 1, 2 and 3 (because it contains three cells). It doesn’t matter what order they appear in that region, they will all affect the highlighted green cell because they are all adjacent to it either vertically or diagonally. That means our green cell (the one with the ?) cannot contain a 1, a 2, or a 3. It also cannot contain a 4 because that already appears in the green region. Therefore the only number that can go there is a 5.
Even though the neighbouring region contained no clue numbers, its size and position made it useful. This was an example of simple implication. The implied contents of one region allowed us to directly solve a cell in a neighbouring one. But implication can go further.
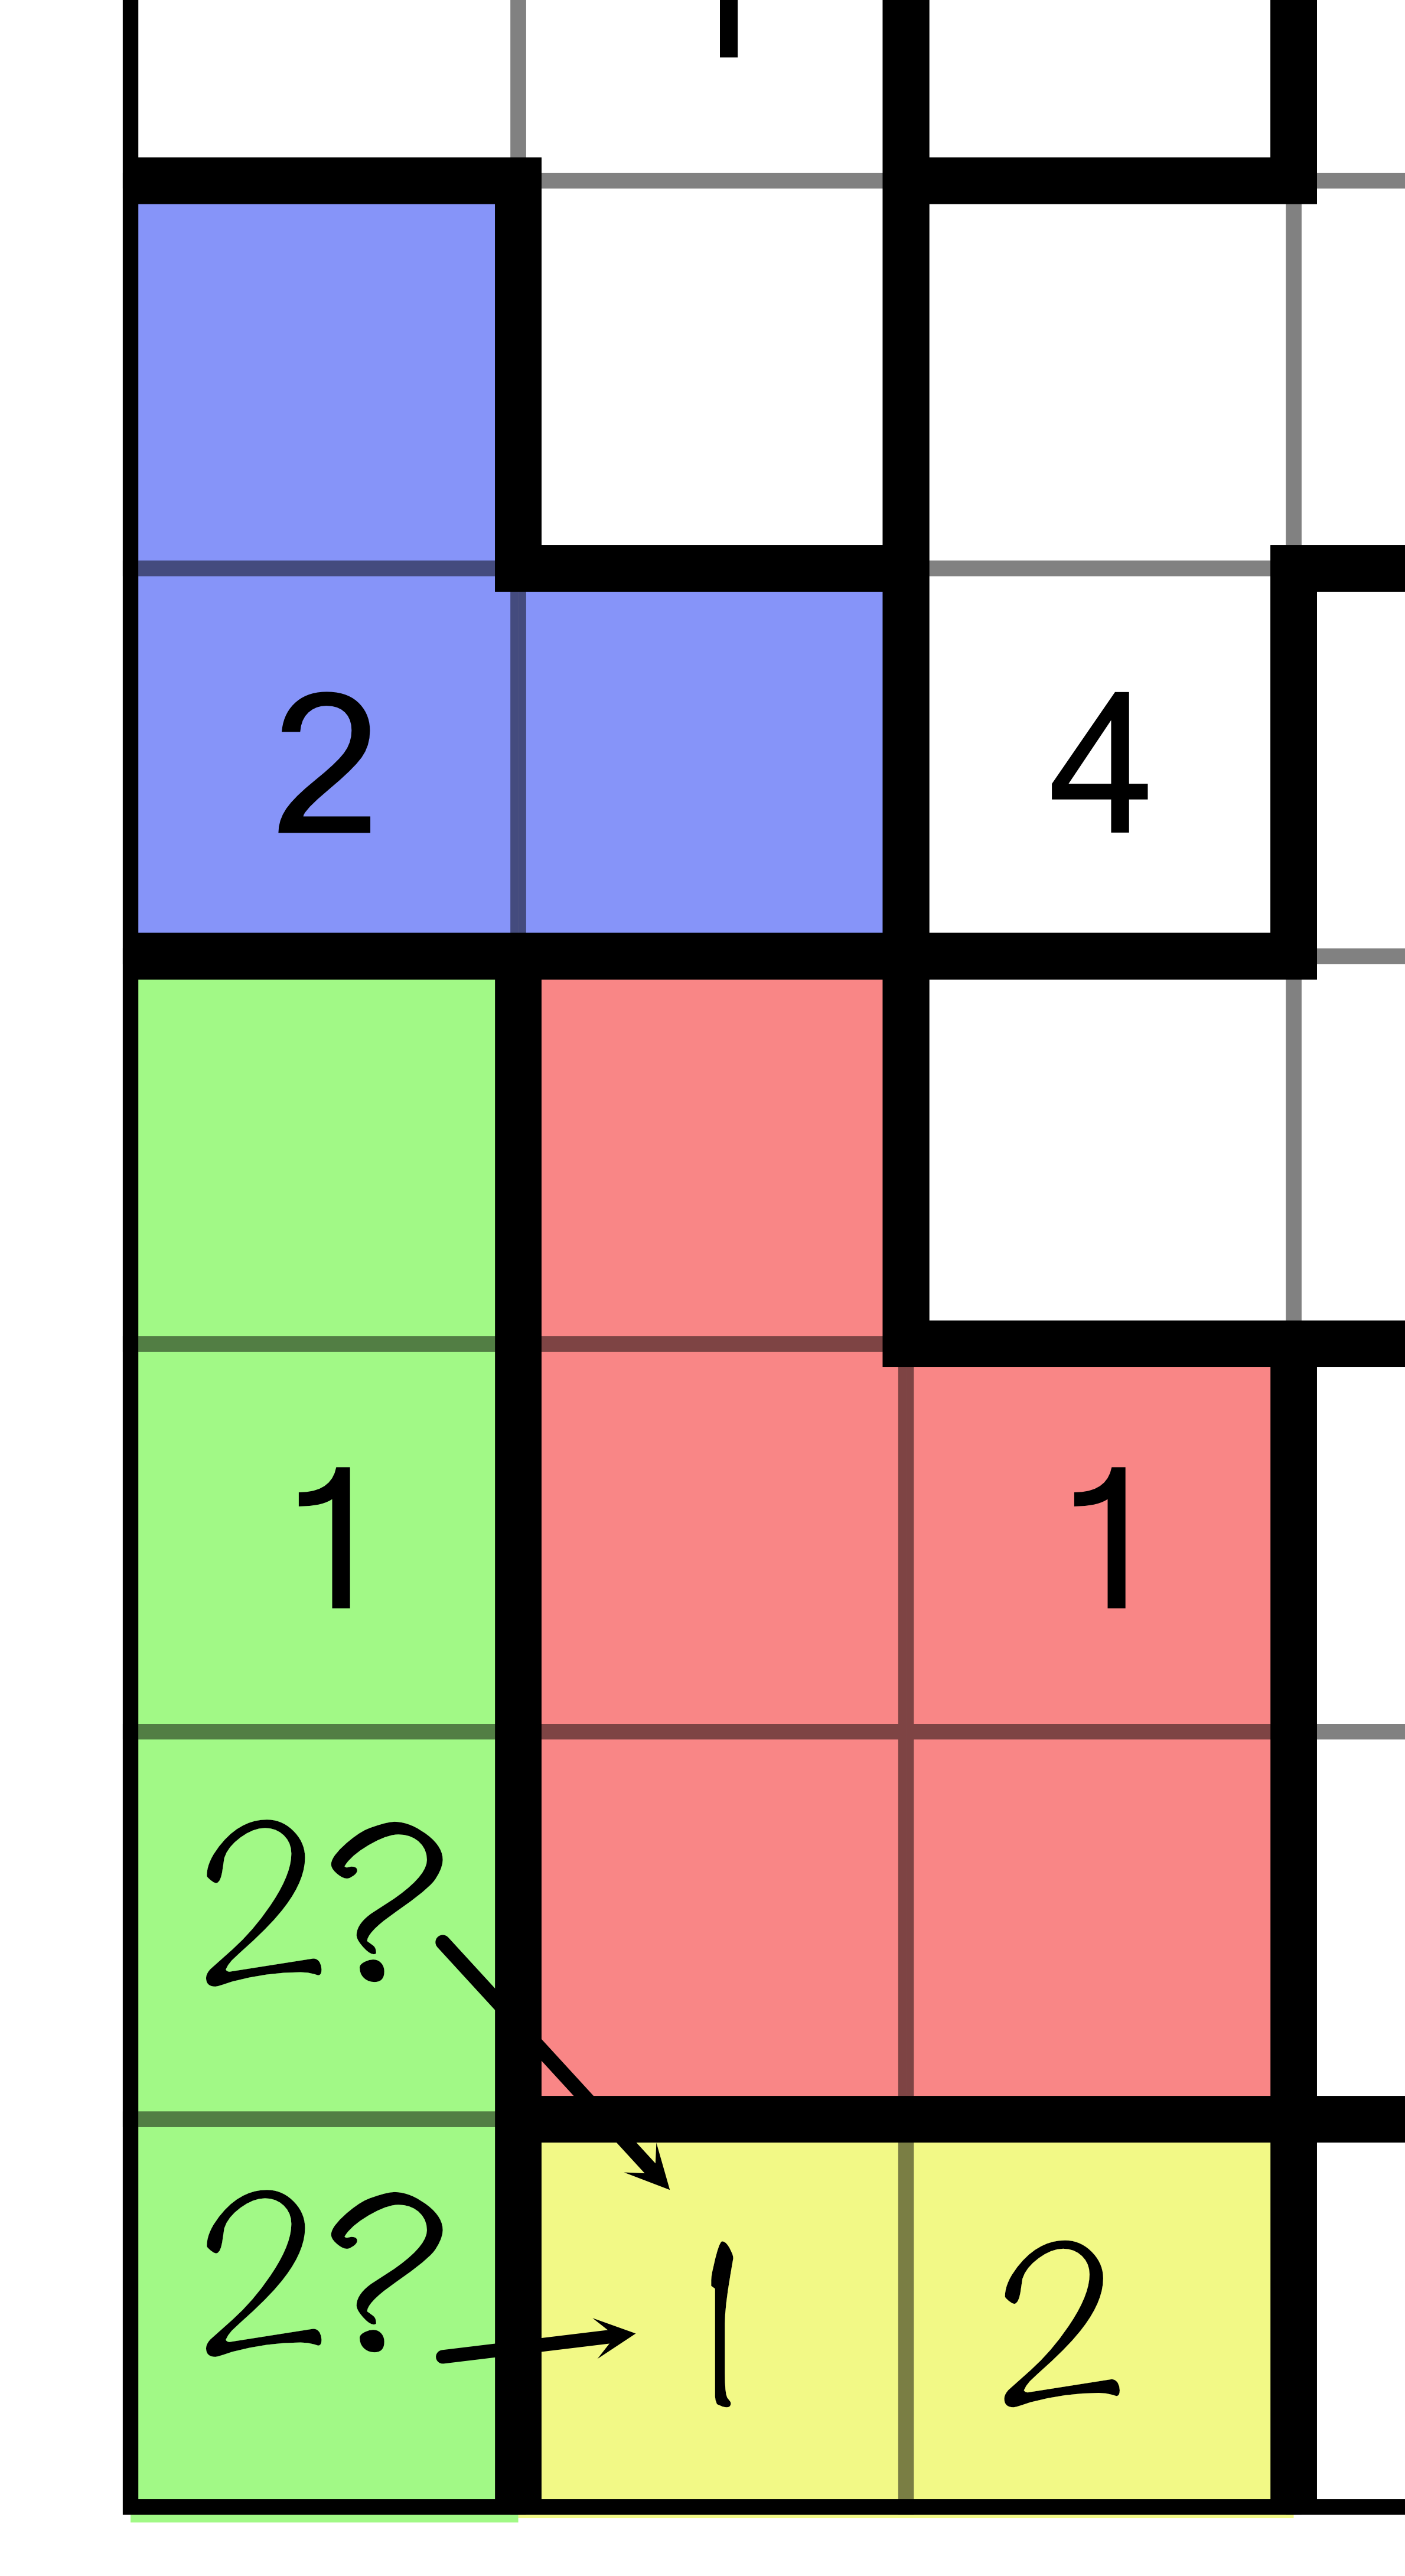
Let’s turn our attention to the bottom right of the grid. I’ve highlighted four regions that have some interesting interplay.
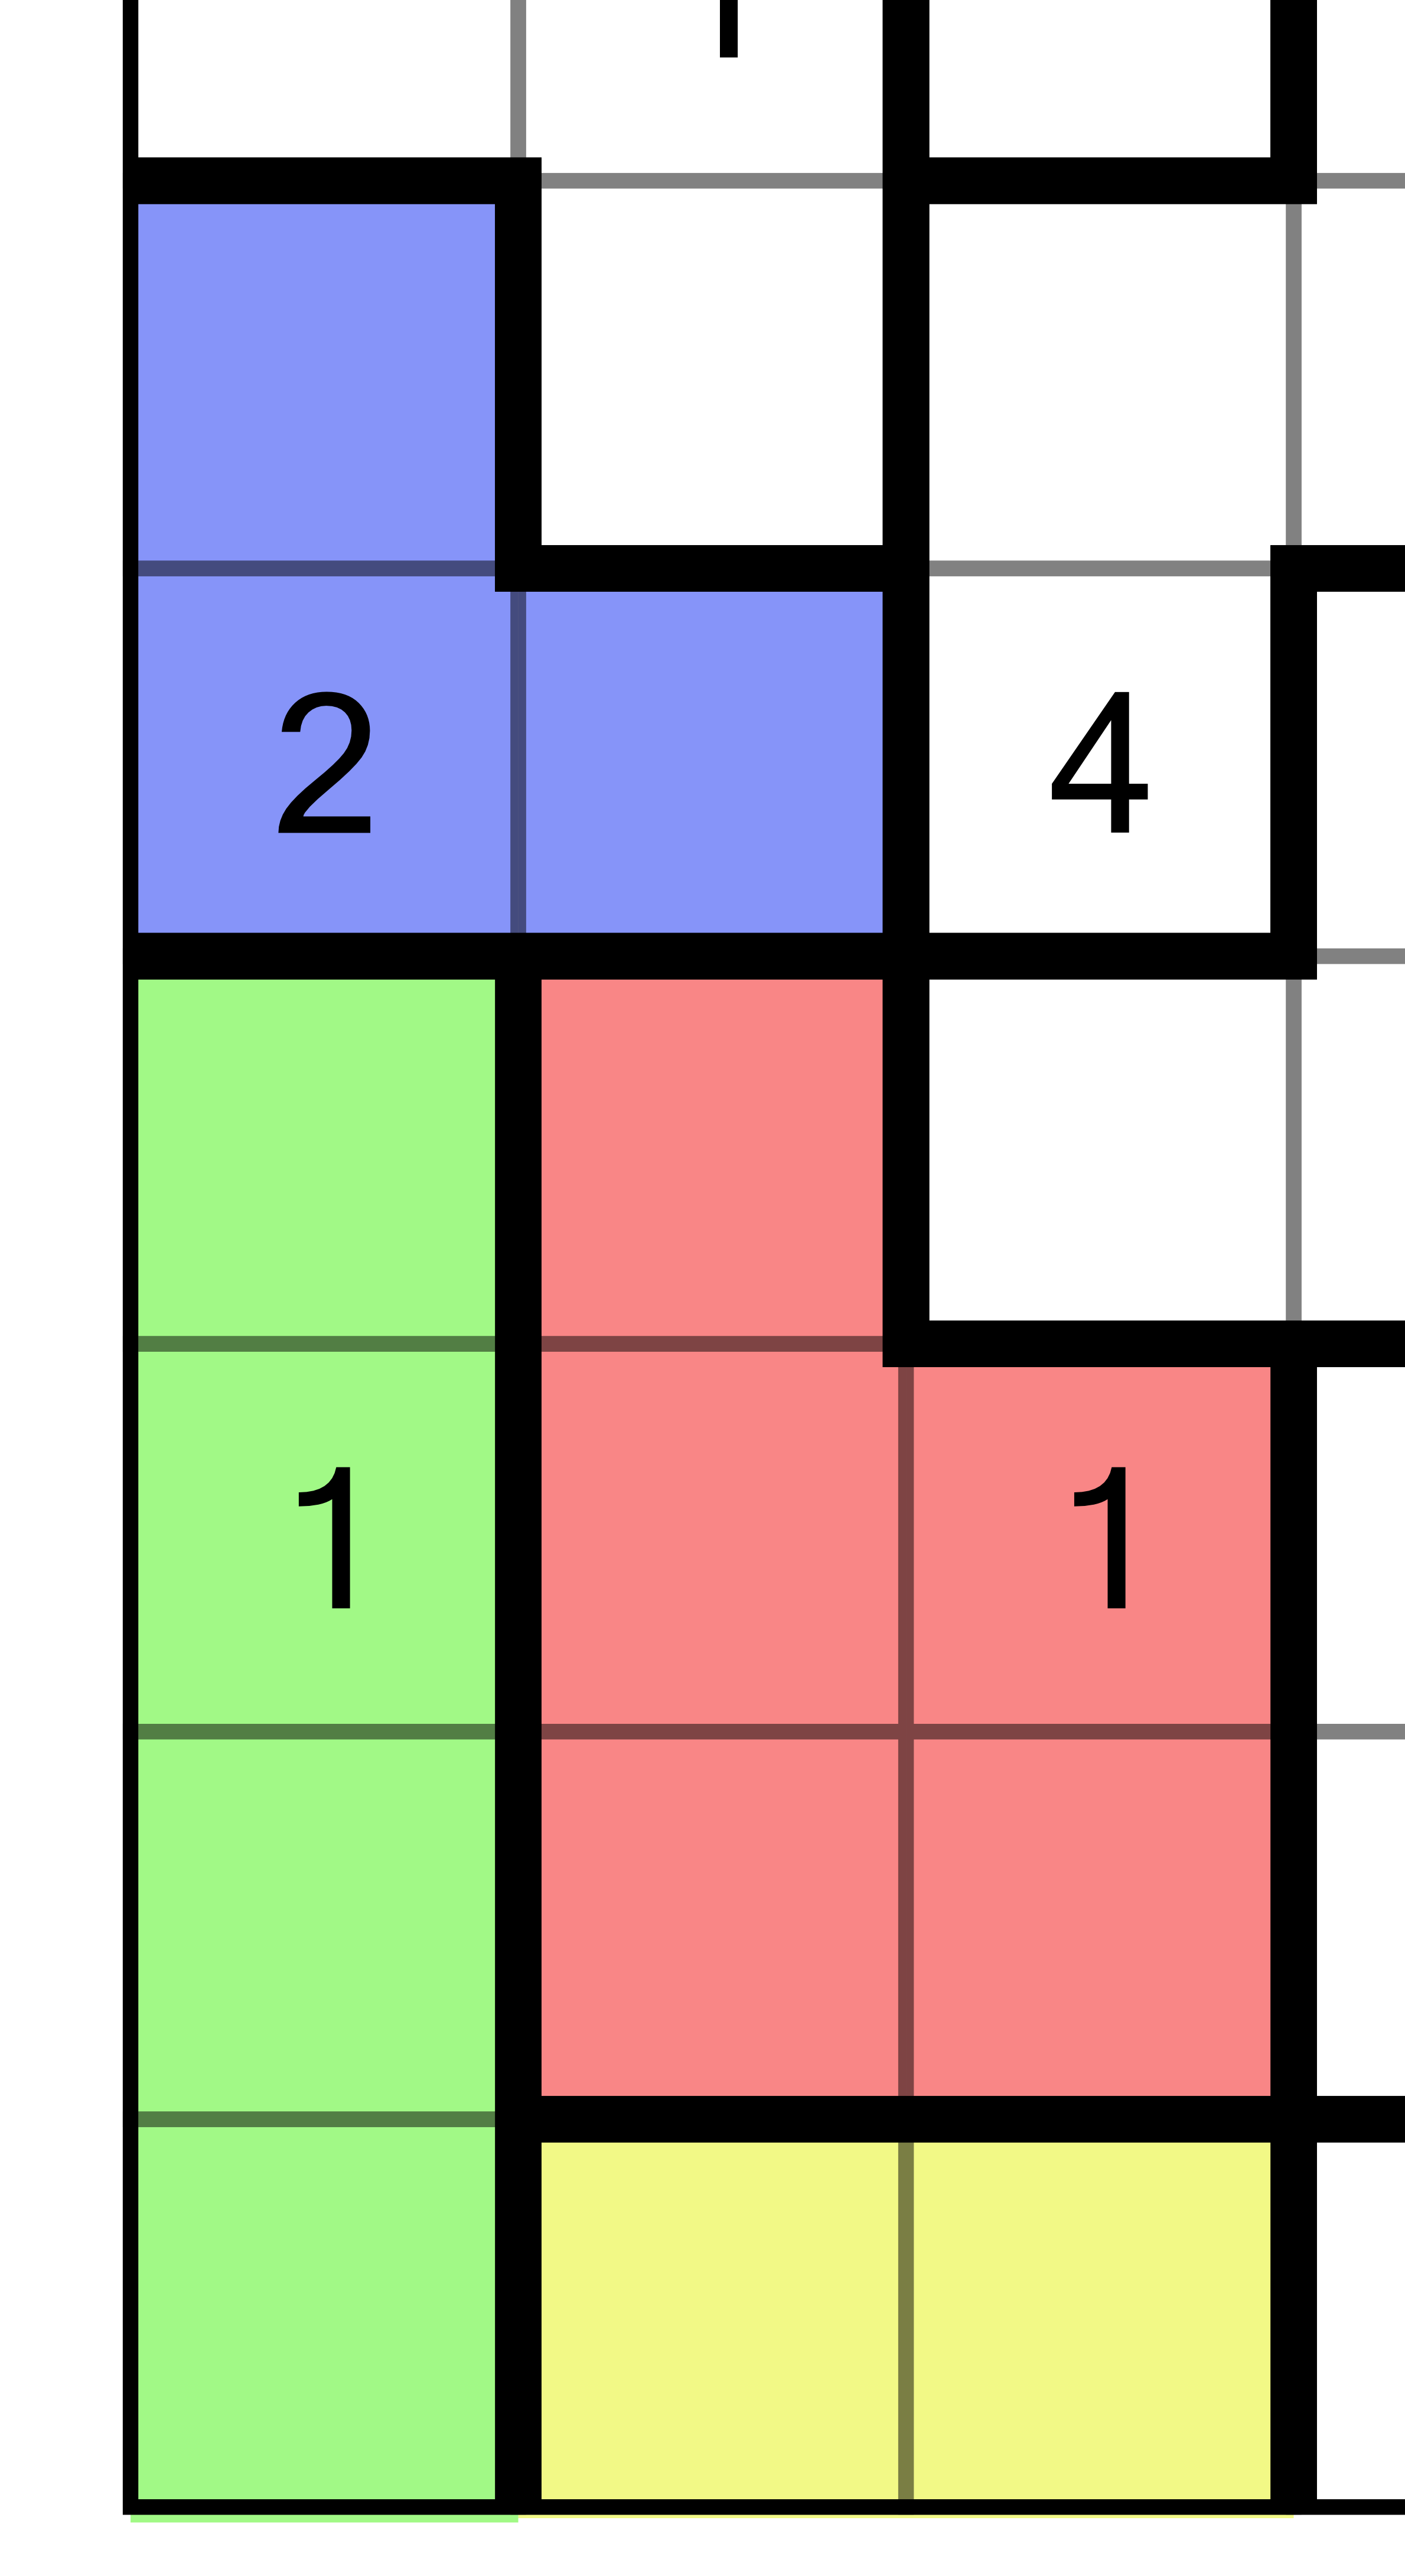
We’ll begin with the green region. Given the presence of the 2 in the blue region above it, we know that the top cell of the green region cannot contain a number 2. Therefore the number 2 must go in one of the two bottom cells. This is a simple implication.
Because we now know that one of those two cells has to contain a 2, we can further imply that the left-most cell in the yellow region cannot be a 2. It doesn't matter which of the green cells is a 2, they both prevent the left-hand yellow cell from containing a 2. As there are only two cells in the yellow region, the left-hand cell must be a 1, which leaves the right-hand cell as a 2.
We’re not done yet. We can also infer, using the green region and the yellow one, combined with the blue one, that there’s only one place to put a 2 in the red region:
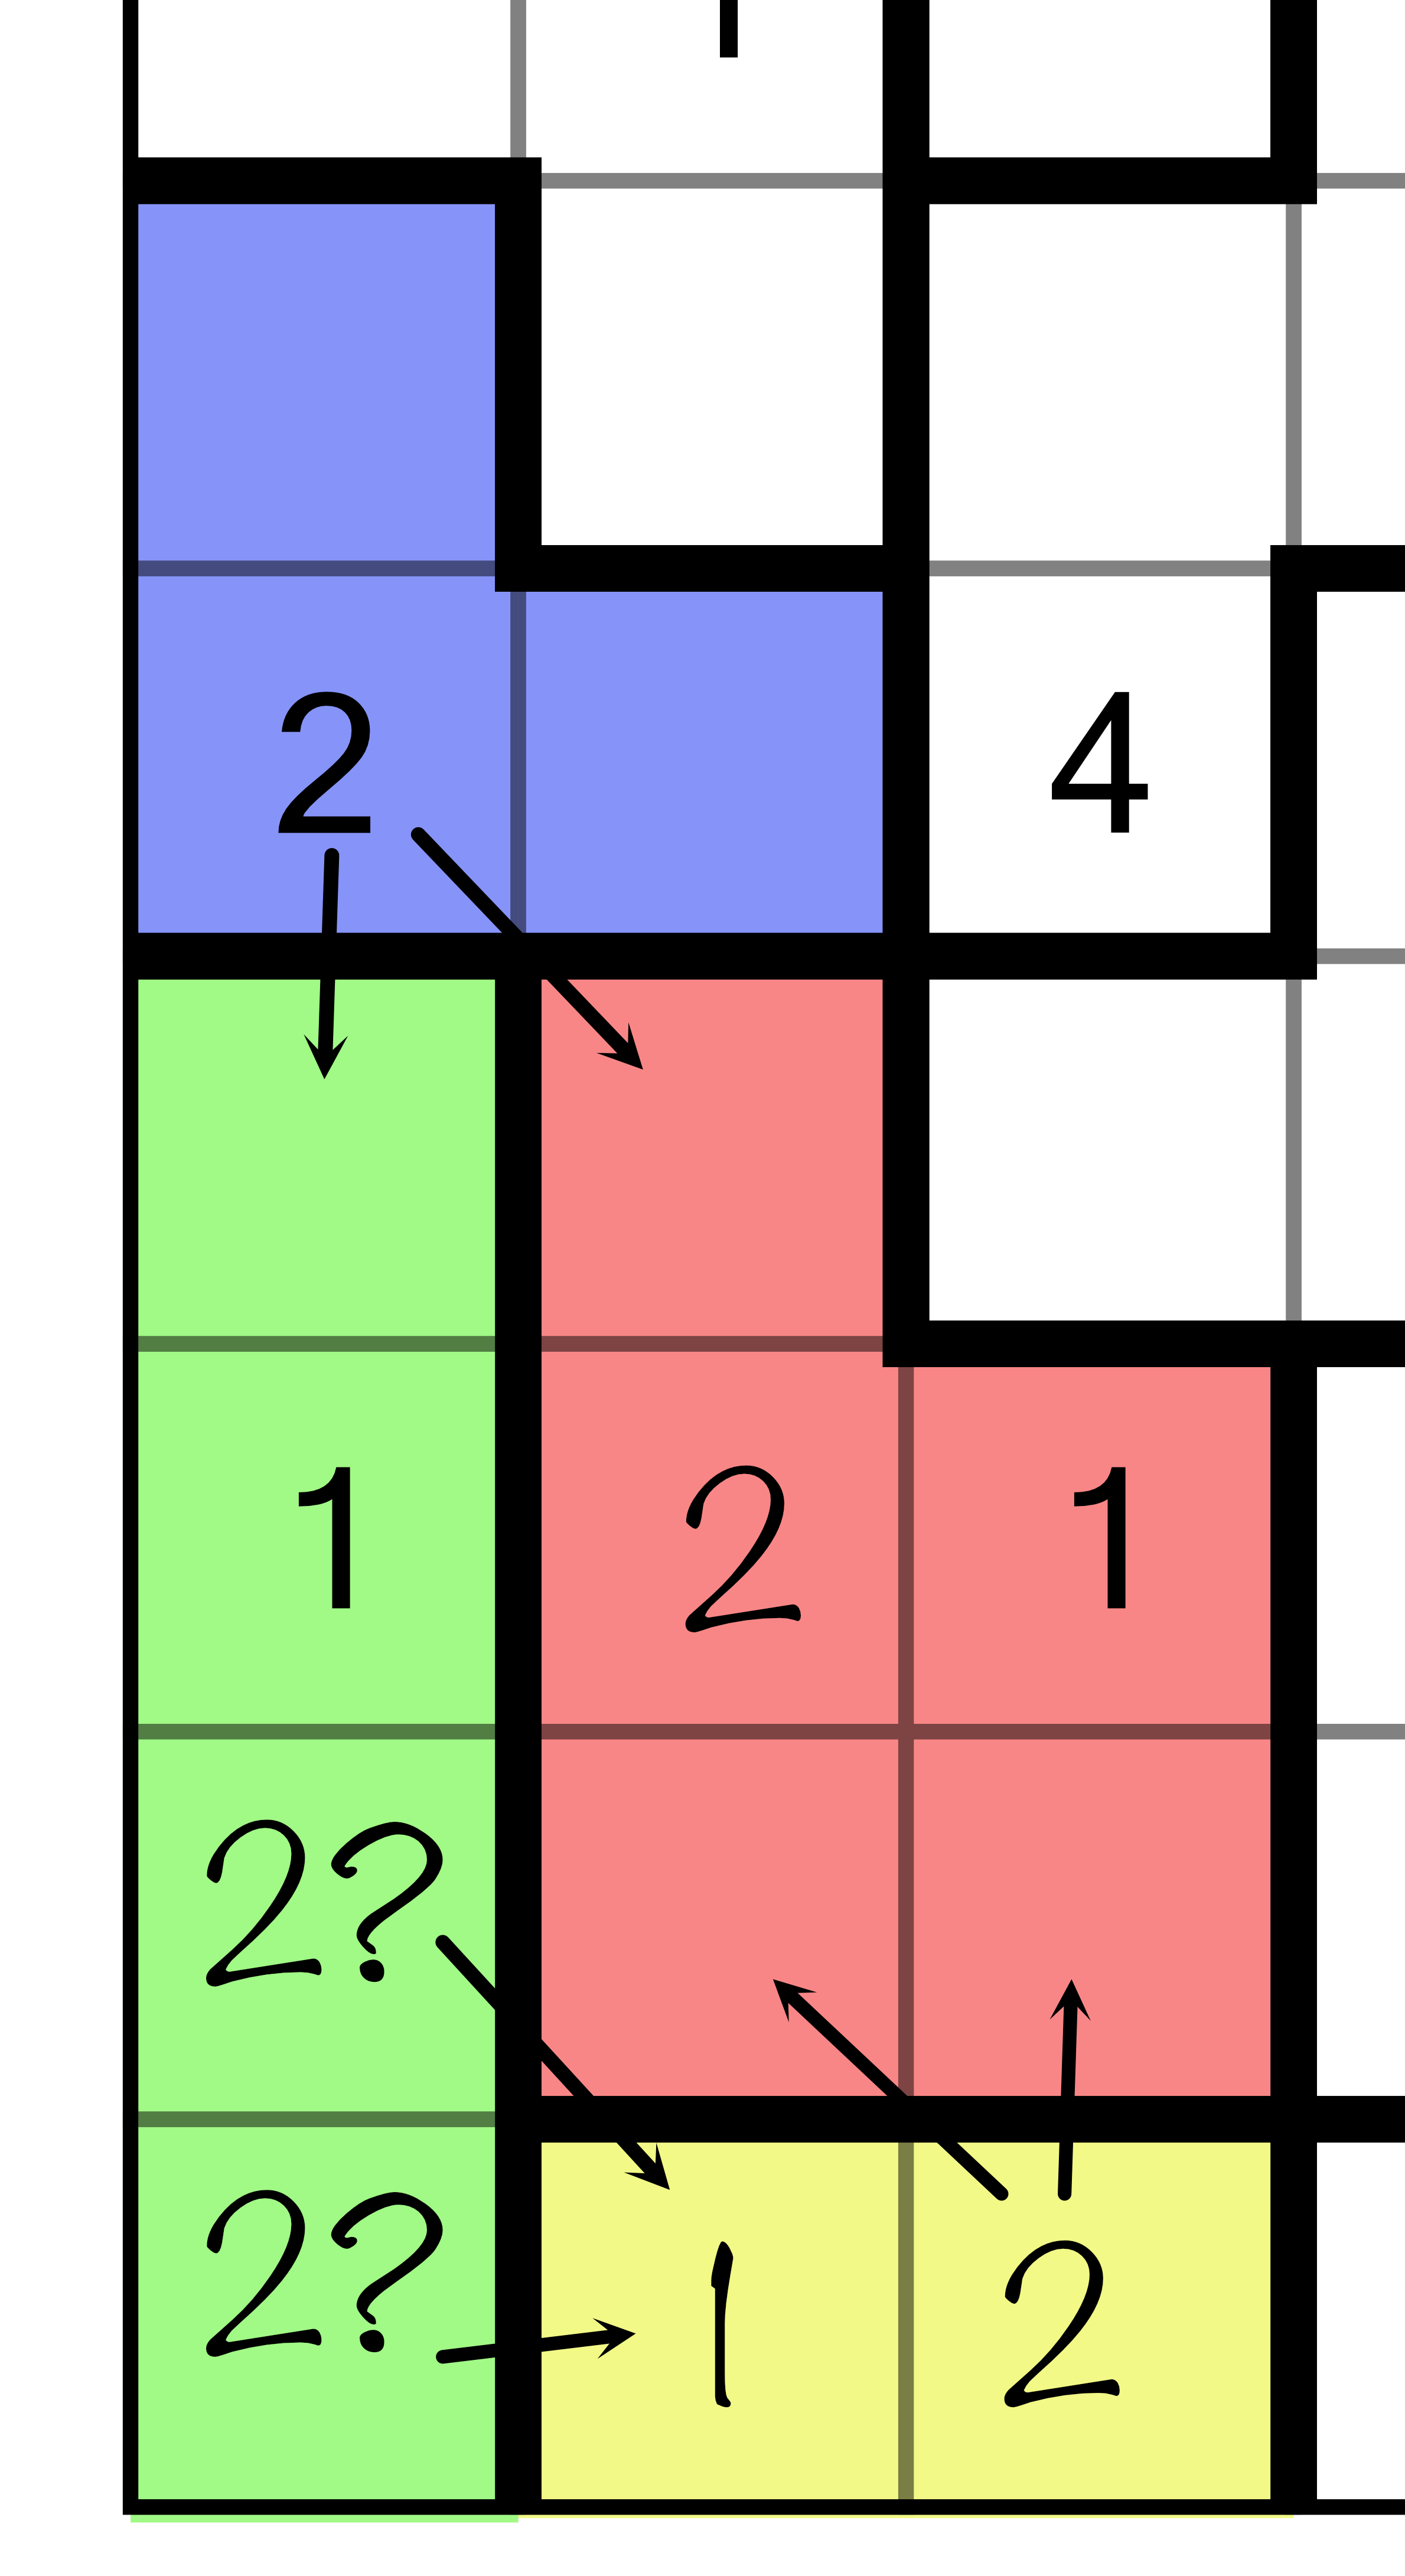
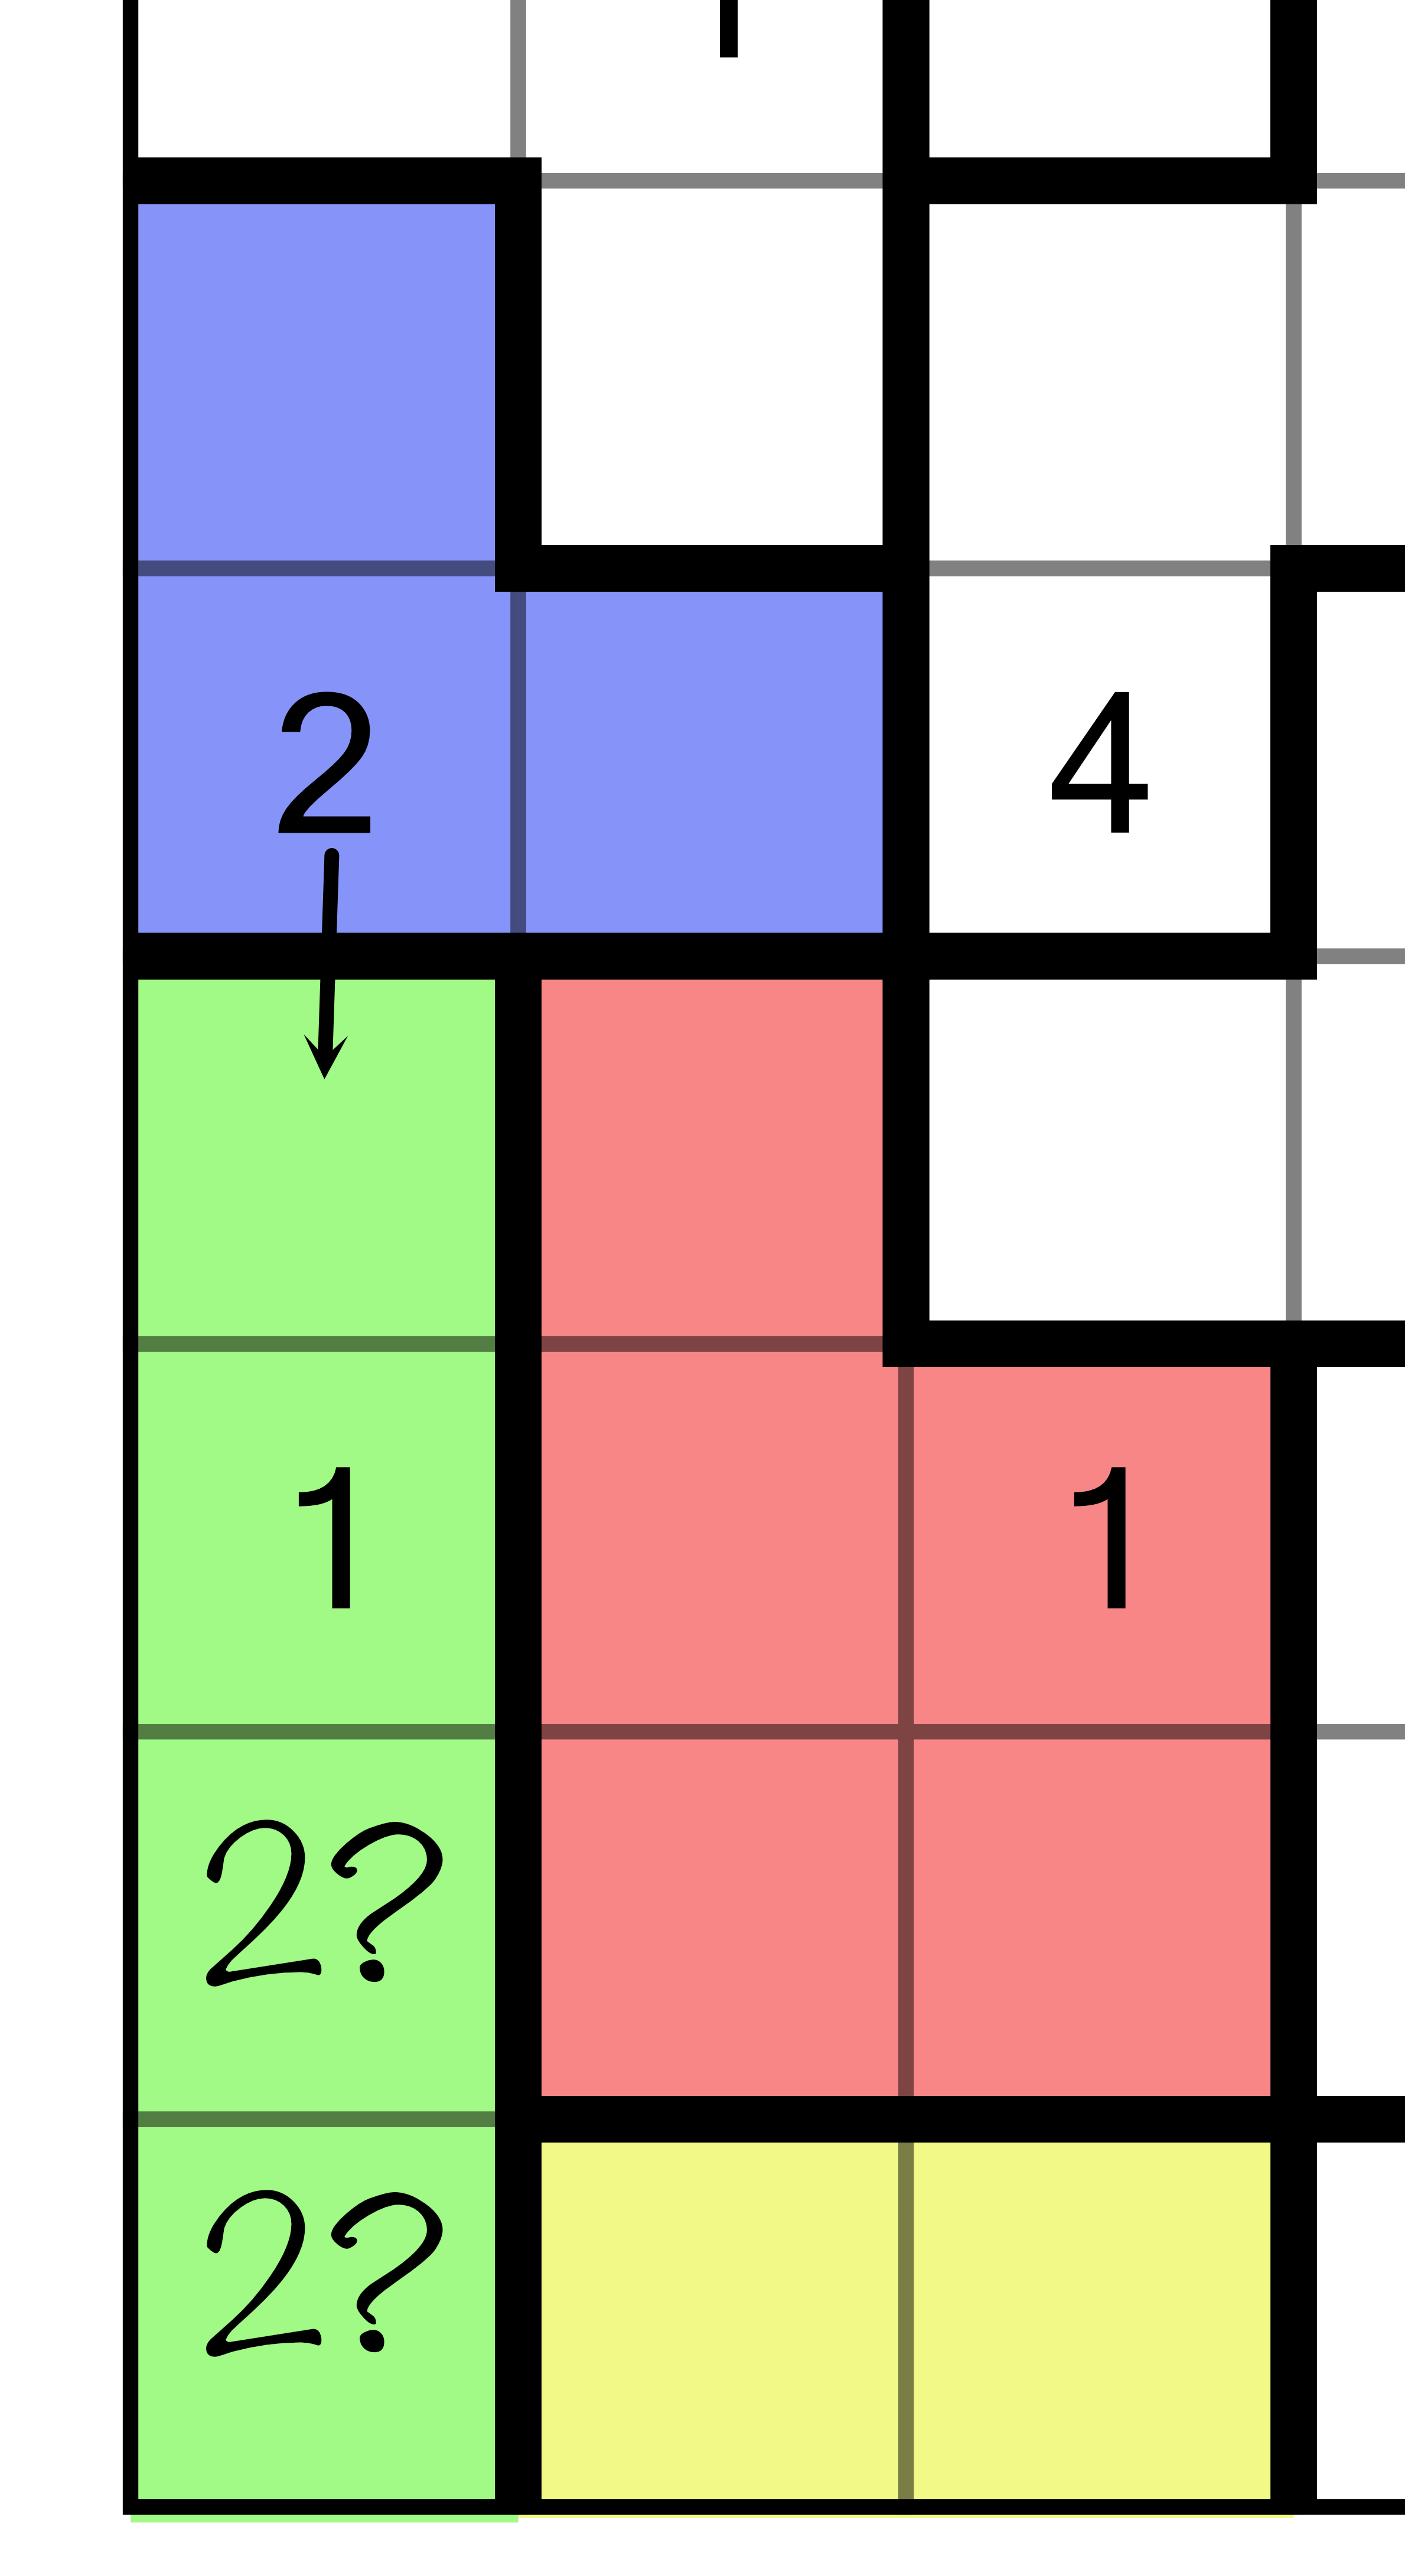
Here’s where it gets fun: the 2 we just filled in inside the red region now has a knock-on effect on the green region, telling us which of our two candidate cells must contain a 2 – the bottom one, it’s the only possibility.

Just by inferring that one of the bottom green cells must contain a 2, we’ve been able to fill in a neighbouring 2, which then allowed us to figure out another neighbouring 2, which in turn let us come back full circle and figure out which of the green cells must contain the 2! This is an implication chain at work, albeit a small one. They can get much, much longer.
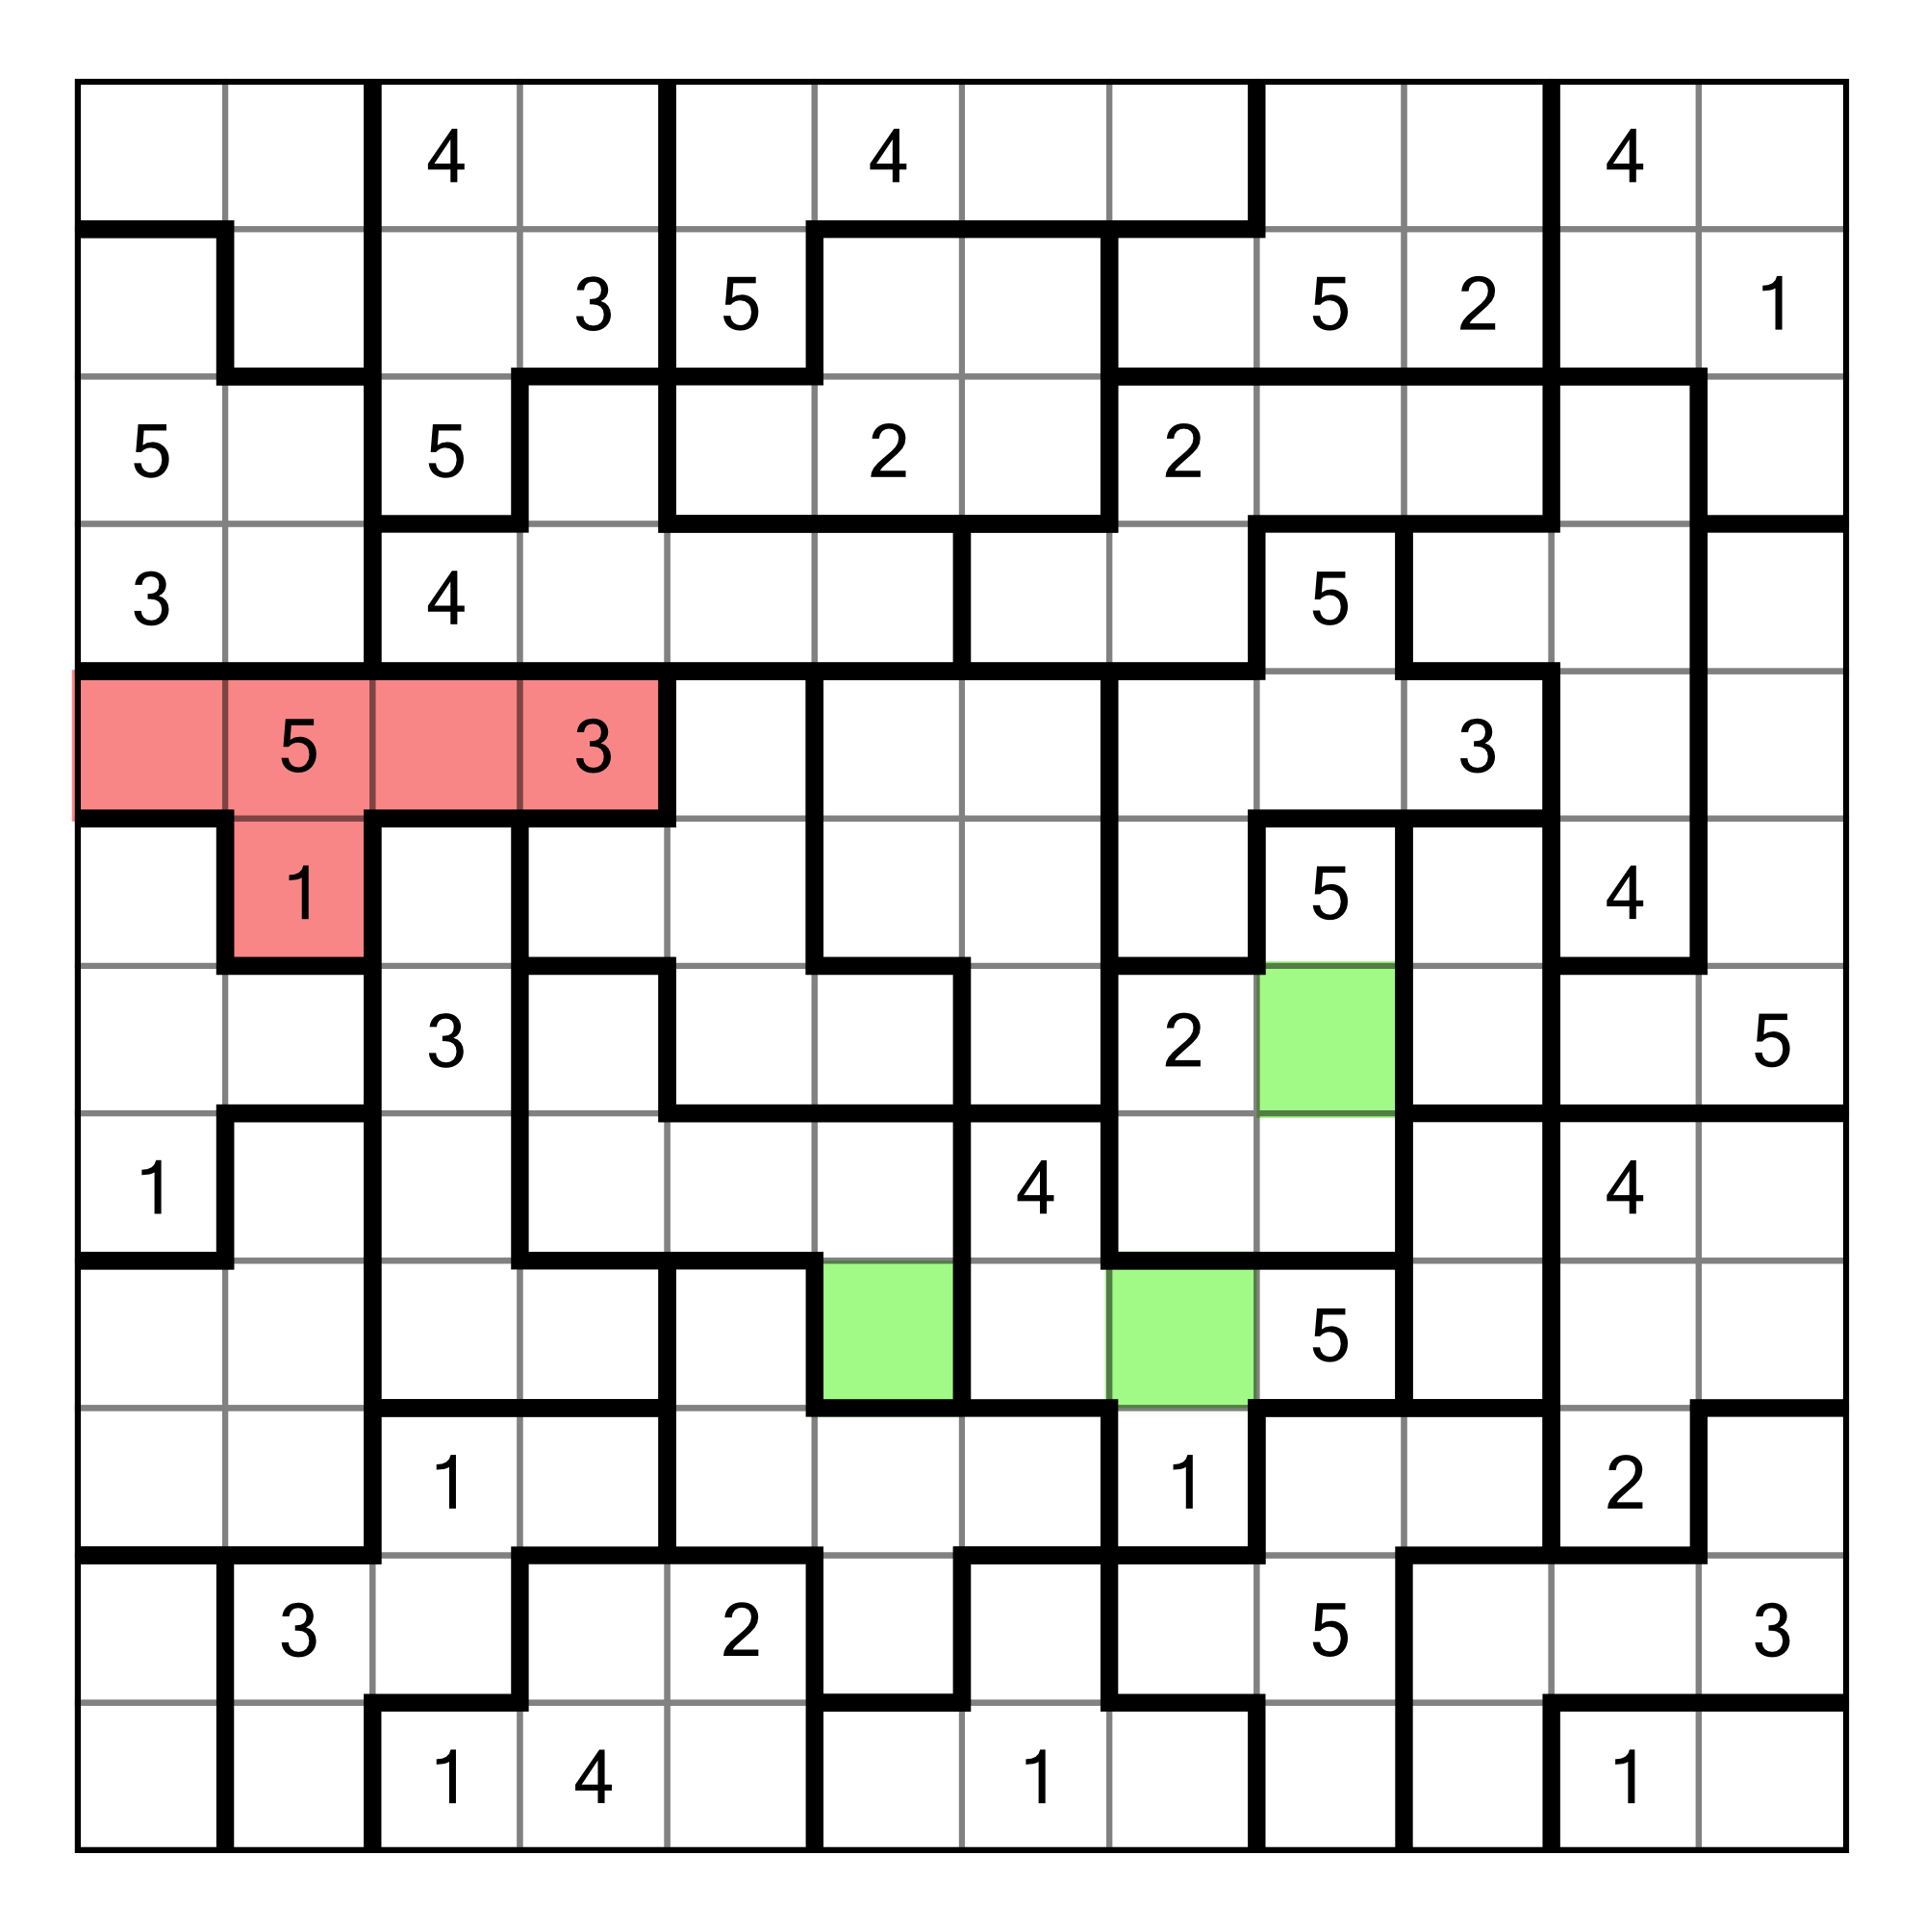
Here’s another example of an implication chain. This is the May 25 puzzle from the same book as above, if you want to play along. Here’s the empty grid, and I’ve highlighted three green cells that we can fill in through implication initiated from the red region. Can you work out how?
We’ll start with the 3 in the red region. This is a handy corner cell which eliminates three neighbours in the region just to the right. We can imply the position of the 3 in that region, narrowing it down to two possible cells, like this:
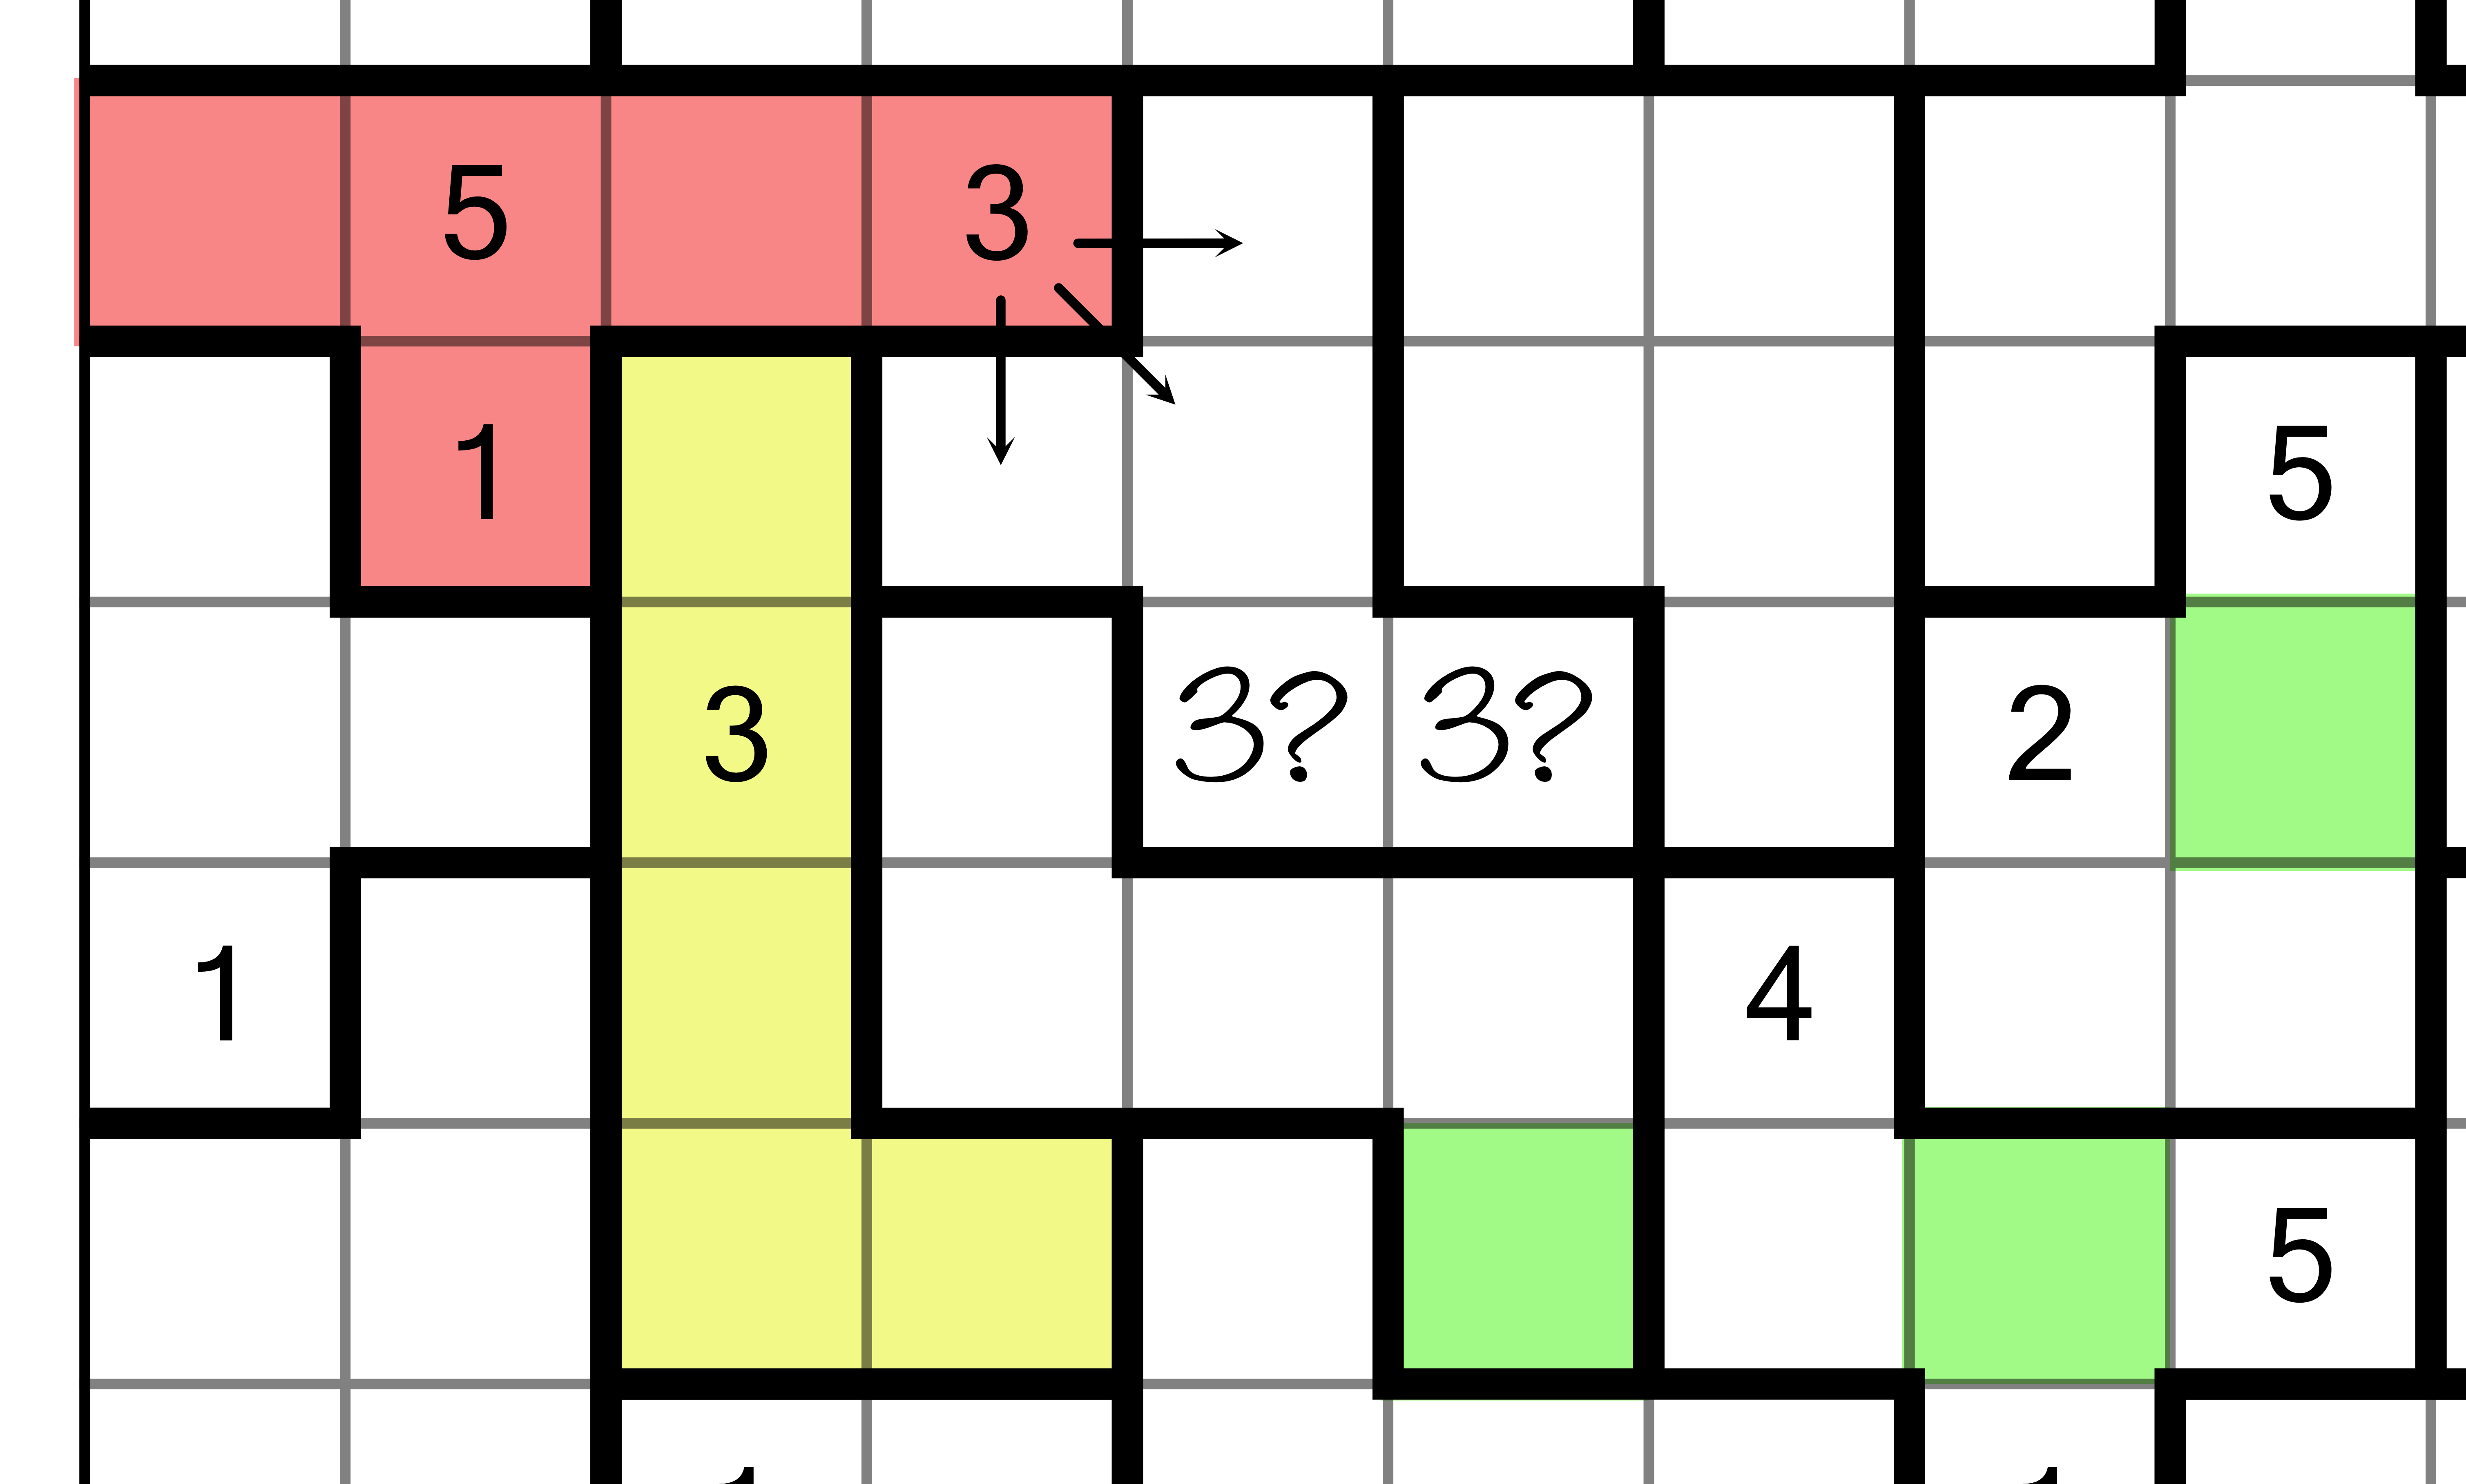
Even though we don’t know which cell contains the 3, we do know that either way, we can eliminate two cells in the region below. Furthermore, the 3 in the neighbouring yellow region knocks out two more cells, leaving only one place to put our 3:
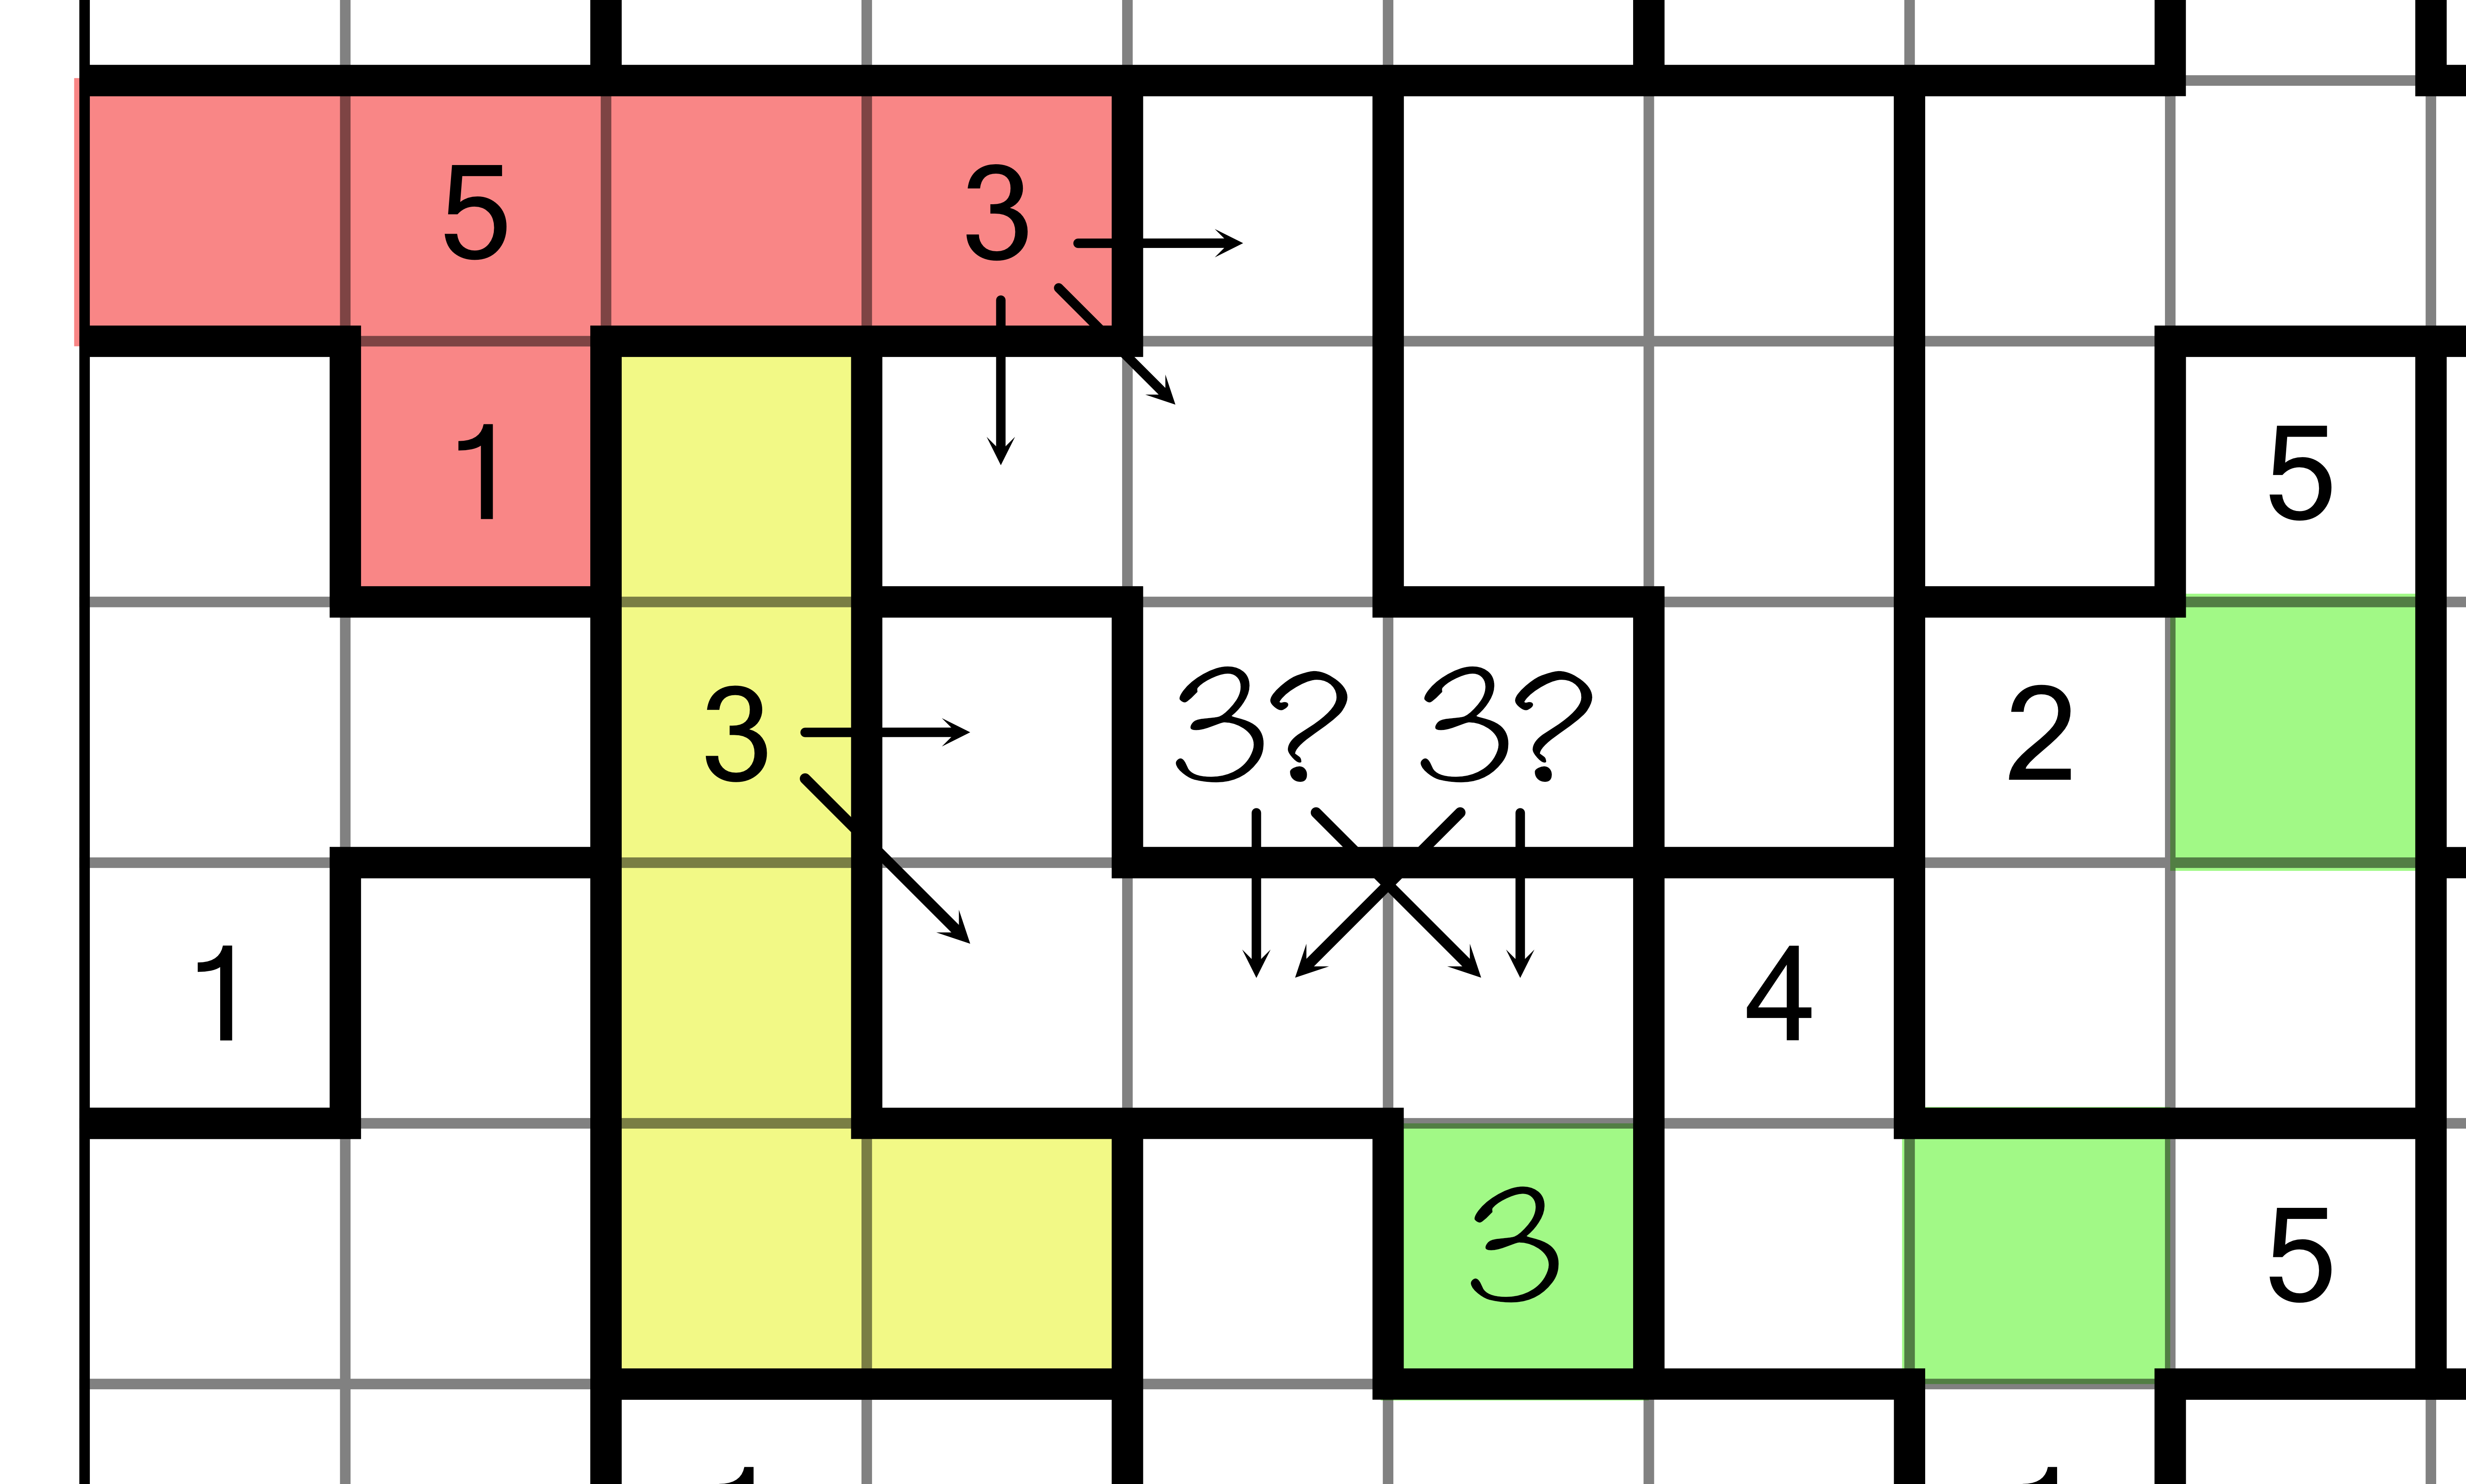
That 3 then gives us the position of the 3 in the region to the right:

That in turn tells us where the 3 goes in the next region up:

Phew - after all that, even though we didn’t yet work out the position of the 3 in the first region, we could still use its implied position to fill in three other cells in the chain.
Implication chains are a powerful tool for solving more difficult Suguru puzzles. Even if a simple implication doesn’t let you fill in a cell, it’s worth trying to follow the chain because you never know where it will lead. It may even lead back in a circle, letting you fill in the original cell.
Chains can often come in handy for getting you moving if you get stuck, but they are just one tool in the toolkit for Suguru-solvers. Don’t get hung up only looking at chains, when often simple elimination will get you to a result more quickly.
Hundred is a numerical puzzle that involves strategically placing digits in a grid to achieve specific sums in each row and column. The puzzle is played on a 3x3 or 4x4 grid. Here’s an example Hundred puzzle:
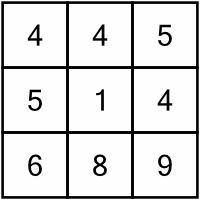
As you can see, the cells are already filled with digits. Your task is to add extra digits into some or all cells in such a way the the sum of the numbers in each row and each column equals 100.
You can add digits before or after those already in a cell. So for example a 7 could become 17 by adding 1 in front of it, or 71 by putting the 1 after it.
There are no restrictions on how often you can use digits, and all the digits from 0 to 9 are on the table.
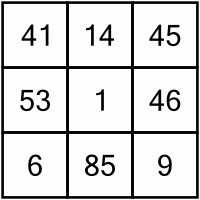
Here’s what the example puzzle looks like once it’s been solved:
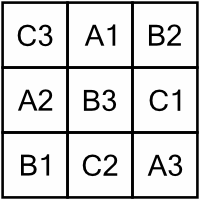
Eulero, also known as a Graeco-Latin Square or Euler Square, is a fascinating logic puzzle that combines elements of Latin squares and Sudoku. Here’s what a small puzzle looks like:
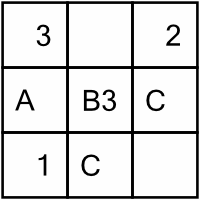
The puzzle is played on a square grid. Bigger grids mean harder puzzles. Each cell in the grid must contain one letter and one digit. Normally, the letters and digits corresponds to the size of the grid. So in a 5x5 grid, we use use the letters A to E and the digits 1 to 5.
The objective of Eulero is to fill out the grid such that every row and every column contains each letter and each digit exactly once - ie no row or column can have a repeated letter or digit. Additionally, no two cells in the grid can contain the same pairing of a letter and a digit.
Here’s what our example puzzle looks like when complete:
Start with Known Pairs. Some cells are already filled in, or are partially filled in (depending on the difficulty level of the puzzle), so use them as a starting point. The given pairs can help you determine what can't be in the same row or column.
Elimination. If you're unsure about where a particular symbol should go, consider where it can't go. This process of elimination can narrow down your options.
Sudoku. Eulero follows similar rules to Sudoku, which means that many Sudoku techniques can either be used directly, or adapted, to help solve the puzzle. See our detailed three-part Sudoku tutorial here for some ideas.
Fancy filling some thermometers? We publish this puzzle occasionally in our free Puzzle Weekly magazine. You should totally sign up for that if you haven’t already, as it puts 28 brand new puzzles in your inbox every week.
You can also find lots of Thermometers puzzles in our Jumbo Adult Puzzle Book – which happens to include more than 500 puzzles of 20 different varieties.
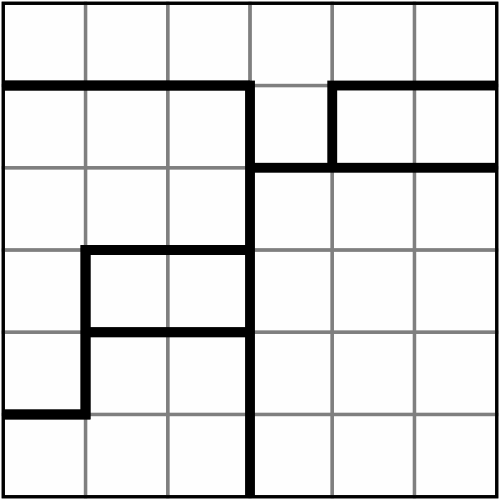
Stitches is an intriguing logic puzzle that involves connecting different regions of a grid with lines. This is what a small grid looks like:
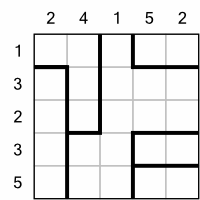
The puzzle is played on a square grid divided into variously shaped regions. Each region must be connected to every one of its neighbouring regions by exactly one line. These lines are referred to as "stitches."
A stitch is a line that spans one cell, connecting two orthogonally adjacent cells from different regions.
A cell can be traversed by at most one stitch.
Numbers along the edge of the grid indicate how many line endpoints must be placed in the corresponding row or column.
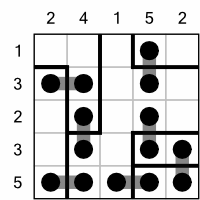
Here is what the above example looks like once it’s been completed:
Start with Edge Clues. Look at the rows and columns with numbers on the grid's edge. This tells you how many times a stitch must end in that row or column, guiding where to draw your initial stitches.
Use the Single Cell Rule. Since a cell can only have one stitch, if a stitch already passes through a cell, you can’t draw another stitch through that cell.
Check for Isolated Regions. Be wary of creating isolated regions where a region cannot possibly connect to a neighbour because all potential connecting cells are used up.
Consider Stitch Length. Stitches only extend one cell. This limits the possible connections, especially near the grid's edges or in tightly packed areas.
Balance Edge Requirements. Continuously cross-check the stitches with the edge numbers. Each row and column should have the exact number of endpoints as indicated by the clues.
Stitches is a great puzzle for those who enjoy spatial reasoning and planning. The challenge lies in ensuring all regions are properly connected while adhering to the grid's constraints.
Fancy filling some thermometers? We publish this puzzle occasionally in our free Puzzle Weekly magazine. You should totally sign up for that if you haven’t already, as it puts 28 brand new puzzles in your inbox every week.
You can also find lots of Thermometers puzzles in our Jumbo Adult Puzzle Book – which happens to include more than 500 puzzles of 20 different varieties.
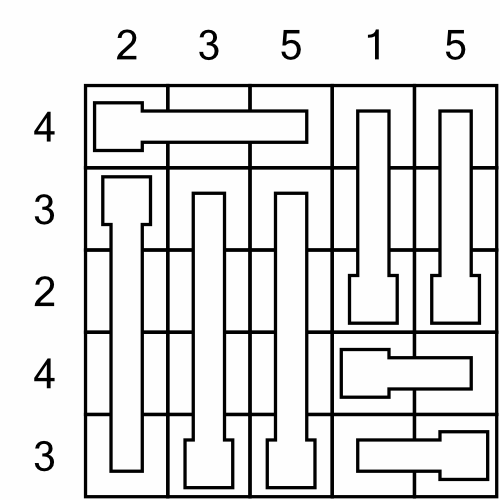
Thermometers is a pure logic puzzle played on a square or rectangular grid filled with thermometer shapes. Each thermometer has a base (the bulbous end) and a top. In simple puzzles, thermometers may be placed horizontally and / or vertically. In more difficult levels, the thermometers may be ‘broken’ such that they span more than one column or row.
The objective of the game is to fill the thermometers sufficiently that the number of cells filled in a row and column of the grid corresponds to the numbers on the outside of the grid.
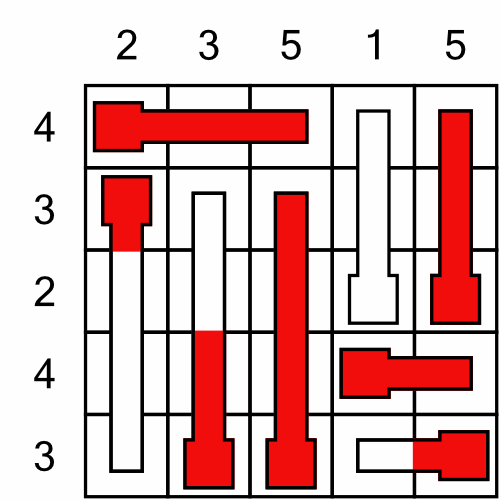
Here’s a small example Thermometers puzzle:
Here is what the example puzzle looks like when it has been solved:
Start with Extremes. Look for rows or columns with a 0 written outside. This means no cell in that row or column is filled, so all thermometers crossing it remain unfilled beyond that cell. Similarly, if a row or column's clue equals its length (e.g., a clue of '5' for a row of 5 cells), then every cell in that row or column is filled.
Look for Forced Fills. If a thermometer segment in a row or column is filled, then all segments below it (toward the base) must also be filled. Conversely, if a segment is unfilled, all segments above it (toward the top) must be unfilled too.
Use Partial Information. Even if you can't completely determine the fill status of a row, column, or thermometer, partial fills can help. For instance, if you have a row of 8 cells with a clue of '6', and two thermometers with bases in that row, you know at least some segments of those thermometers must be filled to meet the clue.
Mind the Gaps. If filling a thermometer segment would exceed the clue number for a row or column, then that segment (and those above it) must remain unfilled.
Use Pencil Marks. For cells you’re not sure about, mark potential fills lightly. If they lead to contradictions, you can erase and reassess.
Fancy filling some thermometers? We publish this puzzle occasionally in our free Puzzle Weekly magazine. You should totally sign up for that if you haven’t already, as it puts 28 brand new puzzles in your inbox every week.
You can also find lots of Thermometers puzzles in our Jumbo Adult Puzzle Book – which happens to include more than 500 puzzles of 20 different varieties.
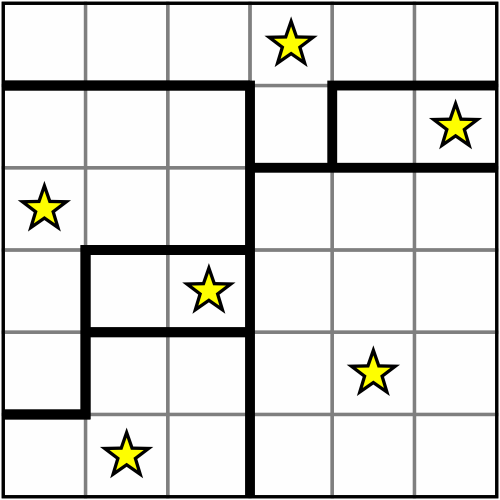
Star Battle is a pure logic puzzle that takes seconds to learn, but can become surprisingly tricky as the difficulty level increases.
The puzzle is played on a square grid which is divided into various regions, delimited by bold lines.
Here is an example of a Star Battle grid:
The objective of the puzzle is to place stars into the cells such that every row, column, and grid contains exactly the same number of stars. Stars cannot be placed in adjacent cells (ie stars cannot be in cells that touch horizontally, vertically, or diagonally). Every region must contain one star when the puzzle is complete.
Here’s what the earlier example grid looks like once it’s been solved:
Start with Smallest Regions. If a region is particularly small or has a unique shape, it might have limited options for star placements. Begin there.
Mark Forbidden Cells. Once you place a star, mark all adjacent cells as forbidden for star placement. This will help you visualise where stars can't go, which often reveals where they should go. You can use a dot, a small x, or shade these cells lightly to indicate they're off-limits for stars.
Use Pencil Marks. If you're unsure about a star's placement, mark it lightly or use a different symbol. If it doesn't lead to any contradictions, it might be a valid placement.
Look for Forced Moves. Sometimes, the configuration of a region or the placement of stars nearby will force a star into a specific cell. Look out for these as they can give quick progress.
Want to try your hand at Star Battle? We sometimes include this puzzle in our free Puzzle Weekly magazine – you should totally sign up for that if you haven’t already, as it puts 28 brand new puzzles in your inbox every week.
You can also find four levels of the puzzle in our Jumbo Adult Puzzle Book – which happens to include more than 500 puzzles of 20 different varieties.
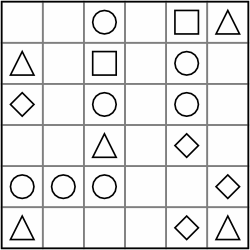
Tetromino is a logic puzzle that originated in Japan. The puzzle consists of a rectangular or square grid with symbols in some of its cells. The symbols can be triangles, diamonds, squares, or circles.
The objective of the puzzle is to divide the grid into regions, each comprising exactly four cells – known as tetrominoes – and each containing two symbols. And yes, tetrominoes are the same shapes you find in Tetris! For reference, here are the possible tetromino shapes:
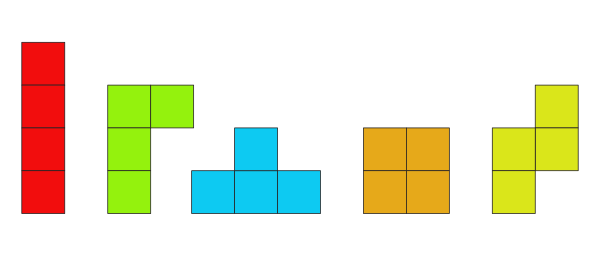
These are just the basic shapes – tetrominoes can be flipped and / or mirrored, giving more possibilities.
Here’s what a simple Tetromino grid looks like:
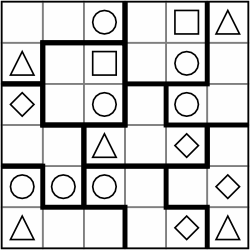
Here is the what the above example puzzle looks like once it’s been solved by drawing in the tetromino regions:
Work from the edges. Starting from the edges can be beneficial because there are fewer possibilities for tetromino placements. Once the edges are filled, it can make the inner sections easier to tackle.
Start with known shapes. Look for cells that already have symbols and try to form tetrominoes around them. Remember, each tetromino must have two different symbols.
Rotation and mirroring. Tetrominoes can be rotated or mirrored. This means that the same shape can appear in different orientations throughout the grid.
Avoid isolating symbols. As you form tetrominoes, ensure that you don't isolate any symbols. Every symbol should be part of a tetromino.
Try using colour. Some people find that colouring in the symbols can help them solve the puzzle more easily. That’s because some brains are wired to see colour differentials more prominently than shape differentials. Some people consider this cheating. We believe it’s a personal choice, so all of our Tetromino puzzles use unfilled symbols so that you have the option of colouring them.
Check for consistency. As you progress, regularly check to ensure that tetrominoes of the same shape have the same symbols. Adjust as necessary.
Use deduction. If you're stuck, try to deduce where symbols might go based on the remaining empty cells and the requirement for each tetromino to have two different symbols.
Use elimination. If you're unsure about a particular placement, consider all possible tetromino shapes that could fit in that space. By eliminating the ones that don't meet the symbol criteria, you can narrow down your options.
Look for unique symbols. If a particular symbol appears less frequently on the grid, focus on it. Since each tetromino must contain two different symbols, this can guide your placements.
Avoid creating un-fillable spaces. As you place tetrominoes, be cautious not to create spaces that can't be filled with a tetromino. If you notice such a space, backtrack and adjust your previous placements.
Sketch out possibilities. If you're solving on paper, lightly sketch out potential tetromino shapes before committing. This allows you to visualise placements without making permanent marks.
Stay flexible. Don't get too attached to a particular placement. If you find that a section isn't working out, be willing to erase or adjust your placements. Sometimes, a fresh perspective can help you see new possibilities.
Break down larger grids. For larger puzzles, it can be beneficial to break the grid down into smaller sections. Solve each section individually, then work to connect them together.
Like all puzzles, the more you practice, the better you'll become at spotting patterns and solving Tetromino puzzles more quickly. Practice with different difficulties. Start with simpler puzzles to get a feel for the game mechanics. As you become more confident, challenge yourself with more complex grids.
Want to try your hand at Tetromino? We have the perfect book for you! Tetromino: Volume 1 contains 100 puzzles over five levels of difficulty. We sometimes also feature this puzzle in our free Puzzle Weekly magazine – you should totally sign up for that if you haven’t already, as it puts 28 brand new puzzles in your inbox every week.
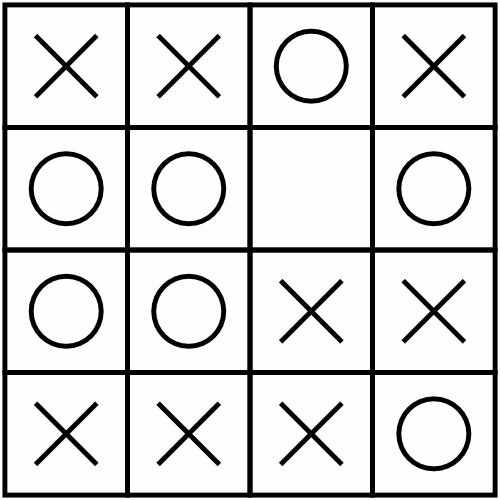
No Four in a Row is played on a square grid, which can vary in size according to the level of difficulty. Some of the cells in the grid are filled with either Xs or Os. The objective of the puzzle is to fill in the rest of the grid with more Xs and Os such that there are never four (or more) of the same symbol appearing consecutively either horizontally, vertically, or diagonally.
Here is an example of a small grid:
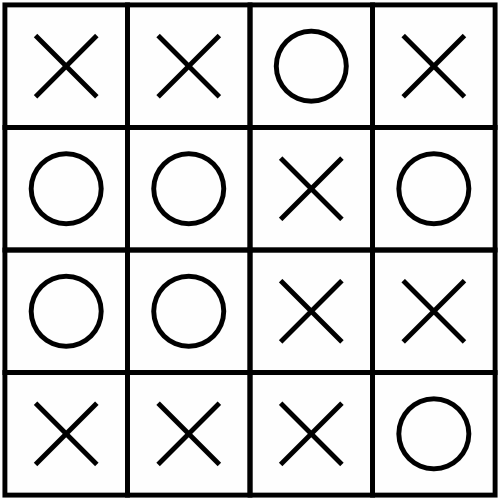
Here is what the example puzzle looks like once it has been solved:
Start with given symbols. Consider the rows and columns the pre-filled symbols are in, and ensure that placing symbols around them won’t immediately violate the "no four in a row" rule.
Look for safe plays. Initially, try to place symbols in positions where it’s impossible to form four in a row due to the grid's boundaries.
Blocking. Sometimes, it’s beneficial to place a symbol simply to prevent a row of three (which would necessitate a block to prevent a row of four on the next turn).
Mind the diagonals. Diagonal lines can be tricky. Keep a close eye on the longer diagonals of the grid to make sure you’re not accidentally forming a line of four.
Adjustments. Be ready to reassess and retrace your steps if you find yourself in a position where you’re forced to place four symbols in a row.
Consider future moves. When placing a symbol, consider how it will impact future moves, especially in the surrounding rows, columns, and diagonals.
The more you play, the more you'll begin to notice patterns and strategies that work, making it easier to navigate through trickier puzzles.
Want to try your hand at No Four in a Row? We sometimes include them in our free Puzzle Weekly magazine – you should totally sign up for that if you haven’t already, as it puts 28 brand new puzzles in your inbox every week.
You can also find four levels of the puzzle in our Jumbo Adult Puzzle Book – which happens to include more than 500 puzzles of 20 different varieties.
Puzzle Weekly has been designed to look great on a wide variety of devices. As well as the printable section, the magazine includes all the puzzles in large format ready to be completed directly on your device.
The instructions on this page will help you load the magazine onto a variety of popular devices.
Jump to:
The easiest way to get the magazine on your iPad is simply to open it from within your email. From whatever email app you are using (the built-in one, or any third party app like Gmail), tap on the Puzzle Weekly PDF attachment. The magazine will open right up for you.
We highly recommend saving the attachment to the Books app before starting to fill out the puzzles. This way everything you do will be saved in the file.
To save the attachment, with the magazine open, tap the share icon - it looks like this: ![]()
If you can’t see the share icon, you might need to tap the screen to show the controls in your app.
From the pop-up menu, tap the Books app icon. If you can’t see it in the list, scroll horizontally to the end of the list, click the “…More” icon, and then select Books from the list.
If you are using a more recent version of iPadOS, you may see a “Open in Books” option right at the top of the screen, which you can use instead.
When reading the magazine in the Books app, you can tap the pen icon at the top of the screen to start solving the puzzles on your iPad.
As an alternative to the Books app, you may prefer to save the magazine to the built-in Notes app. The steps are the same, just choose Notes from the list of icons.
Further help for the iPad can be found here.
There are a couple of ways to get your copy of Puzzle Weekly onto your Kindle Scribe, depending on whether you are using a computer or a phone.
From a Computer, Using the Send to Kindle Tool:
From a Phone or Tablet, Using The Mobile App:
Further help for Kindle Scribe can be found here.
There are a couple of ways of sending the magazine to your Kobo Elipsa.
From a computer, via a USB cable:
From a phone, tablet, or computer via Google Drive or Dropbox:
Further help for Kobo Elipsa can be found here.
To get your copy of Puzzle Weekly onto your reMarkable tablet, you can use the reMarkable app, or Google Drive or Dropbox.
From a phone, tablet, or computer via the web:
From a phone, tablet, or computer using the reMarkable App:
Further help for reMarkable can be found here.
Puzzle Weekly is a multi-format magazine, incorporating a section that is specifically designed to be printed. This section fits the all the week’s puzzles (including kids puzzles) into just 7 pages optimised to minimise ink-use.
Every issue includes the page range to print in a call-out box on the Tips & Tutorials page.
The instructions on this page will guide you through how to print just the printable pages from whatever computer or device you are using.
Jump to:
When you open Puzzle Weekly it will most likely open in the default PDF reader for Windows called Microsoft Edge. We’ve also included instructions for printing from the popular Adobe Acrobat Reader.
Using Microsoft Edge:
Using Adobe Acrobat Reader:
Tips:
Most of the time Puzzle Weekly will open in the default application called Preview. Adobe Acrobat Reader DC is also available for macOS, so we’ve included instructions here for both.
Using Preview:
Using Adobe Acrobat Reader:
Tips:
Printing from a PDF on Android requires using a capable PDF viewer app. For these instructions we’ll use Adobe Acrobat Reader for Android, as it's one of the most widely-used PDF readers available. The steps might vary slightly depending on the version of Android and the app you're using.
Using Adobe Acrobat Reader for Android:
Tips:
Using the built-in PDF viewer or Books app:
Tips: