Doors, sometimes also called Seethrough, is a spatial awareness puzzle played on a square grid. Although there are numbers involved, it’s not a math puzzle (beyond simple counting).
In a hurry? Jump to: Rules / Tips / Worked Example / Download Free Doors Puzzles / Books
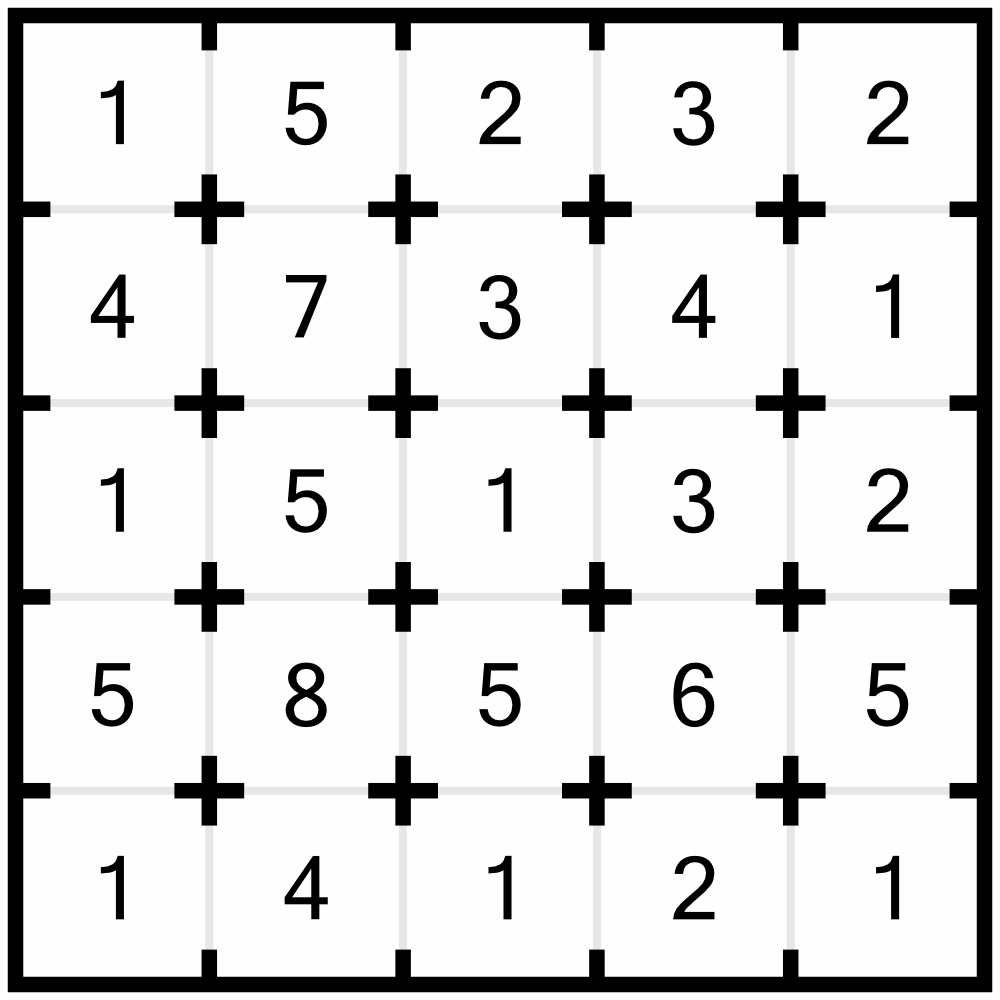
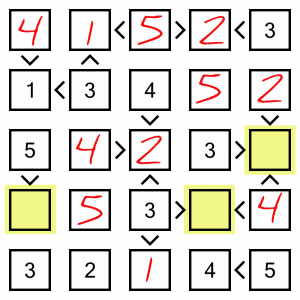
The objective of the puzzle is to ‘close’ certain doors between rooms so that each room opens onto a set number of others. This is done by drawing lines between cells. Here’s what a very small, simple Doors puzzle looks like:
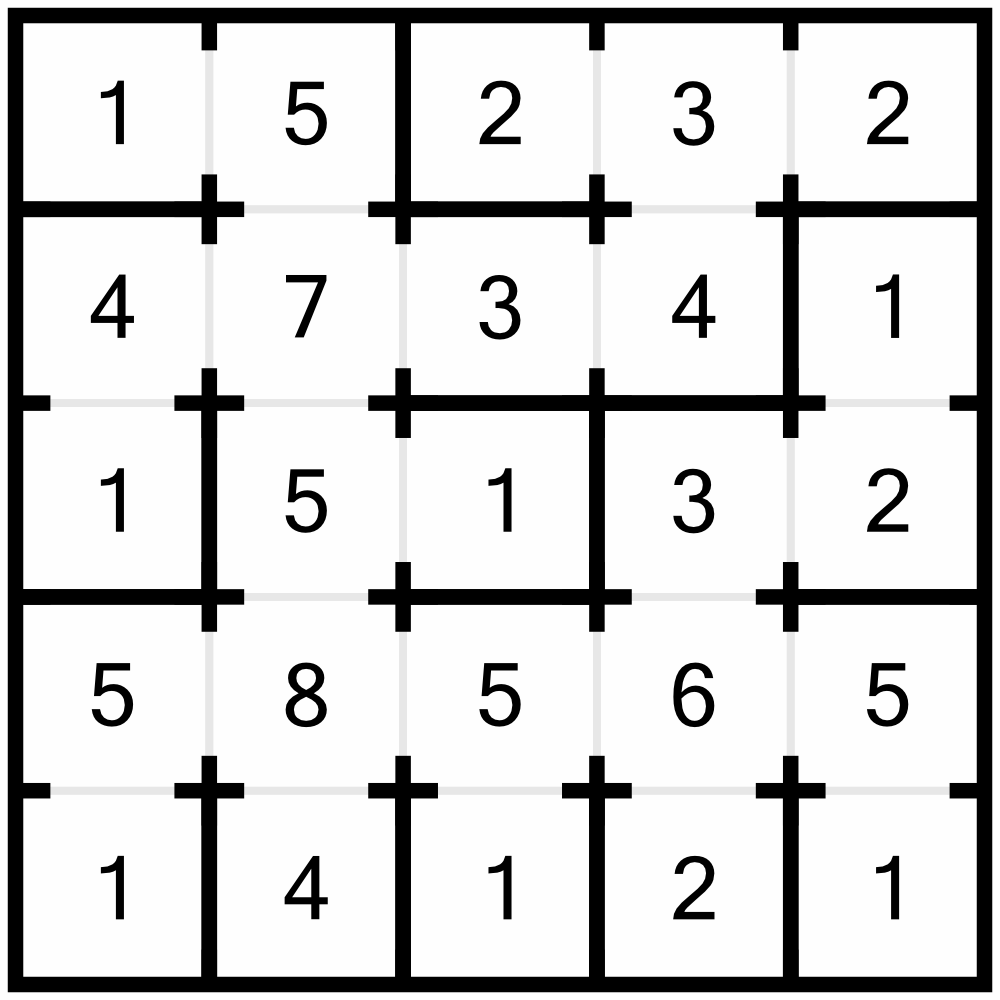
Here’s what the above example puzzle looks like once it’s been solved:
These puzzles are solved through simple logic, mainly just counting. The logic and process might be straightforward, but the puzzles can initially look a little daunting as there are lots of numbers and no closed doors to start you off. The key is not so much to look for which doors you must close, but which must remain open. By forcing some doors open, you eliminate places where you can close others.
Here are some tips to help you get started. Below, we will work through a whole puzzle from start to finish, putting these tips into practice.
Let’s solve a puzzle from start to finish, so we can see some of these techniques in action. This example is not intended to show the best or fastest way to solve the puzzle, only to demonstrate methods that can be used.

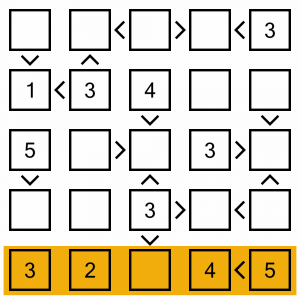
This is the puzzle we are going to solve. It’s a small, easy puzzle. Smaller, in fact, than our usual Level 1 puzzles. But a regular puzzle would make this example too long and unwieldy, and a little puzzle is sufficient to see the solving techniques in action.

The first move is easy: as we have two 1s next to each other, we know there must be a door closed between them. If that door was open, then every other door surrounding those 1s would have to be closed, which would isolate them from the rest of the grid, and that’s not allowed by the rules. So this door must be closed.

Now let’s turn our attention to this corner. Corners are obviously more constrained as they only have two doors. Why look at this corner in particular? Because it’s the largest number in a corner. We need to see five rooms, and we can only look up and to the left. Either direction will only show us a maximum of four rooms each (it’s actually fewer because the 1 in the vertical direction, and the 2 in the other corner, both ‘block’ us), so we know we are going to have to look at rooms in both directions if we are to meet the target. Therefore we know that both the doors to this cell must remain open. We can mark those in on the grid, so we know not to close them later.

I’ve marked those doors open with the small green lines. We can do something similar here with this 6. At first glance, it looks like we can see a maximum of four rooms looking vertically (upwards). However, the 2 at the top of that column means we couldn’t open all the doors between it and the 6. We don’t know if the 2 will see any rooms in that column – it could see the 6 and the 4 below it, or just the 6, or nothing at all in that column. But we do know that we cannot have doors open all the way between our 6 at the bottom, and that 2. So the most rooms we can see vertically is three. That means to see our target of 6 rooms, we are going to have to leave all three doors open. Again, we’ll mark them in to remind us.

Let’s keep looking for forced openings. Another obvious place to look is this 6. Aside from the one we just looked at, it’s the biggest number on the board. However you look at it, we’re going to have to leave the bottom door open if we are to reach the target. There are various combinations in which one of the other three doors may or may not be closed, but we don’t know which is correct yet, so we’ll just mark in what we know for sure: that bottom door is going to have to stay open.

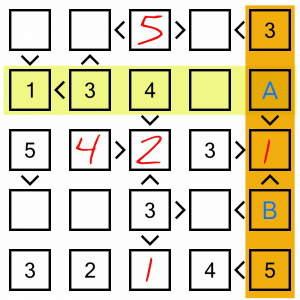
Now we’re going to have a look at this corner 3. Again, we’re rather constrained because we only have two doors. We are further constrained in that below that 3 is a 1, so if we leave the door between them open, we must close all other doors on the 1, shutting off that column as a source of rooms to view. We are further constrained by the 1 in the top row. If we left all the doors open between the 3 and the top 1, we would be fulfilling the criteria of the 3, but we would bust the 1 (it would be able to see 3 rooms!) These constraints, taken together, allow us to solve this cell. We must be able to see the two cells immediately to the left, and the cell below. We can draw in the openings, close the required doors, and strike through that 3 so we know we’ve solved it…

…like this. With the two doors we’ve closed, that 3 can now only see the required 3 rooms.
Closing those doors has some knock-on effects we need to deal with. Firstly, this 1. It’s looking at the 3, so we must close the remaining door to the left.

The 1 is completed so it can be struck off.
The 2 is also complete, because we can see the two threes to its right, as the interconnecting doorways are forced open. So we must close the remaining door, looking downwards.

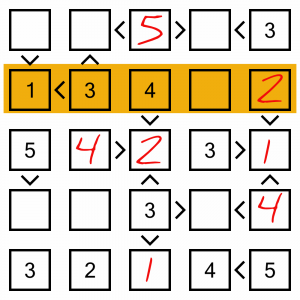
We’ve solved most of this top corner, but what about this 3? It can see two rooms (left and right), so it must keep its bottom door open to look at the 4, but it must not look any further. That means we have to close the bottom door of the 4.

With only one door remaining open, we can solve this 4. It can see one room above, so it must be able to see all three to the left. We’ll mark those doorways as open, and strike through the 4 as complete.

Looks like we’ve just solved this 6 into the bargain! We’ll mark the highlighted doorway between the 4 and the 5 as open.

We can solve this 3, because with the open doors to the left and right it can already see three rooms. We need to stop it seeing any more, so have to close the top and bottom doors.

The 2 and the 1 can also be solved. The 1 already is – it’s only got one door left open! And the 2 must have its bottom door open, and we have to close the one beyond it (the bottom door of the 4)…

…which coincidentally also solves the 4.
I’m going to return to the bottom of the puzzle now, and look at this 2 in the corner. If we leave the door to the right open, we’re going to have a problem as all the other doors further right must stay open and we’d see far too many rooms. So we must close the right-hand door, and we must force open the two doors to the top so we can see enough rooms.

Not only has that solved that 2, it also completes this 6 because it’s now reached its target number.

…and it lets us solve this 3 – we must close the top door.

They’re dropping like flies now. The 4 is solved already. The fact it must open onto the 1 above it means we can shut the other doors on that 1 and mark it as complete.
The 5 is also solved, and we can mark the doors above it as open, which will help solve the other rooms.

Both of these 2s are done, and we can close the other door on the top one.

We can solve this 4, because we know the 1 to its right must open on to it. With the doors at the top and bottom of the 4 already forced open, it has reached its complement of visible rooms, so we can close the left-hand door.

And that’s it! Even though we haven’t struck through them, all the other rooms are actually solved now.
It might look like it took a lot of effort to solve such a simple puzzle, but that’s because we broke it down into very small steps. As you get comfortable marking doors open and seeing where the forced openings then require doors to close, the puzzle flows beautifully. If you want to try some yourself, keep reading for some freebies…
Ready to try some Doors / Seethrough puzzles yourself? We’ve put together a sample pack of four grids for you – a couple of easy ones, and a couple that are more challenging. Download the PDF below. Solutions are included so you can check your results.
Click Here To Download The Taster PDF
Ready for even more Doors? We’ve got you covered!
Puzzle Weekly Presents: Doors is a collection of 120 puzzles set over seven levels of difficulty. Grab a copy here.
Futoshiki is a number-based puzzle that shares many similarities with Sudoku, but adds additional clues in the form of inequality symbols.
In a hurry? Jump to: Rules / Tips / Worked Example / Download Free Futoshiki Puzzles / Books
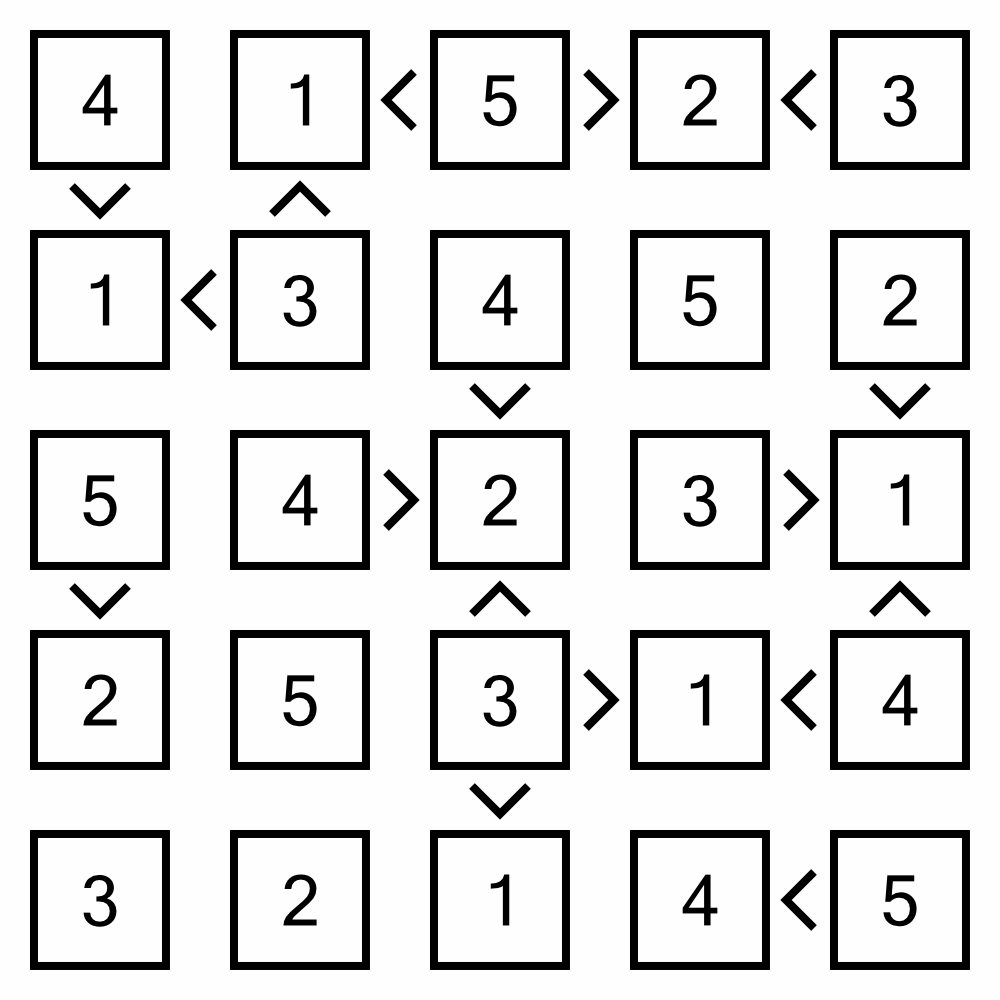
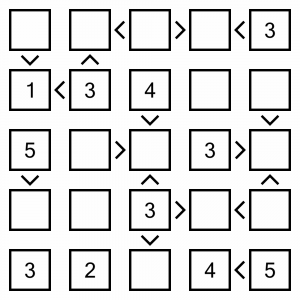
Here’s what a small Futoshiki puzzle looks like:

The rules are pretty easy to understand:
Here’s what the earlier example looks like once solved:
Simple Futoshiki puzzles can mostly be solved using basic Sudoku methods, in other words, elimination based one row and column intersections.
Anything beyond the most easy puzzles requires us to look at the inequality symbols, though. Here are some tips to help you get started:
As puzzles increase in difficulty, you’ll need to combine techniques to narrow down possible cell contents, and that’s when notes come in handy.
Theory is all well and good, but there’s nothing like putting pen to paper and solving a real puzzle, so let’s do that now. We’re going to work on an easy level 1 puzzle so that this example doesn’t become too unwieldy, but it will show the basic techniques we can use to solve Futoshiki. Please bear in mind the objective here is to demonstrate techniques, not to solve the puzzle in the most efficient way possible.
This is the puzzle we are going to be solving. It’s a simple level 1 puzzle that will adequately demonstrate the approach we can take to solving.
The easiest of easy wins on this board is this row at the bottom. It’s only missing one digit, so it’s a real no-brainer! We can put a 1 in here.

The 1 we’ve just placed is going to help us solve the middle cell in this column. That cell requires a digit that is smaller than 4 and smaller than 3. The only numbers that fit the criteria are 1 and 2, and seeing as we just placed the 1, we know that can’t be it! So we have to put a 2 in here. And seeing as there’s only one other empty cell in the column, we know that will have to contain the 5.

In this row we are missing a 1 and a 4, and we have two cells ready and waiting. Cell A says it contains a number bigger than 2, so we can’t put the 1 in there, it has to contain the 4, and the 1 goes into B.
In the last column we need a 2 and a 4. If we look at the row that intersects with cell A, it already has a 4, so that cell can only contain the 2. The 4 will have to go in cell B.
There’s only one empty cell left in this row, so that’s our 5.
How can we solve this column? Well, we’re missing a 1 and a 5. According to our inequality symbols, cell A contains a number smaller than 3, so it must contain the 1. That leaves the 5 in cell B.

This is a very easy puzzle, so there are loads of ways of figuring out the last few cells. Let’s look at the top row. We’re missing a 2 and a 4. Cell A must be bigger than 1, so that doesn’t help us. But cell B must be smaller than 3, so the 1 must go in there, leaving the 4 to go into cell A.
There are only three empty cells remaining, and each one is the final empty cell in its column, so they require no effort to fill…

That’s it, all done. I did say it was an easy one! It might be simple, but these kinds of eliminations are at the heart of how we solve Futoshiki puzzles. By combining them in their different forms, and cascading implications between rows and columns, we can solve all but the most complex of puzzles without resorting to candidate notes. If you want to have a go yourself, keep reading for a free taster pack to download.
Ready to have a go yourself? We’ve put together free taster pack with a couple of Level 1 puzzles, and a couple of harder ones, too. Download the PDF below. Solutions are included so you can check your results.
Click Here To Download The Taster PDF
Would you like even more Futoshiki? We’ve got you covered!
Puzzle Weekly Presents: Futoshiki is a collection of 120 puzzles set over seven levels of difficulty. Grab a copy here.
Hoshi is a variant of Sudoku, based around triangles instead of squares.
In a hurry? Jump to: Rules / Tips / Download Free Hoshi Puzzles / Books
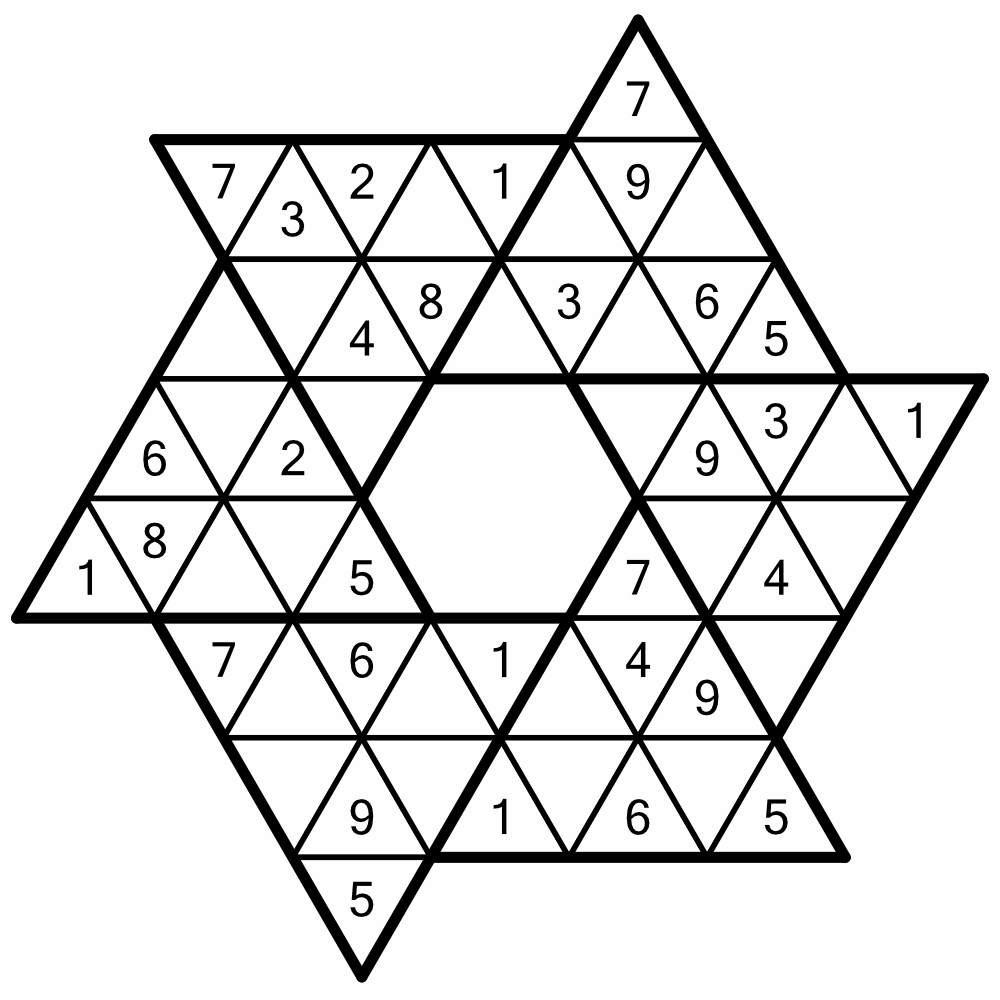
Here’s what an easy Hoshi puzzle looks like:
Normal Sudoku rules apply to Hoshi, but instead of being constrained by rows, columns, and blocks, we have to fill in the puzzle without repeating digits in triangles and lines.
Here’s what the earlier example looks like once solved:

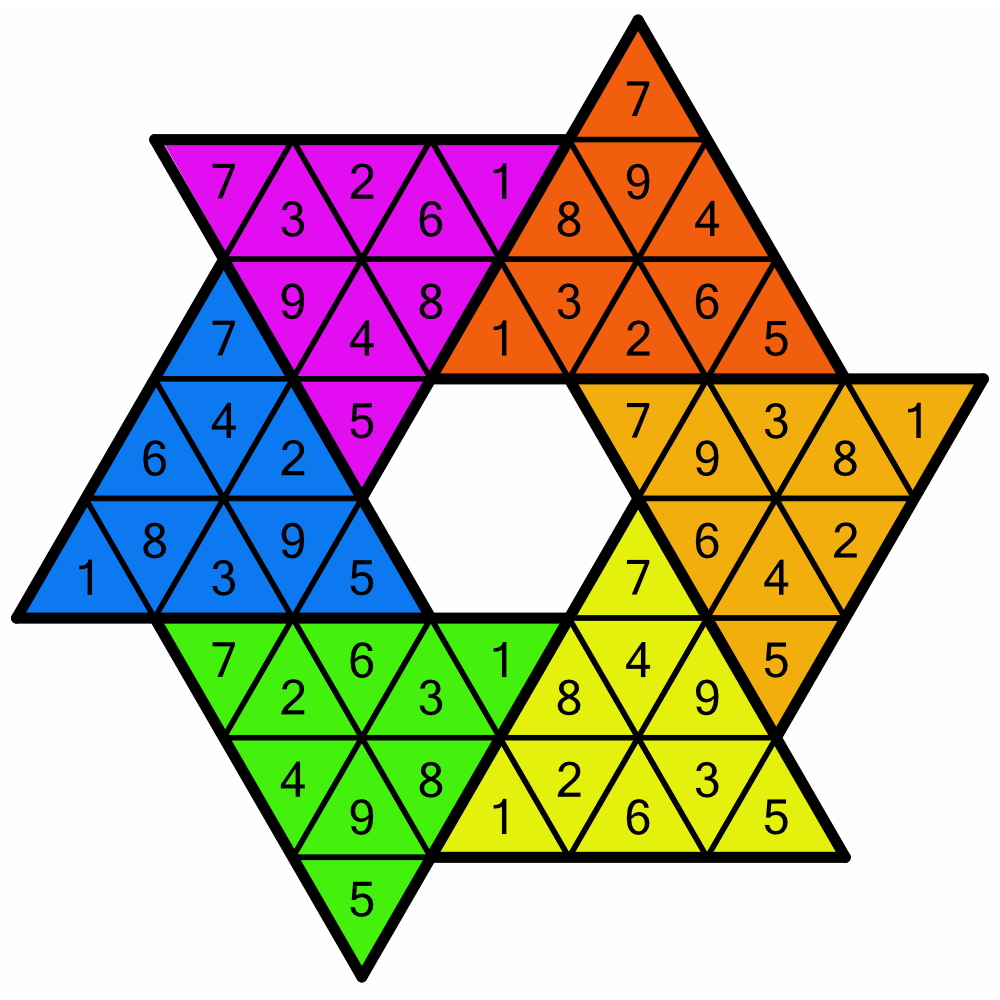
Below, we've highlighted the six triangles, to make it easier to see those constraints. They are the equivalent of blocks in regular Sudoku:
Here we’ve highlighted examples of different lines, which are the equivalent of rows and columns in the normal version of the puzzle:
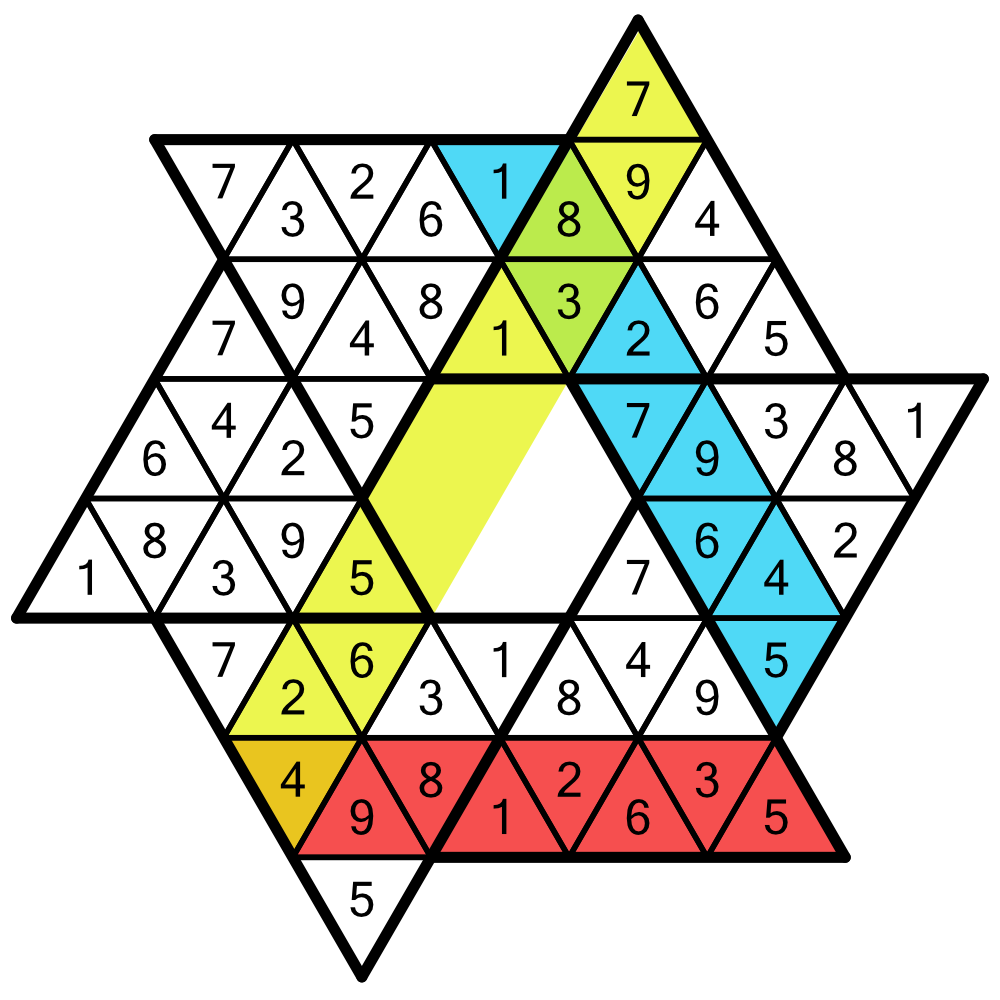
You will notice that although the six triangles that comprise the Hoshi grid each contain nine numbers, not all the lines in the puzzle do; some only contain eight. However, the rules still dictate that a line cannot contain duplicate digits. For example, the red line at the bottom only contains eight digits, but it does not contain the digits from 1-8. Instead, there is a 9 but no 7. As long as no digit is repeated, then it’s within the rules.
You will also see that four of the lines in Hoshi cross the hexagonal hole in the middle. In this example, the yellow line is split across the middle, yet still forms a single valid line containing the digits 1-9 once and only once.
Hoshi is a variation of classic Sudoku, so if you’ve played Sudoku before, you’re all set to go. If not, be sure to read through our comprehensive three part tutorial – it teaches you everything you need to know to solve regular puzzles, and the same techniques apply in Hoshi.
Here are some additional tips you can use to help with Hoshi:
Are you ready to have a go at Hoshi yourself? We’ve put together free taster pack with a couple of easy starter puzzles, and a couple of harder ones, too. Download the PDF below. Solutions are included so you can check your results.
Click Here To Download The Taster PDF
Want to play Hoshi? We’ve got you covered, we have books of puzzles ready and waiting to be solved.
Puzzle Weekly Presents: Hoshi is a collection of 120 puzzles set over seven levels of difficulty. Grab a copy here.
Got a Kobo? We’ve got Hoshi puzzles for that too! Hoshi for Stylus Devices presents 100 puzzles over five levels, and is designed especially for Kobos with stylus. Find out more here.
Noodle is a number puzzle played on a square grid. There’s a little bit of calculation involved, but not as much as something like Number Cross or Calcudoku!
In a hurry? Jump to: Rules / Tips / Worked Example / Download Free Noodle Puzzles / Books
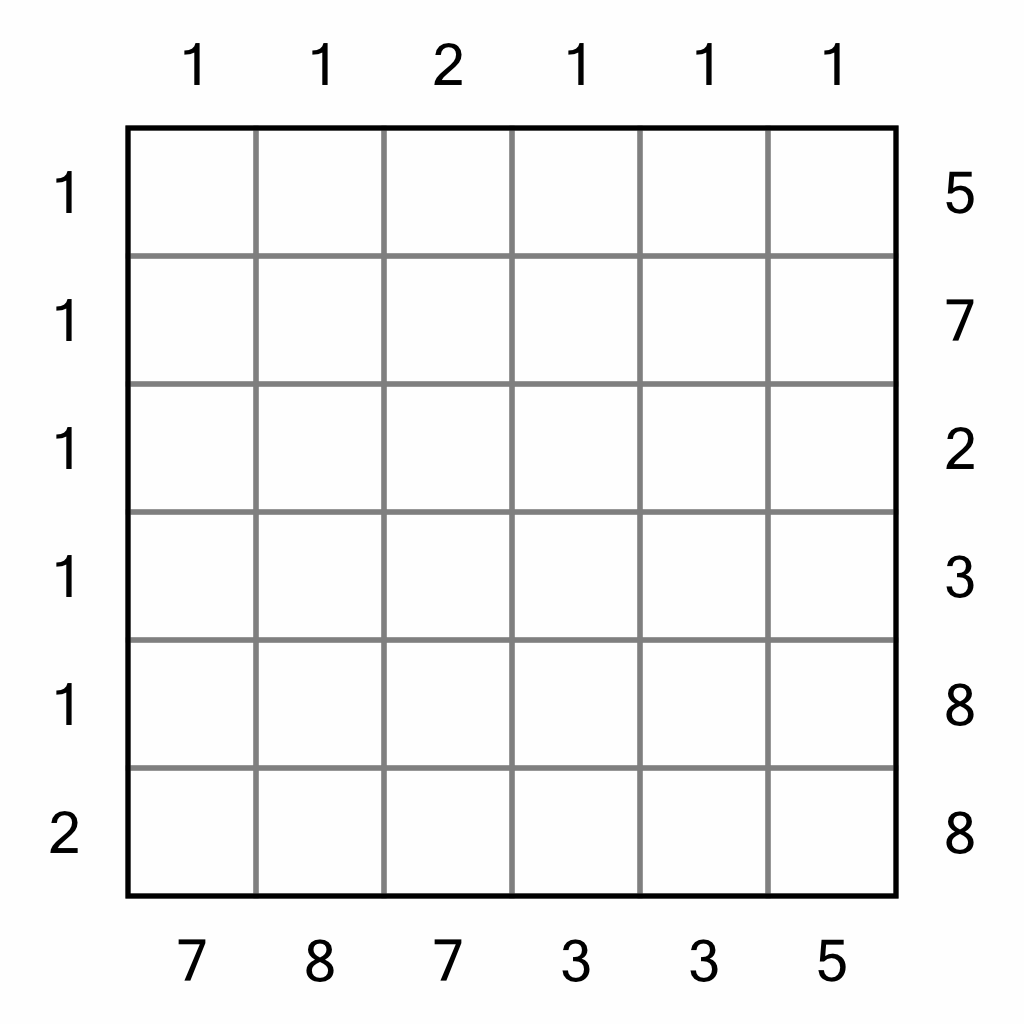
Here’s what a small Noodle puzzle looks like:
The objective of Noodle is to place numbers onto the grid according to the following rules:
Here’s what the earlier example looks like once solved:
Solving these puzzles involves elimination and some simple calculations. Here are some tips to help you get started. Below we’ll work through a sample puzzle from start to finish to see how to apply them.
Let’s put all of that into practice and solve a puzzle. This is a very simple level 1 puzzle, so it’s easy to follow along with and does not involve logic chaining or thinking ahead. This example isn’t intended to show the most efficient way of solving the puzzle, but is to demonstrate the strategies we can use to solve Noodle. This is just one way of getting to the solution.

This is the puzzle we are going to solve. As mentioned, it’s an easy level 1 puzzle, just enough to get the idea, not to stretch our brainpower to the limit!

As we have a couple of zeros here, we can immediately eliminate the first column. It cannot contain any digits, so we can strike through all the cells in that column.

Let’s move onto the second column. The top number tells us we must place a single digit in this column, and the bottom number tells us that the contents of the column must add up to 7. In other words, we know we have to place a single 7 somewhere in the column. Therefore, we can eliminate any cells where putting in the 7 would bust a row. As we can see, none of the bottom three cells can contain the seven, as they belong to rows that add up to 2, 6, and 5. We can put strike marks in to eliminate them.
The top three cells could all potentially hold the 7, so we’ll have to come back to this column later.

We’ll finish looking at the ‘1’ columns, as they give us more easy eliminations. Here we know we have to place a 4, so we can eliminate the cell in the row that sums to 2…

…and in this one we must place a 6, so we can eliminate the cells in the intersecting 2 and 5 rows.

Now we can turn our attention to the rows. We must place a single 8 in the first row. We’ve already eliminated the first cell, and in fact we can eliminate the next four as to put an 8 in any of them would bust the totals for the intersecting columns. That just leaves the last cell, so we must put the 8 into that.

Let’s take a look at the end column now. The top number tells us we need to place two digits, and the bottom number says they must add up to 15. We’ve placed the 8, so we know the second digit must be a 7 (because 8+7=15). As there’s only one cell that can take a 7, that’s where we must put it. We can eliminate the remaining cells in that column, which will help complete the other digits.

The 7 we just placed means that we have completed the row in the green box, so we can eliminate all the remaining cells in that.
As we only have one free cell in the row in the blue box, we can place the 2 that is required in that row.

The knock-on effect of placing the 2 is that we now know we must place a 5 in this column. That’s because the column requires two digits that add up to a total of 7. There’s only one valid cell to put the 5, so we place it and eliminate the remaining cells.

For completeness, we can eliminate the last cell in this row as we’ve complete it.

Let’s take a look at this row. We can solve it using simple arithmetic. We need two digits, they must add up to 11. From the three available, we must use the 7 and the 4. Placing these digits completes a couple of columns, too.

Only one digit left to place, and it’s easy because it’s the only one left! That’s it, puzzle solved.
Obviously that was a very simple example. It’s a starter puzzle, useful for getting to grips with the rules. If you want to try something harder, check out our free taster pack below – it includes a couple of easy puzzles like this, and some harder ones, too. And if you want even more, find our selection of Noodle books at the bottom of this page.
Ready to have a go yourself? We’ve put together free taster pack with a couple of Level 1 puzzles, and a couple of harder ones, too. Download the PDF below. Solutions are included so you can check your results.
Click Here To Download The Taster PDF
Would you like even more Noodle? We’ve got you covered!
Puzzle Weekly Presents: Noodle is a collection of 120 puzzles set over seven levels of difficulty. Grab a copy here.
Got a Kobo? We’ve got Noodle puzzles for that too! Noodle for Stylus Devices presents 100 puzzles over five levels, and is designed especially for Kobos with stylus. Find out more here.
Trilogy is a pure logic puzzle that uses symbols on a square grid. The aim is to fill the empty cells on the grid with the correct missing symbols.
In a hurry? Jump to: Rules / Solving / Tips / Worked Example / Download Free Puzzles / Trilogy Books
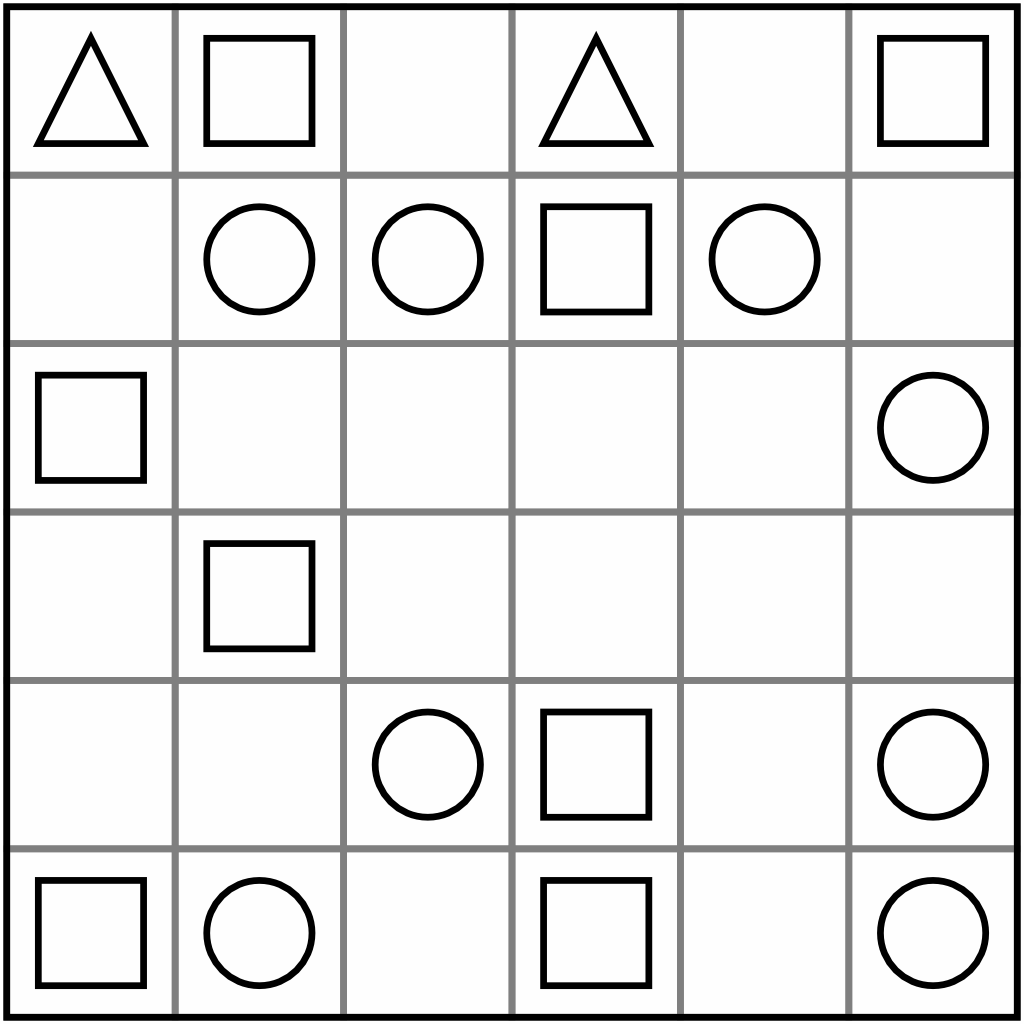
Here’s what a small Trilogy puzzle looks like:
There are three symbols used in the puzzle: circles, squares, and triangles. There are only two rules to remember:
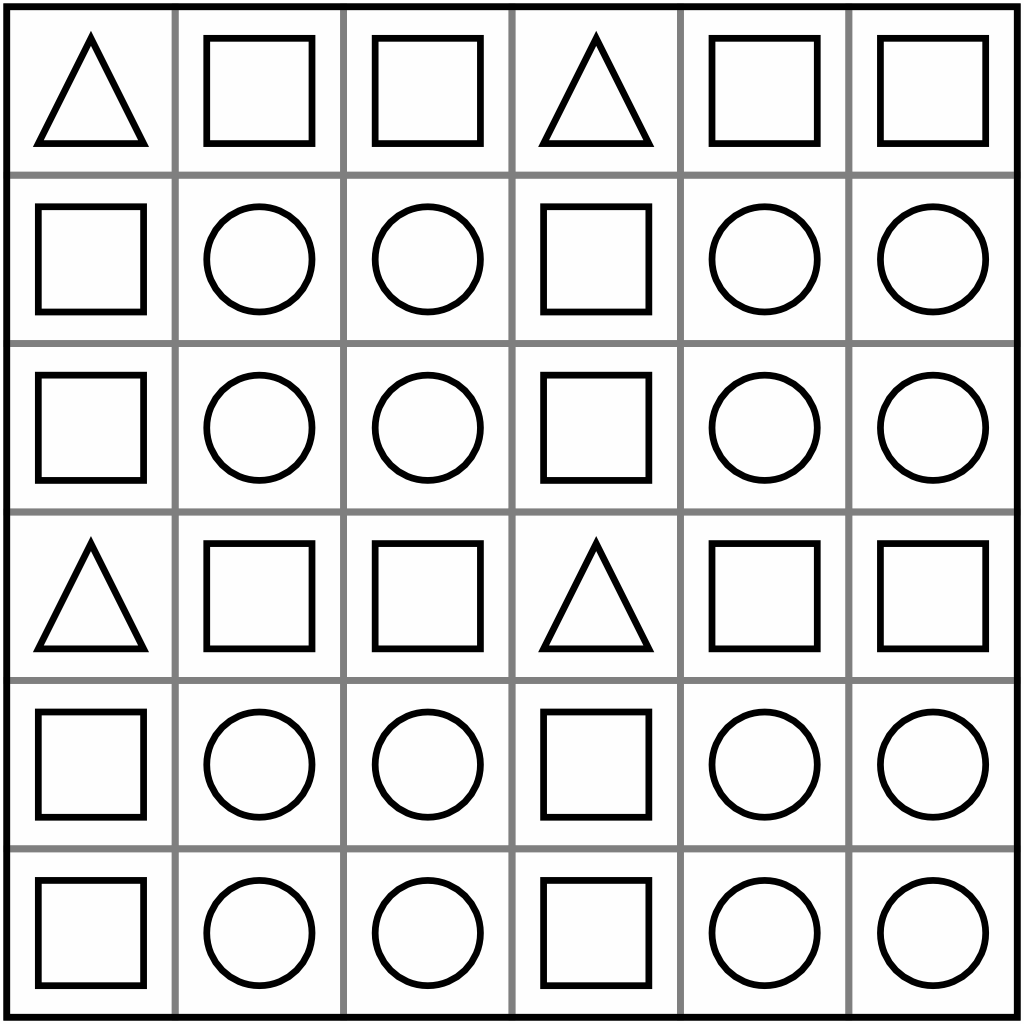
Here’s what the earlier example looks like once solved:
Solving these puzzles requires the application of logic. There are lots of patterns you can use to help you, and the more puzzles you do, the more easily you’ll spot the patterns.
These patterns are all “forced moves” – they allow you to immediately place a new symbol on the grid. Easier puzzles have more of these patterns, but they’ll help with harder puzzles too; as you add more symbols, more patterns will emerge.
In this tutorial we will use the notation A, B, C, and x, where A, B and C stand in for the three symbols and x is the cell we are trying to solve.
There are two kinds of pattern. The easiest is a simple row of four cells with a gap, allowing you to place a symbol:
AxCC pattern. In this case, the x must be the same as the A symbol. It can’t be B because otherwise we’d have (ABC)C, which isn’t allowed, and it can’t be C because otherwise we’d have A(CCC), which is also not allowed.
In this example, A is a square and C is a circle, so the empty (x) cell must be a square.

ABxB pattern. In this case the empty cell must contain the A symbol, because (ABC)B isn't allowed, and A(BBB) is not allowed.
In this example, A is a square and B is a triangle, so the empty (x) cell must be a square.

These patterns are easy to spot as you can quickly look for doubles on the grid (two symbols the same next to each other), and doubles with a gap between and another symbol next to them.
Next, you can look for intersection patterns. These are patterns where the empty cell we are trying to solve is at the intersection of two patterns. The simplest intersections are a confluence of doubles. For example, if you have AAx in one direction, and BBx in another, x must obviously be C, otherwise we’d be making a triple, which isn’t allowed.
In this example, we have two circles together vertically, forming an AAx, intersecting with two triangles together diagonally, forming a BBx. The intersecting cell (x) must be a C to avoid three in a row. Therefore, in this case it would be a square.

There are lots of these patterns to find in Trilogy. The following table lists some common intersections and what they resolve to. It should be fairly easy to work out why the answer is what it is in each case.
| Solves To: | ||
| AAx | BBx | C |
| AAx | ABx | B |
| ACx | BAx | A |
| AxA | ABx | B |
| AxC | ABx | A |
These are not necessarily all the possible patterns – they are the most common, and a good starting place. As you get deeper into this fascinating puzzle, you will find more that you can add to your arsenal.
Here are some further tips to help you solve Trilogy:
Let’s put all of that into practice and solve a simple puzzle. This is not intended to show the most efficient way of solving this puzzle. The purpose of the example is to demonstrate the strategies we can use to solve Trilogy, and is just one way of getting to the solution.

This is the puzzle we are going to solve. We’ve deliberately chosen a simple one to keep this tutorial manageable. The same concepts apply whatever the size of the grid, though.

Let’s begin by looking for the easiest patterns. The first of those is the AxCC. There are three of those in this puzzle, all in the vertical plane. We know that the empty cell in this pattern must be the A symbol. If we put a C in there, we’d have three Cs in a row, which isn’t allowed. And if we put a B in there, we would have A, B and C in a row, which also isn’t allowed. So from the left, the first empty cell must be a square, the second also a square, and the third one, on the right edge, must be a circle.

Filling in those three symbols has created a a new AxCC pattern (in yellow), so we know the empty cell must be a square. It’s also given us an ABxB pattern (green). This must solve to A, for exactly the same reason as before. So the empty box in the green area must be a circle.

We’ve exhausted the simple gap patterns for now. Let’s look for intersections. The easiest to spot are the doubles (it’s quick to find two symbols the same on the grid). Here’s one example, right at the top. We have an AAx intersecting with a BAx. We know this must solve to B, because if we tried to put an A in the intersecting cell we’d have AAA which isn’t allowed, and if we tried to put a C in there, we’d have BAC which is also not allowed. So the empty cell must contain a circle.

Here’s another, almost the same. This time it’s ABx / AAx, but it solves to the same solution for the same reason. We have to put a circle in the intersecting cell.

Here’s a different kind of intersection. This is an AxC / ABx. From our table above, we know it resolves to A. That’s because if we tried to put a B in the intersecting cell, we would be creating an ABC run in the green area, and if we put a C in there, we’d be creating an ABC run in the yellow one. A is the only option. The empty cell contains a square.

This is an easy puzzle, and there are lots of intersections and patterns appearing all over the place. Let’s look at this AxCC for no other reason than because it’s a diagonal, and we haven’t done any of those yet! It’s important to remember to check the diagonals, particularly when puzzles get harder, as they add two extra dimensions and can often be the key to unlocking the grid.
Being an AxCC pattern, we know the empty cell solves to A, so it’s a circle.

We can do intersections on diagonals as well. Here’s another AAx / BAx, with the AAx on the diagonal. We know it solves to B, so the empty cell at the intersection must be a square.

Here’s another diagonal, an AxCC. It must be a square.

And here’s an ABxB. As we fill out the cells, the simple patterns keep popping up again, so it’s worth keeping an eye out for them. This must be a circle.

Let’s speed up a bit. We’ve got two patterns here. The blue is another ABxB, so that’s a circle. The yellow and green intersection is an AAx / AxC, so that has to solves to C - a circle in this case.

Nearly there. Here are two more. The yellow and green intersection is an AAx / ABx, so must solve to B. It’s a square.
The blue intersection is an AxA / ABx. It must solve to B, so it’s a circle.

A quick AxCC here. It must be a circle.

Just two more to go. This is a new intersection: ABx / ACx. This must solve to A (square). If we put a B in here, we’d be creating an ACB run on the diagonal. if we a C in there, it would be an ABC on the vertical. So, it’s a square.

That just leaves us with a simple ABxB pattern along the bottom. It must be another circle.

That’s it, we’ve completed the puzzle. And we didn’t even have to draw any triangles! I said it was an easy one. If you want to try some puzzles like this yourself, read on – there are some freebies to download below…
This was a very simple puzzle, but it shows the basic techniques used in solving Trilogy. Harder puzzles have far fewer starting symbols on the board, and fewer (if any) initial patterns. They require using more advanced logic, and notes in the cells as you eliminate possibilities.
Are you hooked? Ready to have a go at some Trilogy puzzles yourself? We’ve put together a sample pack of four grids for you – a couple of easy ones like the above example, and a couple that are more challenging. Download the PDF below. Solutions are included so you can check your results.
Click Here To Download The Taster PDF
Would you like even more Trilogy? We’ve got you covered!
Puzzle Weekly Presents: Trilogy is a collection of 120 puzzles set over seven levels of difficulty. Grab a copy here.
Got a Kobo? We’ve got Trilogy puzzles for that too! Trilogy for Stylus Devices presents 100 puzzles over five levels, and is designed especially for Kobos with stylus. Find out more here.
Arrows is a logic puzzle in which you must place arrows outside the grid according to certain rules.
In a hurry? Jump to: Rules / Tips / Worked Example / Download Puzzles / Books
Here’s what a small Arrows puzzle looks like:
Your task is to place arrows in the empty boxes around the grid in such a way that each box contains a single arrow that points to at least one number in the grid. The numbers tell you how many arrows point to that cell.
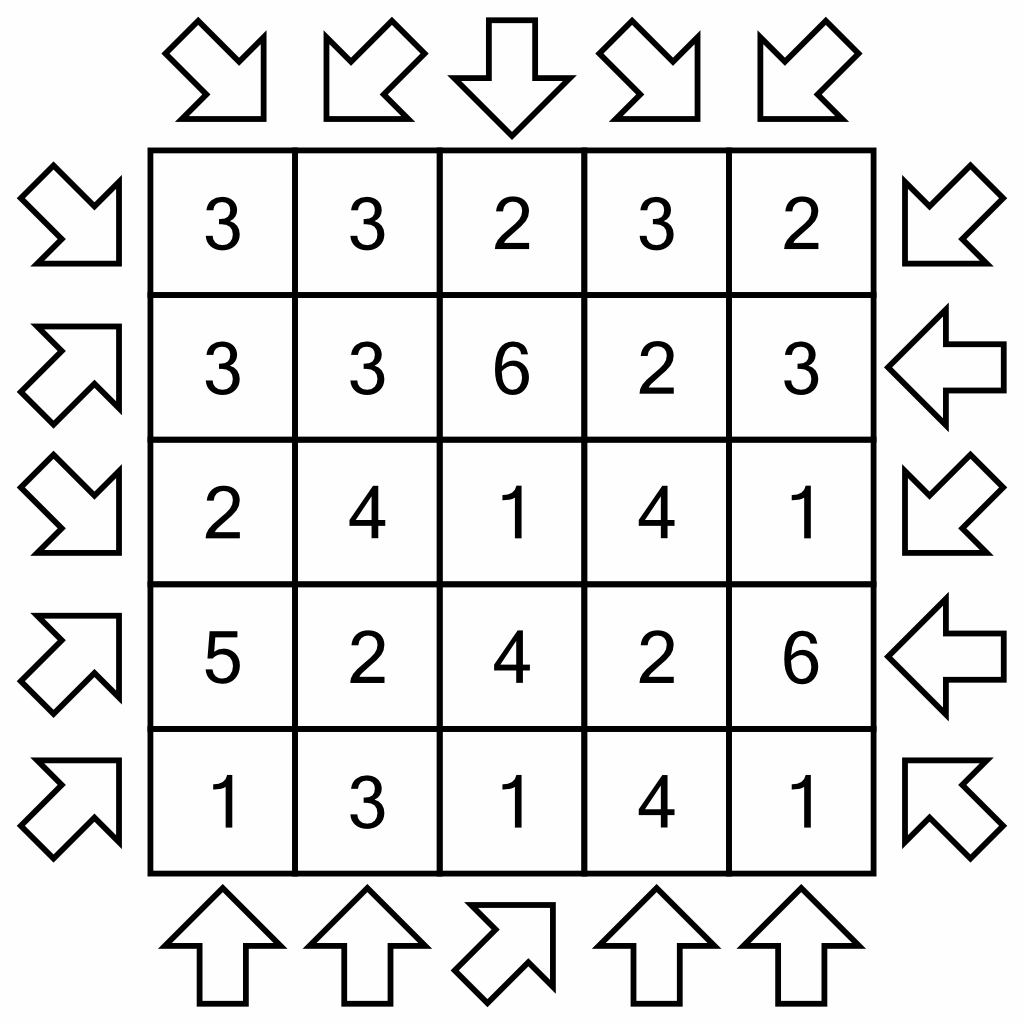
Here’s what the earlier example looks like once solved:
Solving these puzzles is all about elimination. They can seem daunting at first (especially larger ones), but by taking a methodical approach and applying logic, we can always reach the correct solution.
Before we get into specific tips, here are some useful things to bear in mind about Arrows puzzles.
We can attack a puzzle on two fronts: by looking at the numbers and trying to work out from which directions the arrows must point at them, or by looking at the arrow cells and working out where they must point. Considering that most numbers have eight potential arrows pointing at them, but any given arrow cell only has three possible directions in which it can point, we’re better off working from the arrows inwards. If we can eliminate two out of three directions that an arrow could point, we can complete the arrow cell.
Here are some tips to help you get started with solving Arrows puzzles. In a moment, we’ll work through a puzzle from start to finish and put these into practice.
Let’s put some of the tips above into practice and work through a puzzle from start to finish.

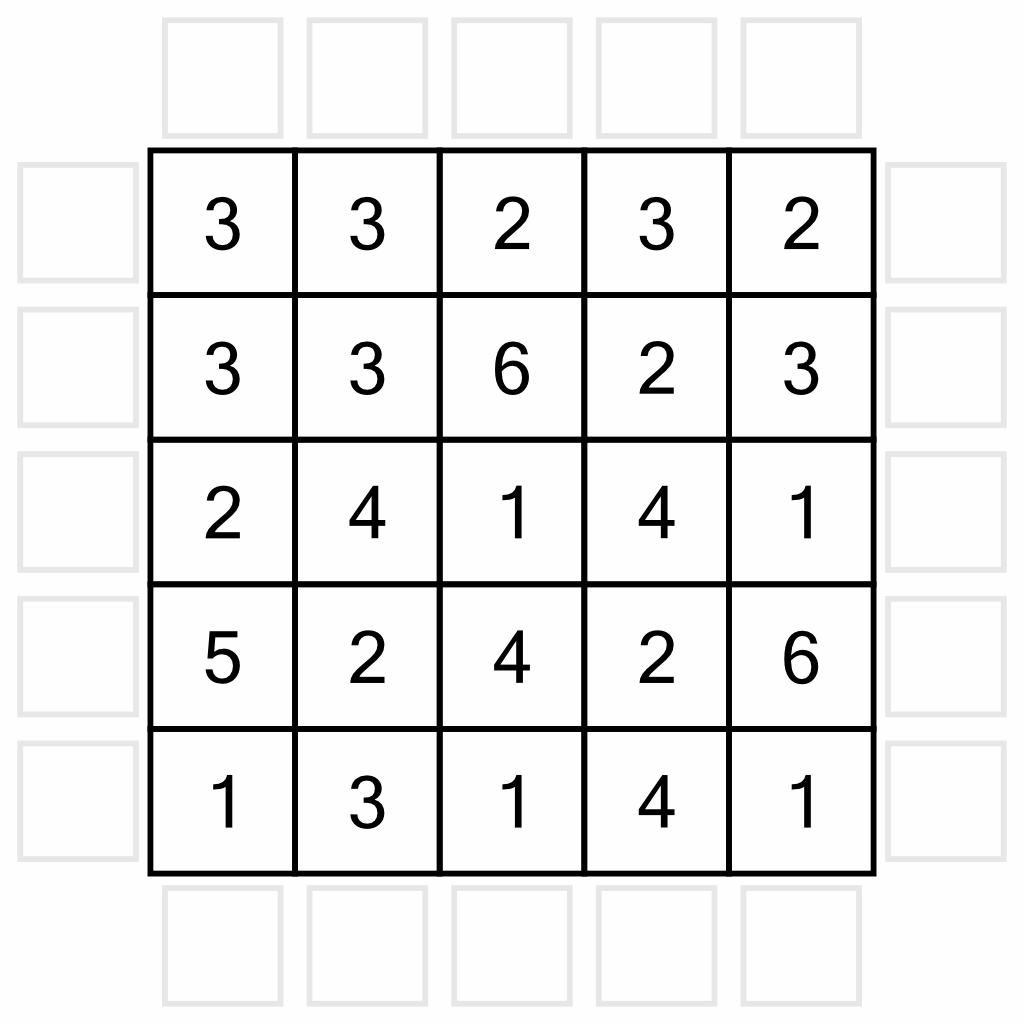
This is the puzzle we are going to work through. We’re using a very simple puzzle here as anything larger would make this walk-through way too long. Being an easy puzzle, we are provided with clue numbers in all the cells. Harder levels have fewer clues.

Before we get started, a quick word on notation. As we’ll be eliminating possible arrow directions, we need a consistent way of doing so. Any given cell has three possible arrow directions: up / down / horizontal for the sides, and left / right / vertical for the top and bottom. Here we have the three possible side arrows shown. As we eliminate possible placements, we can place an X in the relevant position to rule it out.

The very first thing we can do on any puzzle is eliminate ‘illegal’ arrow positions in the corners. The rules state that arrows must point towards at least one number. That means that the arrows shown here are not acceptable as they don’t point at any numbers….

…so we can put Xs in all those positions to rule them out. It’s not strictly necessary, but it makes things easier later on.

Now let’s look at the 0. No arrow can point to it, so we can add in more Xs as we eliminate all the positions that could point to it. That means no vertical arrows in the column the 0 is in. I’ve eliminated those with the purple Xs.

It also means no horizontal arrows for the row the 0 is in, so we eliminate those with Xs too.

And of course we mustn’t forget the diagonals. That gives us four more arrow positions to eliminate.

With all those eliminations, we’ve got some places to put some arrows on the board. We’ll start at the top. With the vertical arrow and diagonal right arrows not an option, we know we must place an arrow going diagonal left, pointing at the cells highlighted here.
At this point we are going to add another kind of note to the board. Each of the three highlighted cells now has an arrow pointing at them, so we’ll mark each one with a dot. This will help us keep track of which cells are ‘complete’, which will be essential later on.

Working around clockwise, we can place a horizontal arrow pointing to this row. Again, we add a dot to each of the cells it’s pointing to.

Still going clockwise, we have another placement here. And again, we add dots to all the numbers the arrow is pointing to.

And lastly for now, we can put in this vertical arrow.
So where next? We’ve used up all of the known placements, so how can we eliminate any more? We’re going to have to find some constrained numbers – those with limited placement opportunities that can help us out.

We know that numbers on the main diagonals are already more constrained than the other numbers on the board, as they can only have a maximum of six arrows pointing at them, not eight. The largest number on a main diagonal is this 5. It’s already got two arrows pointing to it, so it needs three more. There are four more potentials, but we don’t know which three are the ones we need to use.
Note: Although we don’t know which of those four arrows will be used, we do know that at least one of the ones on the diagonal will have to be used. Had this 5 been deeper in the board and not in a corner, that information could have allowed us to add a dot to all the other numbers on the same diagonal, which may have helped us move forward. In this puzzle, with the 5 being in the corner, it’s no help, but this is an essential technique when working on harder level puzzles.

The next largest number on a main diagonal is this 4. It’s already got one arrow pointing to it. Out of the remaining five possibles, two have been eliminated (highlighted here in yellow). We need three arrows, and lo and behold there are only three places to put them!

We’ll draw them in one at a time, taking care to add dots to our number tallies as we go. First the top one…

…then this bottom one. That’s ‘completed’ two of the numbers in this column. The dot tallies let us see at a glance that the 2 and the 3 both have the requisite number of arrows pointing at them. We’ll draw circles around those numbers to remind us we can’t point any more arrows at them. That will allow us to eliminate more potential arrow positions in a moment, but first…

…we’ll just draw in that last arrow for the 4. Adding the dots confirms the 4 is now complete, so we can circle it.

Now we can use these three newly circled cells to eliminate more arrow positions. The 2 gives us three new eliminations (purple Xs). I haven’t drawn in the one to the left of the row as that arrow is already placed, so we don’t need it.

The completed 3 also eliminates three arrow positions (purple Xs).
We know the 4 doesn’t eliminate anything because we already used up all the remaining positions.

We’re really motoring now. We’ve got lots more arrows we can place. Going around the board clockwise again, we’ll start with this diagonal. That completes the 1 in the corner, which in turn allows us to eliminate an arrow position on the diagonal (purple X).

This next new arrow puts three more dots on the board…

…and this one completes two numbers, which in turn give us two new eliminations.

We can place all three arrows up in this corner. They complete several new numbers, which in turn eliminate further positions (again, the purple Xs).

We know where to place the final three arrows. I’ve added the dot tallies to the numbers, but there’s no need to circle them, we’re all done!
Phew! How did you get on? Did you race ahead and finish before the end of the example? If you want to have a go and try some more, including some harder puzzles, there’s a taster pack to download below.
This was an easy puzzle, but it shows the basic techniques used in solving. Harder puzzles have fewer clue numbers, and require using more advanced logic like partial-elimination when you know the direction of an arrow (horizontal, vertical or diagonal), but not from which side it originates.
Ready to try some puzzles yourself? We’ve put together a sample pack of four grids for you – a couple of easy ones like this example, and a couple that are more challenging. Download the PDF below. Solutions are included so you can check your results.
Click Here To Download The Taster PDF

Ready for even more Arrows? We’ve got you covered!
Puzzle Weekly Presents: Arrows is a collection of 120 puzzles set over seven levels of difficulty. Grab a copy here.
Got a Kobo? We’ve got Arrows puzzles for that too! Arrows for Stylus Devices presents 100 puzzles over five levels, and is designed especially for Kobos with stylus. Find out more here.
Hitori is a logic puzzle that, like Sudoku, uses numbers as symbols but does not involve arithmetic.
In a hurry? Jump to: Rules / Tips / Example / Download Free Puzzles / Hitori Books
The objective is to cross out certain numbers such that each column and row contains no more than one of any given number.
Here’s what a small, simple Hitori puzzle looks like:
Your aim is to cross out, or shade, certain cells according to the following rules:
Here’s what our earlier small example puzzle looks like, once completed:
Hitori puzzles are solved with a combination of elimination and logical deduction. When solving, it helps if we remember we are not only looking for cells that we know must be shaded, but that we can also determine certain cells that must be left unshaded. These can be just as useful to discover as we work our way through the board.
Here are some tips for solving. Below, we’ll put them into practice and work through a complete puzzle from start to finish.
Interestingly, contrary to puzzles like Sudoku, you can’t tell you’ve finished a Hidato puzzle simply by filling in a final missing digit. You have to work out when you’re done by constantly checking if there are any remaining duplicate digits. So it’s always worth double-checking before you declare your puzzle complete and check your result!
Now that we know how to attack Hitori puzzles, let’s work through an example from start to finish.

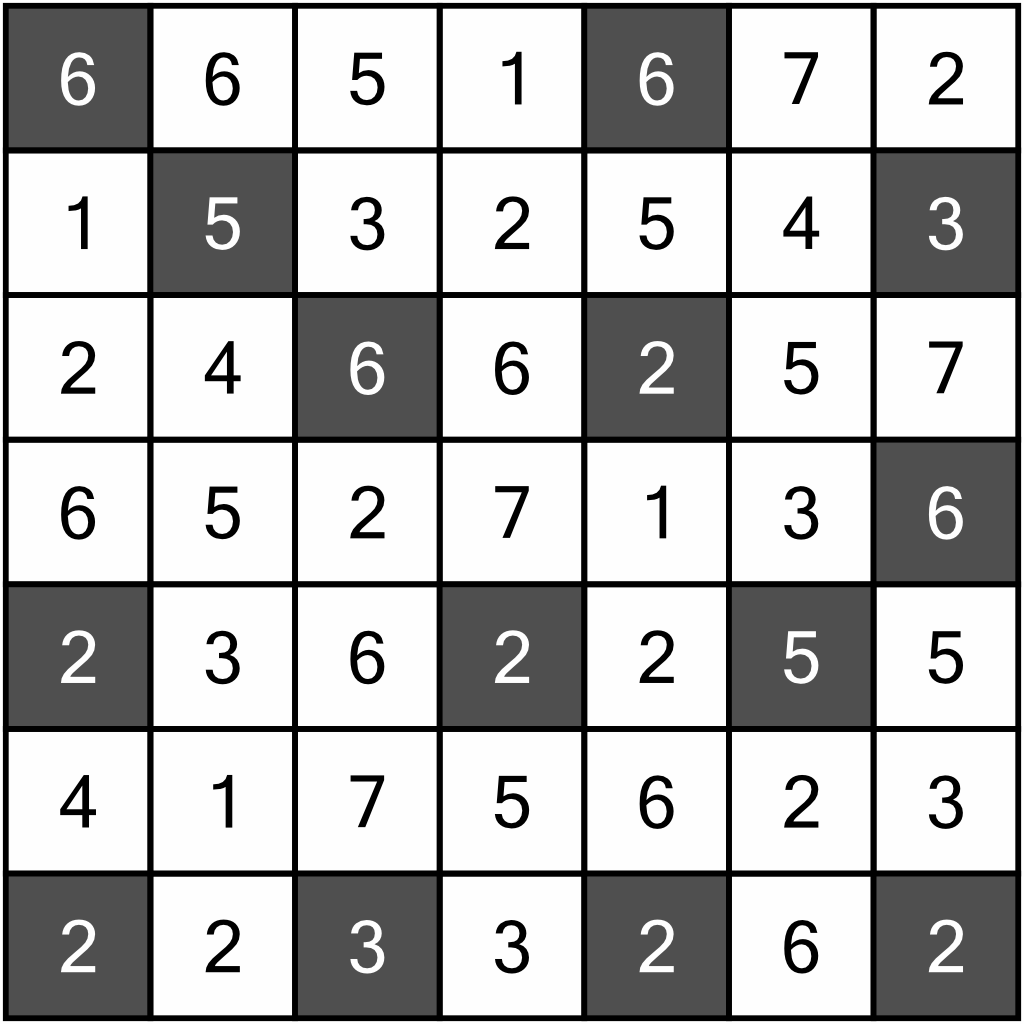
This is the puzzle we are going to solve. It’s a Level 1 puzzle; 7x7, easy to solve but sufficient to demonstrate the common techniques we use.

We’ll begin by looking for the easy patterns. There aren’t any ‘3 in a row’ patterns here, and neither are there any “2+1” patterns. There are quite a few “XYX”s though, which are shown here in yellow for rows and green for columns. We know that in each of these cases, we can circle the middle digit – it must be kept, because we know we’ll have to eliminate (shade) at least one digit immediately adjacent to it. We don’t know which will be shaded (and indeed it could be both), but it doesn’t matter, at least one will be and as we cannot have two shaded cells next to each other, the middle cell can’t be shaded so must be circled.

Now we can look along each row with circled digits, and see if there are duplicates of those digits. If there are, they can be eliminated. In row 2 we are looking for any other 5s and 2s. There is a 5, so we will be able to eliminate it.
Row 6 also has a duplicate 5 that we can take out.

We’ll do the same for the columns. In column 3, there’s a duplicate 5, so that can be shaded in.

As we know that we can never have two shaded squares orthogonally adjacent, we can circle the digits immediately above, below, to the left, and to the right of those we have shaded in. They must be kept. We’ve circled these here in orange.

With eleven new circles on the board, we can go back through the rows and columns looking for duplicates we will be able to remove. For example, in column 2 we’ve a newly circled 6, so we can eliminate the duplicate 6 right at the top. Between all the rows and columns, that lets us eliminate ten new cells (shown here in yellow).

Now we repeat our earlier check, circling the cells above, below, and to the left and right of the newly eliminated ones. That gives us lots of new circles (shown here in orange)…

…and of course, we can use those to further eliminate doubles in the rows and columns. In fact, despite all those nice new orange circles, we can only eliminate one new cell – the 4 right in the middle.

That 4 lets us circle the 4 immediately to its right.
We’ve reached a dead-end with the rippling of these eliminations; the four newly circled in orange don’t let us eliminate anything new, so where next? Let’s take stock of the board…remember, we only know that we’ve completed the puzzle once we are sure there are no duplicate numbers in any rows and columns.

In fact, there are no more duplicates in any row or column, so we’ve completed the puzzle. I said it was an easy one!
Of course, being a Level 1 puzzle, that was pretty simple to solve. Everything rippled out and we could just use basic techniques. As puzzles get harder, you’ll need to take into account the rule about non-shaded cells making a single contiguous unit. Even harder puzzles will require chaining logic to determine which cells to keep and which to eliminate.
Ready to try some puzzles yourself? We’ve put together a sample pack of four grids for you – a couple of easy ones, and a couple that are more challenging. Download the PDF below. Solutions are included so you can check your results.
Click Here To Download The Taster PDF
Ready for even more Hitori? We’ve got you covered!
Puzzle Weekly Presents: Hitori is a collection of 120 puzzles set over seven levels of difficulty. Grab a copy here.
Got a Kobo? We’ve got Hitori puzzles for that too! Hitori for Stylus Devices presents 100 puzzles over five levels, and is designed especially for Kobos with stylus. Find out more here.
This series of three videos covers Killer Sudoku specific solving techniques. The third video works through a puzzle from start to finish. If you prefer learning by reading, we have a comprehensive Killer Sudoku tutorial here.
Killer Sudoku From Scratch – Our written guide to solving this fascinating puzzle.
Killer Sudoku Cheat Sheet – Is it cheating? Only you can decide.
Killer Sudoku Calculator – An interactive alternative to the Cheat Sheet, and with some special tricks up its sleeve!
The Killer Sudoku Challenge – Think you're good at Killer Sudoku? Prove it! Take the seven-puzzle challenge and see how far you get.
Killer Sudoku Books – More wonderful Killer Sudoku puzzles than you can shake a stick at.
Shikaku is a spatial awareness puzzle that shares some traits with Meadows.
Jump to: Rules / Tips / Worked Example / Video Tutorial / Download Free Puzzles / Books
Here’s what a small puzzle looks like:

The objective of Shikaku is very simple: split the playing area into square or rectangular regions such that each one contains one number, and that number corresponds to the area of the region (in squares). Here’s what the sample puzzle above looks like when it’s been completed:
Shikaku is solved by using spatial constraints and logical deduction. Here are some tips to help you get started, then we’ll work through an example puzzle to put them into practice.
Now let’s put some of those tips into practice and work through a puzzle. There’s only one correct solution to each puzzle, but lots of ways of getting to it. This example is intended to show some solving techniques, and is not necessarily the best or most efficient way of solving this or any other puzzle.

This is the puzzle we’re going to solve. It’s an easy level 1 puzzle – just enough of a challenge to show some solving techniques in action.

There are a couple of places we could start, but the easiest line to draw in is this one between the 12 and 9. No region can contain two numbers, so there has to be a division here. We don’t know where (or if) that line will extend yet, but it gives us something of a starting point.

Let’s turn our attention to this 3. Because it’s on an edge, it’s more constrained than numbers in the middle of the board.
There are three ways we can draw a region of three squares that incorporate this number: we could go upwards (as shown by the orange area), or we could go sideways (blue) or downwards (green). To work out which way to go, we need to look at the neighbouring numbers that will affect the squares nearest the 3.

This 9 and 10 are of most interest. Why? Well, consider the possible scenarios: If we extended our 3 region into either the orange or blue squares, that would leave the green ones empty. Every square must be part of a numbered region when the puzzle is complete, so those green squares would have to join another region. The trouble is that neither the 9 region or the 10 region (the two closest) could be drawn in such a way as to include those green squares.
Therefore, our 3 region must extend into the green squares, because that’s the only way to incorporate them into any region on the board.

We can use the same logic to work out how to complete our partially drawn region around the 9. Given the 3 to the left, the 12 above, and the 10 to the right, we either have to draw around the orange region or the blue one. If we draw around the blue one, that’s going to leave three orphaned squares between the 9 region and the 3 region – squares that cannot be incorporated into any other region.
Therefore, we have to draw around the orange region for the 9.

If we turn our attention to the two 10s, there’s only one way to draw a region around the bottom one because of the constraints imposed by the top 10 and the 20 higher up. We’ll draw that in next.

Now let’s look at the 5. It’s an odd number, and as it’s not divisible by three, it means we have to draw its region as a straight line. That limits the placement options considerably. We can either draw it vertically (the orange or blue regions), or horizontally (the yellow region, which could extend in either direction).
The answer, once again, comes from working out how we would fill any remaining squares. If we went with the yellow region, or the blue one, we’d be leaving a single empty square above the 5. That square could not be used by the top 12 (because the board is only 9 squares wide), and neither could it be used by the 20 (because regions must be rectangular or square, they cannot be odd shapes that poke out to fill holes!)
So our only option here is to incorporate that top square into the 5, which means we have to draw around the orange region.

These two 12s are now easy to work out. They have twenty-four squares between them, so we just have to divide them in two. There’s no other way to draw two regions of twelve in this area.

That leaves us with the 10 and the 20, and it should be pretty easy to work out how to divide those.

There, all done! As I said at the start, this was an easy puzzle. But don’t worry, they get a lot more complicated than that. Ready to try some yourself? Read on for some free puzzles to download, and details of where you can get more.
We’ve put together a taster of four puzzles for you, including the example above. You can download and print the PDF below. Solutions are included, just in case you get stuck.

Need more Shikaku in your life? We completely understand! We've got 120 brand new puzzles spread over seven levels of difficulty, ready and waiting for you. Find out more about Puzzle Weekly Presents: Shikaku, and order your copy, here.
We also include Shikaku puzzles in Puzzle Weekly from time to time. Puzzle Weekly is our free weekly magazine – find out more here.
Skyscrapers is a spatial-awareness puzzle that’s about thinking in three dimensions.
In a hurry? Jump to: Rules / Tips / Worked Example / Video Tutorial / Download Puzzles / Books
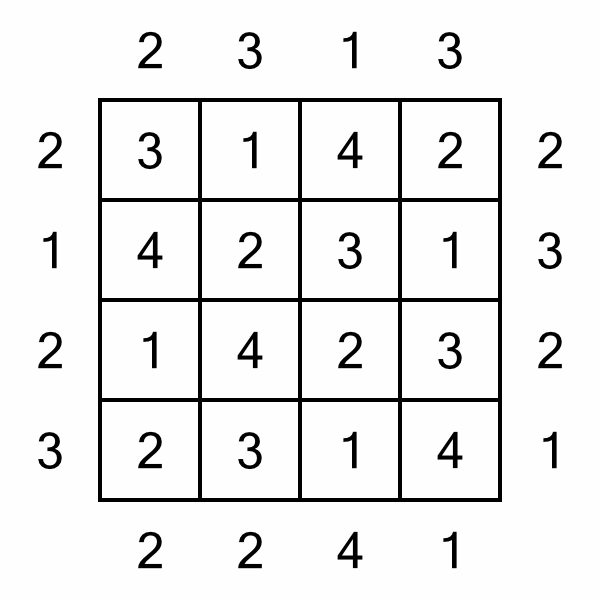
The objective is to fill the grid with numbers. Each square on the grid represents a building, and the number you write in a given square corresponds to the number of floors in that building. Here’s an example of a small Skyscrapers puzzle:

The rules of Skyscrapers are as follows:
Here’s the example puzzle from above, once it’s been solved:

To make things a little easier to understand, this is what the same puzzle would look like if projected into three dimensions, as viewed from above.
If you were standing to the left of the puzzle, it would look like this.


And if you were standing at the bottom of the puzzle, it would look like this.
Solving these puzzles requires thinking three dimensionally – or at least mathematically. It’s about elimination and forced placement. Here are some tips to help you get started, then we’ll work through a puzzle from start to finish.
Now we’ll work through a puzzle from start to finish and put some of those tips into practice. There’s only ever one correct solution to each puzzle, but there’s lots of ways of reaching it. This example is not intended to show the best way, or fastest way, of solving the puzzle. It’s just one possible path that could be taken, and demonstrates some solving techniques at work.

This is the puzzle we are going to solve. It’s a Level 1 puzzle. It’s small, and all the clue numbers are present, making it quite easy to solve. Being a 5x5 puzzle, we’ll be trying to put the numbers 1–5 in each row and column.

We’ve got some easy squares to fill in to start us off; those at the start of rows and columns labelled with a 1 must contain the number 5. It’s the only way to ensure no other building can be seen.

We’ve got another really easy win here in the bottom row. As it’s labelled with a 5 on the right, we have to fill the numbers from 1 to 5 in order, from right to left. It’s the only way to see all five buildings from that position.

Now let’s have a look at this column. We’ve got a clue number of 2 at the top, and we’ve already got a 5 in the bottom of the column. There’s nothing we can put ahead of that 5 to prevent it from being seen from the top. Therefore whatever goes at the top of the column has to be tall enough to prevent the remaining buildings from being seen. In other words, we have to put the 4 there. Anything else would mean we could see at least three buildings from that position.

Next we’ll have a look at the end column (yellow). At first glance, it might look like the missing numbers (2, 3 and 4) could be placed into the three empty squares in any order. However, on closer inspection we can see that’s not the case.
If we take the biggest number (because it’s likely to have the most constraints), the 4, we can see that it cannot go in square A, because that would mean whatever went in square B could not be seen from the bottom of the grid, therefore we wouldn’t reach our target of 4. It could go in square B. What about square C? It cannot go there because there’s already a 4 on that (green) row. So B is the only square into which we can put the 4 in that column.

Let’s try to finish this end column, because there are only two numbers left to place, which means there are only two possible ways of completing it. Either:
A = 2, B = 3
or
A = 3, B = 2
Either way would fulfil the requirements of the clue numbers at the top and bottom of the column. But what about the clue number of 3 at the top right? If we put our 3 in square B, it would become impossible to complete the top row correctly – it would block whatever went to the left of it (a 1 or a 2). So we have to put the 2 in square B, leaving the 3 to go in square A.

We can complete this top row, because there’s only one possible way to fill in the two missing numbers such that they fulfil the clue number of 3 on the right…

…like this.
Let’s look at this yellow column to see another way of working out where to place a number.
We know we need to put a 3 somewhere in the column, and it can’t go in the intersection with the green row because of the 3 already in that row. So we’re limited to two possible squares: A and B. If we put the 3 into square A, it would become impossible to complete that row in a way that respects the left-hand clue number of 2. So the 3 must go into square B.

Now that we’ve got four 3s on the board, it’s easy to work out where the fifth and final one goes. It has to go in the intersection of the only row without a 3 and the only column without a 3.

This is another easy sequence to figure out. We’re missing a 1, 2, 4 and 5. We need to be able to see four buildings from the left-hand side. The only possible way to fit those missing numbers in, in a way that meets the criteria, is to put them in order…

…like this.
Now these two columns are only missing one number each, so they are ‘no-brainers’ to complete.

There are a couple of ways we could work out the last few squares, but let’s keep it simple. We’ve got four 2s on the board, so the only place to put the fifth and final one is the intersection of the only row and column without a 2.

That leaves a single number to complete here…

…which in turn leaves these two rows each with a single square to fill in. Easy!

That’s it, all done. How did you get on? Did you race ahead and complete the puzzle before finishing this tutorial? Don’t worry – we’ve got some much harder ones to keep your brain busy! Read on to find out how to get more…
We’ve put together a taster of four puzzles for you, including the example above. You can download and print the PDF below. Solutions are included, just in case you get stuck.
Download Our Skyscrapers Taster

Ready for some serious sky scraping fun? We have you covered! Puzzle Weekly Presents: Skyscrapers is a collection of 120 brilliant puzzles spread over seven levels of difficulty. With one puzzle per page, there's plenty of space for notes and doodles.
We include seven levels of Skyscrapers puzzles in Puzzle Weekly from time to time. Puzzle Weekly is our free weekly magazine – find out more, and get your copy, here.