Skyscrapers is a spatial-awareness puzzle that’s about thinking in three dimensions.
In a hurry? Jump to: Rules / Tips / Worked Example / Video Tutorial / Download Puzzles / Books
The objective is to fill the grid with numbers. Each square on the grid represents a building, and the number you write in a given square corresponds to the number of floors in that building. Here’s an example of a small Skyscrapers puzzle:
The rules of Skyscrapers are as follows:
Here’s the example puzzle from above, once it’s been solved:
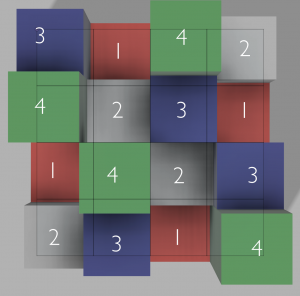
To make things a little easier to understand, this is what the same puzzle would look like if projected into three dimensions, as viewed from above.
If you were standing to the left of the puzzle, it would look like this.
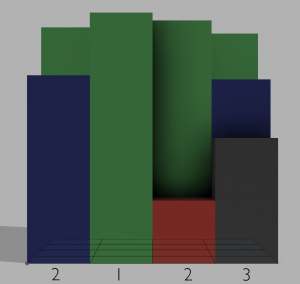
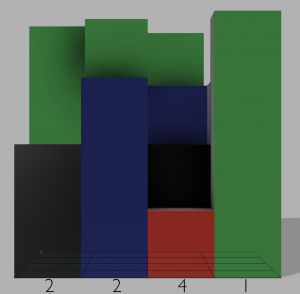
And if you were standing at the bottom of the puzzle, it would look like this.
Solving these puzzles requires thinking three dimensionally – or at least mathematically. It’s about elimination and forced placement. Here are some tips to help you get started, then we’ll work through a puzzle from start to finish.
Now we’ll work through a puzzle from start to finish and put some of those tips into practice. There’s only ever one correct solution to each puzzle, but there’s lots of ways of reaching it. This example is not intended to show the best way, or fastest way, of solving the puzzle. It’s just one possible path that could be taken, and demonstrates some solving techniques at work.
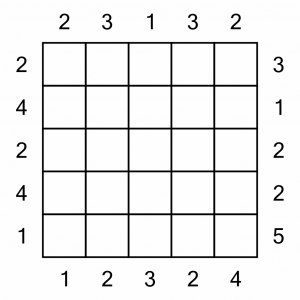
This is the puzzle we are going to solve. It’s a Level 1 puzzle. It’s small, and all the clue numbers are present, making it quite easy to solve. Being a 5x5 puzzle, we’ll be trying to put the numbers 1–5 in each row and column.
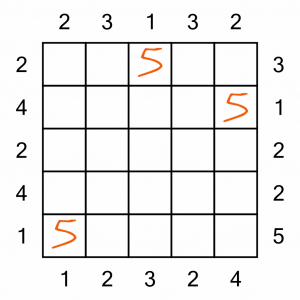
We’ve got some easy squares to fill in to start us off; those at the start of rows and columns labelled with a 1 must contain the number 5. It’s the only way to ensure no other building can be seen.
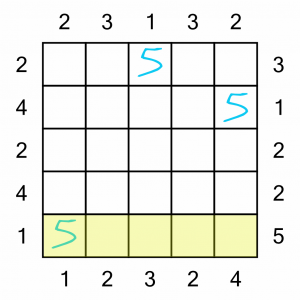
We’ve got another really easy win here in the bottom row. As it’s labelled with a 5 on the right, we have to fill the numbers from 1 to 5 in order, from right to left. It’s the only way to see all five buildings from that position.
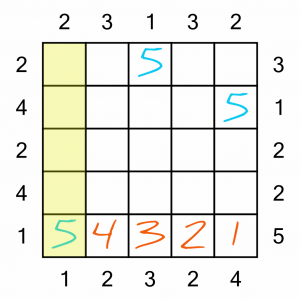
Now let’s have a look at this column. We’ve got a clue number of 2 at the top, and we’ve already got a 5 in the bottom of the column. There’s nothing we can put ahead of that 5 to prevent it from being seen from the top. Therefore whatever goes at the top of the column has to be tall enough to prevent the remaining buildings from being seen. In other words, we have to put the 4 there. Anything else would mean we could see at least three buildings from that position.
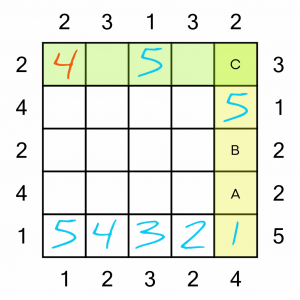
Next we’ll have a look at the end column (yellow). At first glance, it might look like the missing numbers (2, 3 and 4) could be placed into the three empty squares in any order. However, on closer inspection we can see that’s not the case.
If we take the biggest number (because it’s likely to have the most constraints), the 4, we can see that it cannot go in square A, because that would mean whatever went in square B could not be seen from the bottom of the grid, therefore we wouldn’t reach our target of 4. It could go in square B. What about square C? It cannot go there because there’s already a 4 on that (green) row. So B is the only square into which we can put the 4 in that column.
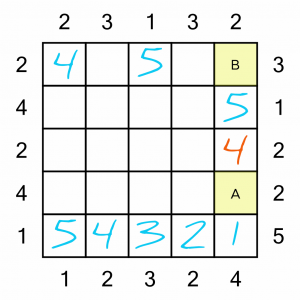
Let’s try to finish this end column, because there are only two numbers left to place, which means there are only two possible ways of completing it. Either:
A = 2, B = 3
or
A = 3, B = 2
Either way would fulfil the requirements of the clue numbers at the top and bottom of the column. But what about the clue number of 3 at the top right? If we put our 3 in square B, it would become impossible to complete the top row correctly – it would block whatever went to the left of it (a 1 or a 2). So we have to put the 2 in square B, leaving the 3 to go in square A.
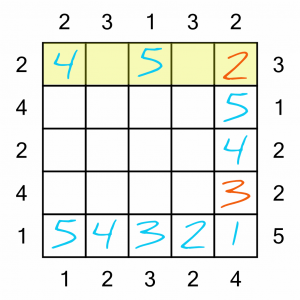
We can complete this top row, because there’s only one possible way to fill in the two missing numbers such that they fulfil the clue number of 3 on the right…
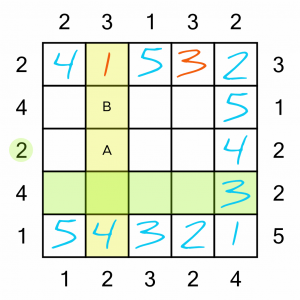
…like this.
Let’s look at this yellow column to see another way of working out where to place a number.
We know we need to put a 3 somewhere in the column, and it can’t go in the intersection with the green row because of the 3 already in that row. So we’re limited to two possible squares: A and B. If we put the 3 into square A, it would become impossible to complete that row in a way that respects the left-hand clue number of 2. So the 3 must go into square B.
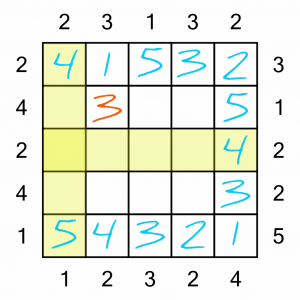
Now that we’ve got four 3s on the board, it’s easy to work out where the fifth and final one goes. It has to go in the intersection of the only row without a 3 and the only column without a 3.
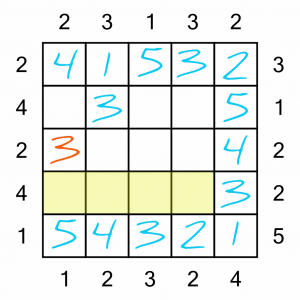
This is another easy sequence to figure out. We’re missing a 1, 2, 4 and 5. We need to be able to see four buildings from the left-hand side. The only possible way to fit those missing numbers in, in a way that meets the criteria, is to put them in order…
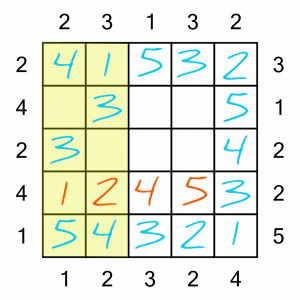
…like this.
Now these two columns are only missing one number each, so they are ‘no-brainers’ to complete.
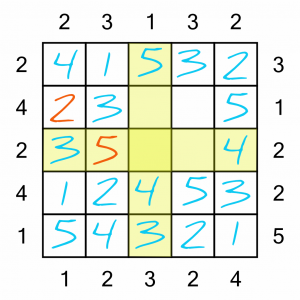
There are a couple of ways we could work out the last few squares, but let’s keep it simple. We’ve got four 2s on the board, so the only place to put the fifth and final one is the intersection of the only row and column without a 2.
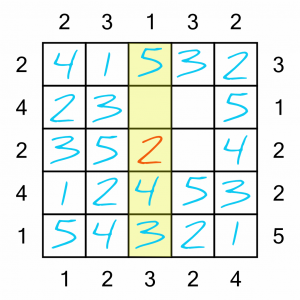
That leaves a single number to complete here…
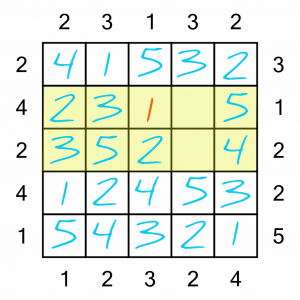
…which in turn leaves these two rows each with a single square to fill in. Easy!
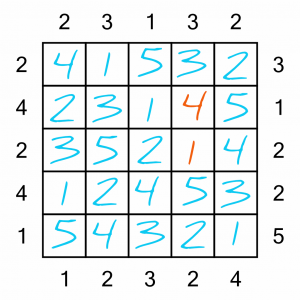
That’s it, all done. How did you get on? Did you race ahead and complete the puzzle before finishing this tutorial? Don’t worry – we’ve got some much harder ones to keep your brain busy! Read on to find out how to get more…
We’ve put together a taster of four puzzles for you, including the example above. You can download and print the PDF below. Solutions are included, just in case you get stuck.
Download Our Skyscrapers Taster
Ready for some serious sky scraping fun? We have you covered! Puzzle Weekly Presents: Skyscrapers is a collection of 120 brilliant puzzles spread over seven levels of difficulty. With one puzzle per page, there's plenty of space for notes and doodles.
We include seven levels of Skyscrapers puzzles in Puzzle Weekly from time to time. Puzzle Weekly is our free weekly magazine – find out more, and get your copy, here.