Yakazu is a logic puzzle in the same vein as Sudoku. The rules are simpler, but don’t let that fool you into thinking the puzzle is too! Harder level puzzles require some extended logical reasoning to complete.
In a hurry? Jump to: Rules / Tips / Worked Example / Video Tutorial / Download Free Puzzles / Books
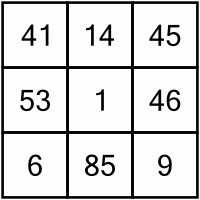
Here’s an example of a small Yakazu puzzle:

The aim of the puzzle is to complete the grid such that every region of consecutive cells contains the numbers 1 to x, where x is the size of the region. So a run of cells that’s four cells wide must contain the numbers 1, 2, 3, and 4. Numbers can be in any order. Sounds simple, right?
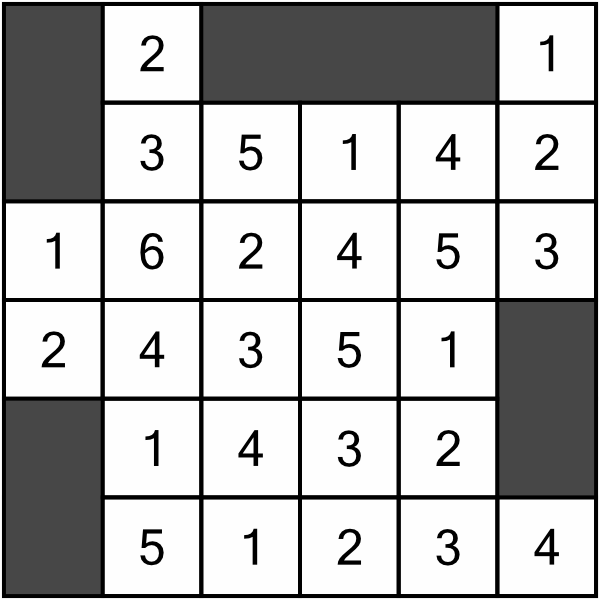
Here’s what our small example puzzle looks like once it’s been solved:
Solving these puzzles requires a combination of elimination and logical reasoning. Here are some tips to help you get started, then we’ll work through an example puzzle.
We’re going to work through an example puzzle from beginning to end. Whilst every puzzle only has a single valid solution, there are lots of ways of reaching that solution. So please do bear in mind that this in not the way to solve this puzzle, just one possible way to solve it.

This is the puzzle we are going to solve. It’s a Level 1 puzzle, an easy 6x6 grid, which will provide an overview of the basic techniques for approaching Yakazu.

We’ll begin with the easiest of easy wins. There are a couple of two-cell regions we can fill in without a second thought (both of them taking a 2). We’ve also got a three-cell region missing just the 1. That cell also happens to complete a row.

We can fill in this three-cell region. The middle cell cannot contain the 3 because it’s in a column that already has a 3. So the 3 has to go in the last cell, leaving the middle cell for the 1.

Column three is now easy to fill in. The 1 cannot go in the bottom cell because that’s in a row that already has one, so we put it in the top. That leaves the bottom cell for the 2.

Let’s look at another technique. Consider the row highlighted in yellow; it is missing a 3, 4, and a 5. Ignoring any other way of working out what goes where (because we’re demonstrating a method!), we can focus on the 5. There’s only one place in the row it can go, and we can work it out by looking at the three intersecting columns, which happen to correspond to the three available empty cells.
Looking from right to left: the orange column is four cells high, so cannot take a 5. The blue column is three cells high, so also cannot possibly have a 5 in it. That leaves the green column, which is six cells high, and therefore can take the 5. Indeed it’s the only cell in that row which can do so…

…and so we can write it in. Where next?
Well, the blue column should be easy enough to fill in, based on the two rows that cross it.

The bottom cell can only be a 3 (because it’s in a row that already has a 1 and a 2), and the 2 can only go in the middle cell, leaving the top cell as having to be the 1.
Now we can complete the third row down, because there’s only one free cell…

Putting a 4 in that last free cell means there’s only one place to put the 3 in the intersecting column, and that in turn leaves just the 4 for the top row. This can happen a lot in Yakazu – filling in one cell can lead to a chain-reaction, which is why it’s always worth checking for consequences when you complete a cell.
There are only three cells left to fill in, and they are simple to work out.

It doesn’t really matter whether you look at the six-cell row first or the six-cell column first, their intersections mean there’s only one way to complete them.
All done! Of course, that was the easiest level…the puzzles can get much tougher than this, requiring some deeper logical thinking. Ready to have a go yourself? Read on…
We’ve put together a taster of four puzzles for you, including the example above. You can download and print the PDF below. Solutions are included, but no cheating!

Finished the taster and want more great Yakazu puzzles? No problem! Get 120 carefully crafted puzzles set over seven levels in Puzzle Weekly Presents: Yakazu– it's great value!
We also include Yakazu in Puzzle Weekly from time to time. Puzzle Weekly is our free weekly puzzle magazine – find out more, and get your copy, here.
Aquarium (sometimes also called Water Fun) is a spatial awareness logic puzzle. It shares some similarities with Thermometers, but make no mistake, this puzzle is its own thing with some unique challenges.
In a hurry? Jump to: Rules / Tips / Worked Example / Video Tutorial / Free Puzzle Downloads / Books
Here’s what a small example puzzle looks like:
The aim of the puzzle is to fill the aquariums (regions delimited by bold lines) such that the number of filled cells matches the clue numbers shown outside the grid. Water always finds its level, so the water level in connected regions must match.
Here’s what our small example puzzle looks like once it’s been solved:
Solving Aquarium puzzles is, much like Thermometers, about exclusion and forced placement. Here are some tips to help you get started, and then we’ll work through an example puzzle from start to finish.
Now you know how Aquarium works, we can put it into practice and work through a full size puzzle. There is rarely a single path to solving a given puzzle, so this is not the only way to solve this one, only a single possible way to do so. Indeed, I’m going to deliberately bypass some obvious steps in order to demonstrate some techniques.

This is the grid we are going to work through. It’s a Level 1 puzzle which is easy enough to solve but should give you a grasp of the basics. There are lots of places to begin, but we’ll start with the easiest of all, which is probably the two rows labelled with the clue number of 2.

Both of those ‘2’ rows have horizontal sections of aquarium that are considerably larger than two cells, therefore they cannot be filled. We can mark them with Xs to exclude them.
By implication, we can also exclude the cell highlighted in yellow – there’s no way that could contain water if those below it are empty.
Now we know how to complete the top row of the puzzle…

…as there are only two cells remaining. That completes the row, so we strike out the clue number.
Of course, that cell in the top right corner can’t be filled on its own – the water cannot simply float there! We have to fill the rest of the aquarium beneath it....

...like so.
Moving on, we know we can fill all the other empty cells in the ‘8’ row.

That’s completed the row. And because we had to back-fill the aquarium at the far left, it’s also meant we’ve completed the ‘2’ row beneath it.
Where next? We have a few options, but let’s go and exclude some more cells.

Excluding the two yellow areas for the two ‘3’ rows (because they are wider than three cells) lets us knock out a whole load of other cells by implication.
That’s going to let us complete some more rows…

…specifically, the two ‘4’ rows in the middle.
Now, let’s have a look at the ‘6’ row.

Although we don’t know all the cells that need to be populated to complete that row, we do know that the 2-cell region must be filled. There’s no way to complete that row without filling it. So we can fill it, which incidentally lets us strike off the end column as being complete. That means we can also put an X in the bottom-right cell.

That lets us complete the bottom ‘8’ row, which in turn means we complete the first column (and can strike out the two remaining cells in it). We can also strike out the ‘3’ column as complete.
Finishing the puzzle now is easy, as it’s just a case of filling in the last few cells to meet the column and row targets.

And that’s it – all done. Ready to have a go yourself? Read on!
We’ve put together a taster of four puzzles for you, including the example above. You can download and print the PDF below. Solutions are included, but no cheating!

Finished the taster and want more Aquarium in your life? No problem! Get 120 carefully crafted puzzles set over seven levels in Puzzle Weekly Presents: Aquarium – it's great value!
Prefer an instant dose of Aquarium fun? Check out Puzzle Express Volume #6. It contains 70 unique puzzles in our special dual-format, with sections for both printing and solving on screen. You can download it in seconds...
We also include Aquarium in Puzzle Weekly from time to time. Puzzle Weekly is our free weekly puzzle magazine – find out more, and get your copy, here.
Snake (sometimes also called Tunnel) is a spatial awareness path-finding logic puzzle. The aim is to connect the snake’s head with its tail by filling in grid cells following certain rules.
In a hurry? Jump to: Rules / Tips / Worked Example / Video Tutorial / Download Free Puzzles / Books
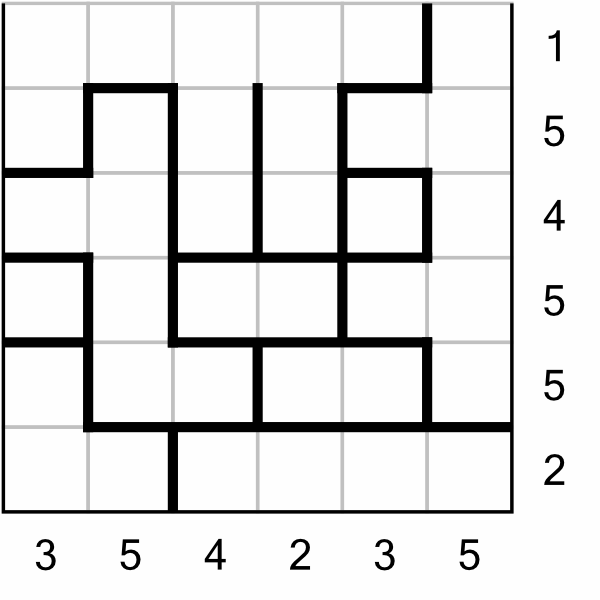
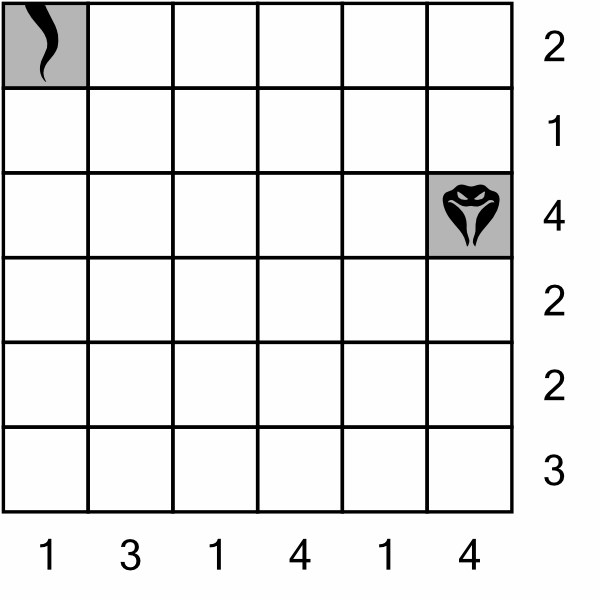
Here’s what a very easy Snake puzzle looks like:
The rules of Snake are easy to remember:
In easier level puzzles, every row and column is labelled. As the difficulty ramps up, some rows and columns are blank, making it harder to determine the snake’s path.
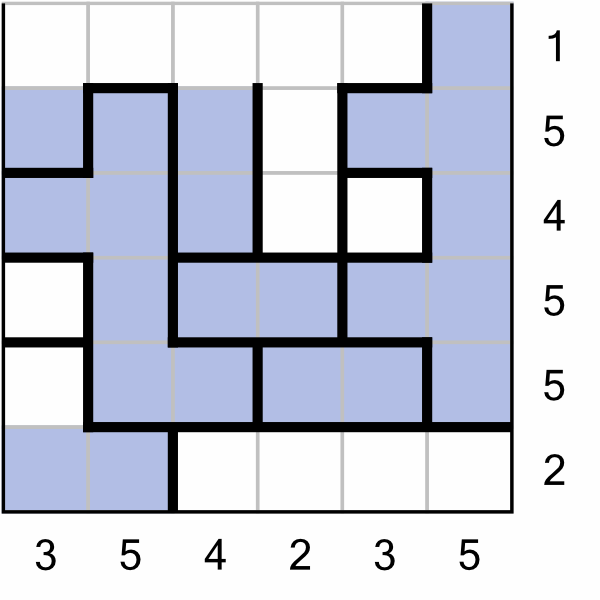
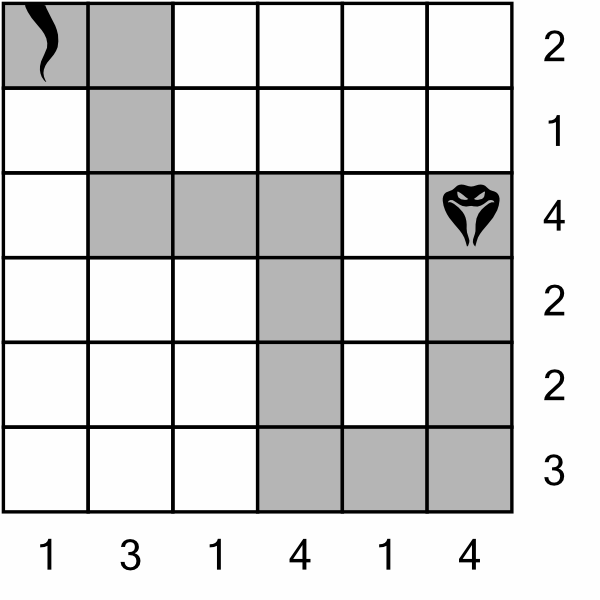
Here’s what our earlier example puzzle looks like once solved:
Solving these puzzles requires a combination of elimination and forced placement based on logical deduction. There is no single ‘correct’ way to solve a Snake puzzle, rather, you need to have a variety of techniques available to you.
Although the goal is to connect the snake’s head to its tail, there is no particular need to start at either the head or the tail; sometimes it makes more sense to start somewhere in the middle, solving different sections at a time until eventually they all link up.
Here are some tips to help you tackle Snake puzzles, then we’ll look at a worked example below.
We will work through a sample puzzle from beginning to end. As with all examples, remember that there’s no single path to the solution. This is just one way to get to the end.

This is the Snake puzzle we are going to solve. At 8x8, and with every row and column labelled, it’s quite easy.

There are no extreme values on this 8x8 grid (no rows or columns labelled with a 0 or an 8).
We do however, have a ‘1’ row and a ‘1’ column. Because these are one-way crossings, it’s useful to highlight them. Once the snake’s body crosses each of these, there’s no turning back.
This allows us to immediately cross off three cells. The two to the right of the tail cannot be used, because it takes three cells to cross a ‘1’ column, and that would violate the 2 for that row. We can also eliminate the cell to the left of the head, for the same reason. That means the body extends from the head either up or down. Either way will allow us to fulfil the 2 clue for the column containing the head. Which way to go?

We have to go down. Why? Because the row above the head requires three cells to be filled in. Crossing the ‘1’ column would use our full complement. We would have to get back down to the bottom row to fill in the six cells that must be filled there, and that would violate the ‘2’ row, and the ‘3’ row on our way back. The only way to fill in the ‘6’ row is to go there directly from the head.
Once on the bottom row, we know we fill three cells to cross the one-way ‘1’ column. In fact, we can also deduce that we must place all six required cells in that row because there’s no valid way to leave the row and return. In other words, we couldn’t go across three cells, up a couple, across again, and back down, because that would violate the rows above.
This one move has completed a row and two columns for us. Where do we move next?

We know we have to move up the ‘7’ column, because we’ve filled the ‘6’ row. Going up one cell completes the ‘2’ row (with the head), so we must go up another cell – there’s no choice.

Now we do have a choice though. Because we have a one-way barrier ahead of us (the highlighted ‘1’ row), we know we must complete the ‘3’ row before moving upwards. So do we go left or right?
The one-way barrier means that once we turn upwards, we will have to continue for at least another two cells. Going right would violate the rules in two ways. Firstly, we would be filling three cells in a ‘2’ column. Secondly, we would end up touching the snake’s tail (diagonally). As the snake cannot touch itself, this would be an invalid move.
So we have to go left…

…then we have to cross our one-way barrier row by going up three cells, completing another column.
We can’t go up any more, so we have to go right…

…and then upwards, because we’ve completed the three cells allowed in this row, and also because we have to complete our ‘7’ column. We’ve knocked off quite a few rows and columns now.
It’s a clear run to the end. We have to fill four cells in the top row, and there’s only one way to do that…

…which means we can drop down to the tail, completing the puzzle. Easy! Ready to have a go yourself? Read on!
We’ve put together a taster of four puzzles for you to try out, including the example above. You can download and print the PDF below. Solutions are included, but no cheating!
Finished the taster and want more Snake in your life? No problem! Get 120 carefully crafted puzzles set over seven levels in Puzzle Weekly Presents: Snake – it's great value!
We publish Snake puzzles in Puzzle Weekly from time to time. Puzzle Weekly is our free weekly puzzle magazine – find out more, and get your copy, here
Pipelink is a spatial awareness puzzle from Japan. There are no numbers, there’s no complex mathematics, and no fancy formulas. The objective is very simple: to link all the cells in the grid with a single, continuous pipeline.
In a hurry? Jump to: Rules / Tips / Worked Example / Video Tutorial / Download Free Puzzles / Books
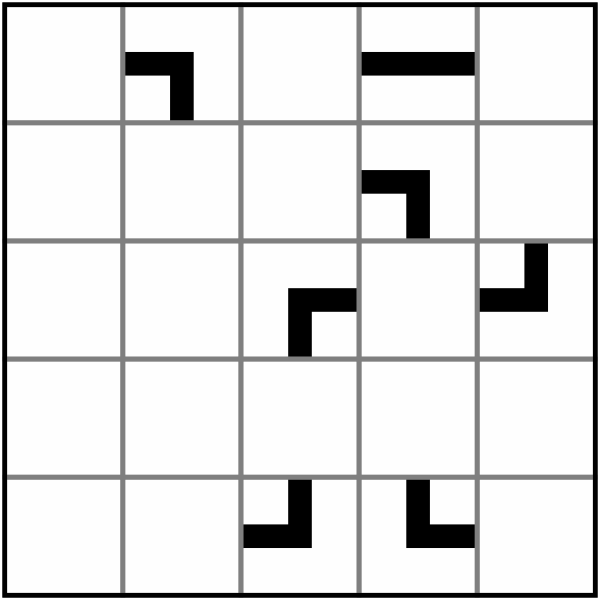
Here’s what a very easy Pipelink puzzle looks like:
The rules are straightforward:
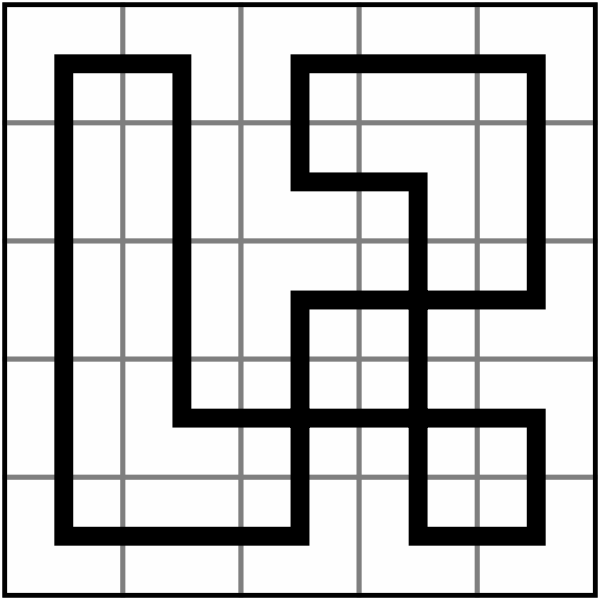
Here’s what our earlier example puzzle looks like once solved:
These puzzles are solved through logical deduction and spatial reasoning. We begin with what we know — the given pipe segments – and using that knowledge we work out where we can and cannot extend them. As we grow the pipeline a segment at a time, we slowly reduce the options for where subsequent segments can be placed.
Here are some tips to help you get started.
We will work through a sample puzzle from beginning to end. As with most puzzles, remember that there’s no single way to solve it. The larger the puzzle, the more possible paths to reach the final solution.

This is the puzzle we will be working on. It’s an easy grid, but sufficient to demonstrate the techniques used to solve Pipelink puzzles.

We can begin by marking out routes we know the pipe cannot take. This will be helpful later when we come to start extending it. Because we cannot add to the given segments, we know our pipe can’t go anywhere we’ve marked with a red cross.

Next we can extend all the given segments into the middle of the adjoining cells. Doing so has connected some sections of the pipeline together – we’re making progress already!

We can continue extending the pipe. The segments in the highlighted cells can only be extended in a single direction…

…so we can extend those.
Where next? Let’s examine the grid further…

The two highlighted cells have only one possible direction to extend. We have to extend them both downwards.

But this leaves us with a problem. We’ve got two ‘islands’ that are isolated from the rest of the pipeline below. We’ll deal with the smaller one first. If we are to connect it to the rest of the pipeline, we can only do so from the highlighted cell. There’s simply no other option. Do we go down, or to the left? The answer, of course, is both! We cannot have a cell with three segments entering/exiting, it’s either two or four (because either the pipeline traverses the cell, or it crosses itself within the cell). So we can draw those extensions in now.

That’s connected the top right-hand island, but it’s given us a two new problems – the highlighted cells are invalid because they have three entries/exits. Of course, these aren’t really problems, they’re opportunities, because we know we have to add a fourth segment to both of them. They must be crossings.

We’re almost done. We just have one gap, and it’s an easy one to connect up…

…which completes the puzzle. It’s fairly easy to see that this solution is valid just by looking. With larger puzzles, it can be harder to be sure your solution is valid. To check a solution, it can be worth tracing the entire pipeline with a different colour to make sure you can cover off the whole thing, and every cell, without lifting the pencil or stylus.
Ready to have a go yourself? We’ve put together a taster of four puzzles for you, including the example above. You can download and print the PDF below. Solutions are included, but no cheating!

Want to get properly stuck into some Pipelink puzzles? We have just the book for you! Puzzle Weekly Presents: Pipelink is a collection of 120 brand new challenges spread over seven levels of difficulty. With one puzzle per page, there's plenty of space for experimentation and notes. And of course, all the solutions are included as well, to make checking your own a breeze. Find out more here.
We publish Pipelink puzzles in Puzzle Weekly from time to time. Puzzle Weekly is our free weekly puzzle magazine – find out more, and get your copy, here
Binairo, which is sometimes also called Takuzu, is a pure logic puzzle played on a variable sized grid. Using just 1s and 0s, it might be quick to learn but it can be a real challenge to solve!
In a hurry? Jump to: Rules / Tips / Worked Example / Video Tutorial / Download Free Puzzles / Books
Here’s a small example puzzle:
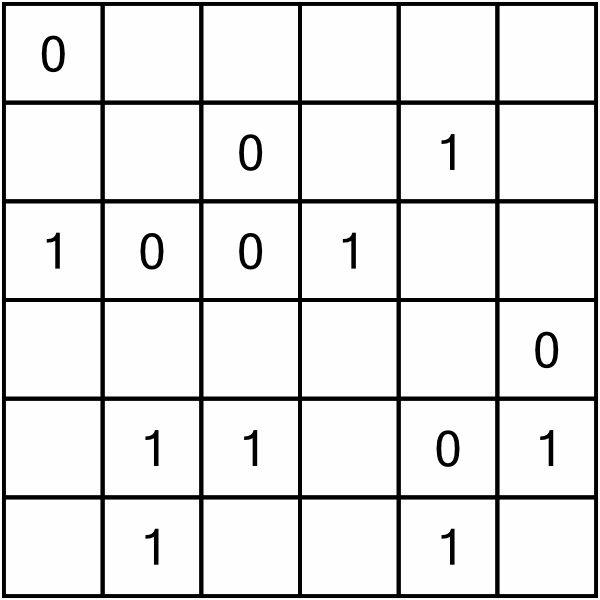
The goal is to fill the grid with 1s and 0s, following certain rules.
There are only three rules to remember:
Here is what the example puzzle looks like once completed:
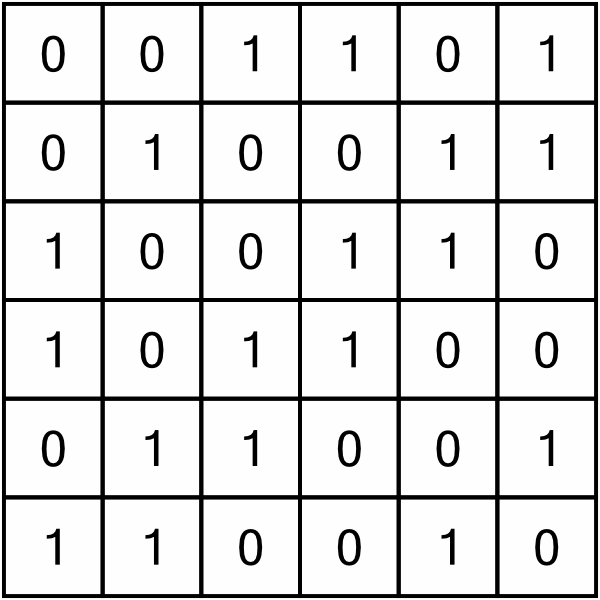
Every puzzle has a single valid solution, though of course there may be lots of ways to reach that solution.
Unlike many kinds of logic puzzle, Binairo is not necessarily easier to solve from the outside in; even the corners aren’t helpful. On the contrary, the easiest wins come from clusters of numbers.
Here are some tips on how to approach solving a puzzle. Below, we will work through an example from beginning to end.
As with all puzzles, there’s not a single correct way to solve a Binairo. The example presented here is just one way, and is a demonstration of the general techniques used.

Here is the grid we are going to work through. This is a level 2 puzzle, so though it’s easy to complete, it still presents enough of a challenge to give an overview of the techniques used to solve these puzzles.
We’ll begin by looking for all the easy wins. Remember there are three kinds of easy win. First up, doubles (two adjacent numbers the same).

There are six doubles. We know that the numbers either side of them must be the opposite of the numbers forming the doubles, otherwise we’d be trying to put three numbers in a row, which isn’t allowed. So between them, these doubles allow us to solve seven cells. We’ll put those numbers in now.

Filling those in gave us three new doubles. We’ve also got an almost completed column (another easy win). We can fill in the yellow cell straight away; we know we must have an even number of 0s and 1s in each row and column. That column already has four 0s, but only three 1s. Therefore the yellow cell must be a 1.

Now the top row is almost complete, so we can figure out what the one remaining (yellow) cell must be. We’ve got all the 1s, so it must be a 0.
We can also work out the two remaining cells in the second column must both be 0s, for the same reason.

We’ve used up all the easy doubles for now, so let’s check on another kind of easy win - empty cells with the same number either side. There are two such opportunities available here, so we can fill out those cells.

That’s opened up two new opportunities: there’s a single remaining cell in column three (yellow), and a new double in column five (green). Even without the double, we could complete that column just based on the count of 0s and 1s.

The penultimate row has a new double (which is also a single cell surrounded by two numbers the same).
Row five has a full complement of 1s, so we know the last two cells must both be 0.

We’ve got one more easy win for now (the green highlight). There are a couple more cells we can solve here too.
First, the blue column. It’s already got three 0s, and as this is an 8x8 grid we know we need one more. Although there are three empty cells, there’s only one into which we can place the missing 0 – the bottom cell marked with the blue X. If we put it in either of the others, we’d be making a row of three.
Next, the yellow row. We know that one needs three more zeros. We can’t put all of them in the last three cells, so one of them must go in the cell with the purple X.

Now we’ve got a double and a single cell, although we don’t need them anyway because as there are four 0s already, both remaining cells in that column must be 1s.

Here’s another single we can fill in.

That gives us a row with one empty cell.

Here’s an easy double.

That gives us an almost complete row.

We’re out of doubles, and empty singles. In fact, we’re left with several pairs of cells and no obvious answers as to which way around to fill them.
But we do have a way to move forward. We can use several pieces of logic to solve the blue and green cells. We can combine our knowledge of what numbers we still need to place, along with the fact that no two columns can be the same. The column with the blue cells is shaping up to look a lot like column two. And the column with the green cells is looking like its neighbour to the left so far. These facts limit our placement options.
Let’s consider, for example, the end column. We must place three 0s somewhere. If we put them both in the top two free cells, that would make the two blue cells at the top of column six both 1s. But that would make it impossible to fill in the remaining free cells in rows two and three correctly:

This is wrong! Clearly that cannot be the solution...

In fact, if we work through the options, there’s only one way we can fill in the blue and green cells in such a way that the columns don’t duplicate others, and that allows us to complete the last two cells correctly. And that’s it – we’ve completed the puzzle.
Ready to have a go yourself? We’ve put together a taster of four puzzles for you, including the example above. You can download and print the PDF below. Solutions are included, but no cheating!

Finished the taster and want more Binairo in your life? No problem! Get 120 carefully crafted puzzles set over seven levels in Puzzle Weekly Presents: Binairo – it's great value!
We publish Binairo puzzles in Puzzle Weekly from time to time. Puzzle Weekly is our free weekly puzzle magazine – find out more, and get your copy, here
Thermometers is a logic puzzle played on a square or rectangular grid filled with thermometer shapes. Each thermometer has a base (the bulbous end) and a top. In easy to intermediate level puzzles, thermometers may be placed horizontally and / or vertically. In more difficult levels, the thermometers may be ‘broken’ such that they span more than one column or row.
In a hurry? Jump to: Rules / Tips / Worked Example / Video Tutorial / Free Puzzle Download / Books
The objective of the game is to fill the thermometers sufficiently that the number of cells filled in a row and column of the grid corresponds to the numbers on the outside of the grid.
Here’s a small example Thermometers puzzle:
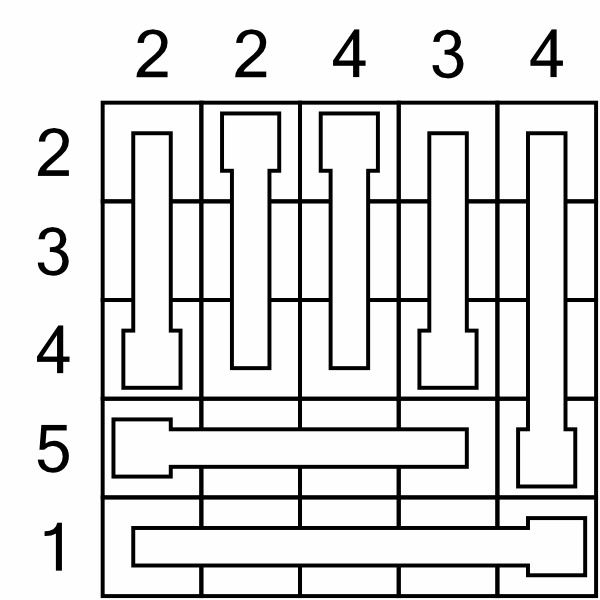
The thermometers are filled (or not) according to the following rules:
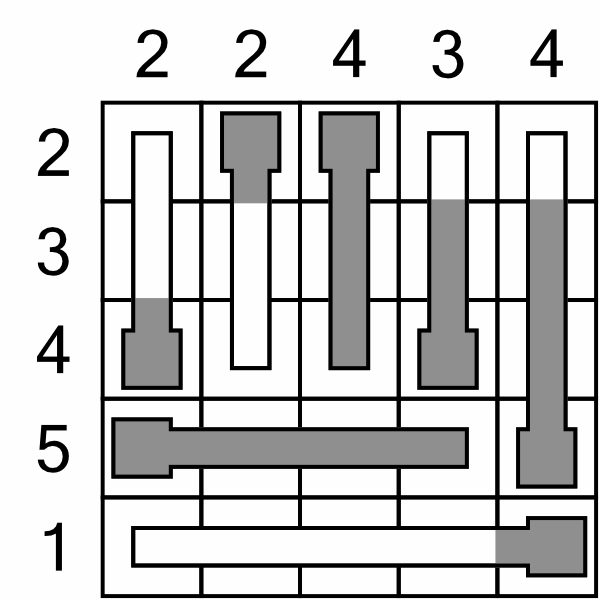
Here is what the example puzzle looks like when it has been solved:
These puzzles are solved through a combination of forced positioning and elimination. Here are some tips to get you started.
We are going to work through a sample puzzle from beginning to end. This is a level 2 puzzle, so easy to complete but a good demonstration of the techniques required. Remember that there’s no single path to a solution; this is just an example of one way to solve this puzzle.

This is the grid we are starting with. As a level 2 it’s fairly small, and the thermometers only run horizontally and vertically. We’ll start off by looking for the easiest fills. Being a 7x7 grid, those 6s look promising.

The final column is an easy win. Out of seven cells, six need to be filled. It’s easy enough to work out the one that cannot be filled – it’s in a row labelled 2, at the end of a thermometer four cells long. Obviously the end two cells of that thermometer can never be filled. To make life easier, we can cross them out. We know all the other cells in the column are filled. We can strike through the 6 at the top of the grid too, so we know we’ve done that column.
Let’s look at the first row, which is also a 6.

Because we’ve already got one cell filled in that row, we have to fill the whole of the other thermometer. We cannot possibly fill the cell in 1-column, because, well, that column can only contain one filled segment and that thermometer is four cells high! In fact, while we are at it, we will strike out the top three cells of that thermometer because we know they can never be filled. That row is done, so we can strike out its label, too.
Now we know how to complete the first column.

We can fill up the first five cells of the thermometer, reaching our target of 6. We strike out the bottom cell as it can’t be used, and strike out the label because that column is complete.
Now we’ve done the easy ones, let’s do some elimination. We’ll see if there’s anything we know we definitely cannot fill.

We can take out four more cells. Now, consider the row highlighted in yellow. We need to fill five cells, and have already filled two. There are four cells remaining. We know we’ll have to fill the bulbs of the two thermometers that start in that row, even if we don’t yet know where the fifth cell will be.

Putting those in completes the 1-column. Striking out the cell at the bottom of that column leaves us only one place to put our second cell in the 2-row (bottom row), so we can fill that in as well. These last placements have more knock-on effects: we can strike out cells in both the 3-columns because they are impossible to reach now.
Where next? Well, that second row (5) is looking promising.

We needed to fill three cells, and there were only three left. We’ve completed that row. We’ve also completed the 3-column, so we can cross out the last two cells in that one.
The cell we filled in the 4-column is useful, because it’s at the top of a thermometer. We must fill the cells below it.

That’s completed the 4-column, so we cross out the remaining cell. That leaves us only one place to fill in the last cell in the 5-row highlighted...

…and because that’s the top of a thermometer (even if it’s upside down), we have to fill the cells below it. That completes a whole bunch of columns and rows! In fact, we only have one cell left to fill in to complete the puzzle…

That last cell completes the remaining 2-row and 3-column. All done!
That was easy, wasn’t it? Of course it was, it was a level 2 puzzle! We publish seven levels of difficulty, with bigger grids, longer thermometers, and even thermometers that go around corners. Harder grids also have rows or columns without labels. Plenty to give your brain a proper workout. Read on to find out more.
Ready to have a go yourself? We’ve put together a taster of four puzzles for you, including the example above. You can download and print the PDF below. Solutions are included, but no cheating!
Download Our Thermometers Taster
Fancy filling some thermometers? We publish this puzzle occasionally in our free Puzzle Weekly magazine. You should totally sign up for that if you haven’t already, as it puts at least 28 brand new puzzles in your inbox every week.
You can also find lots of Thermometers puzzles in our Jumbo Adult Puzzle Book – which happens to include more than 500 puzzles of 20 different varieties.
Line segment is a spatial awareness logic puzzle invented in the USA. Whilst it can look a little daunting at first, it’s actually very straightforward to learn.
In a hurry? Jump to: Rules / Tips / Worked Example / Video Tutorial / Download Free Puzzles / Books
Here’s a very small example puzzle:
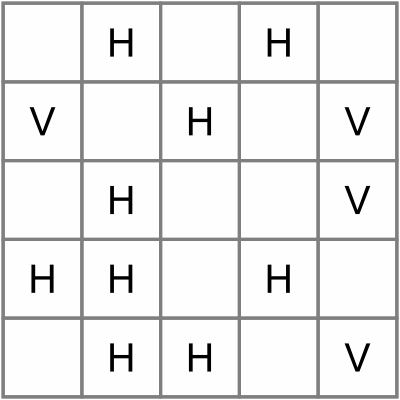
The aim of the puzzle is to fill every cell with lines that can run either horizontally, vertically, or diagonally. Naturally, there are some rules.
Here’s what the earlier example looks like once it’s been solved:
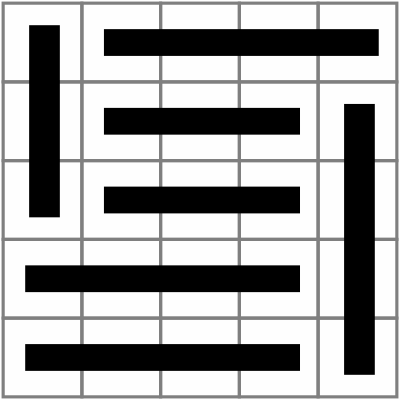
This very small puzzle is particularly easy because there are no diagonals. Most puzzles are larger and include diagonal lines.
Solving Line Segment puzzles is largely a process of elimination. Here are some tips that should help you get started. Below, we’ll work through a larger puzzle from start to finish.
Let’s put everything into practice and work through a real puzzle.

Here’s the grid we are going to solve. We’ll begin at the top left and work across, marking out horizontal and vertical cells. As we do, we are bound to pick up some ‘quick wins’ - sections we know we can complete. We’ll ignore diagonals for now because they are more complicated.

You can see we’ve worked across the top row, and that’s already allowed us to eliminate several cells. The first cell is a V, and we know it must descend at least 3 cells vertically. Maybe it connects to the next V below it, maybe not, we don’t know. The same thing goes for the V in the second cell.
When we get to the H, we know we must go at least 3 cells to the right (can’t go left), so that knocks out the next H.
The final H in the top row is an interesting one; we don’t know whether it incorporates the right-most cell or not, but as it must be at least three cells wide, it must include the cell to its left. So we can bar those two.
Let’s continue along the next row.

We can bar three cells with the first H (can’t go left so it has to go right). We don’t yet know if the second H connects to the first or not, but either way we can bar it.
The V at the end must connect to the others below it.
At this time, we still cannot determine what goes in the two empty cells in the top row. Maybe they connect to the Hs, or maybe they are part of diagonals. We’ll have to wait and see. In the meantime, we’ll continue working down the puzzle. Let’s do the next three rows, still looking at Hs and Vs, and leaving the Ds alone for now.

The H is easy – it’s hemmed in by Ds on either side so it’s a no-brainer. The three Vs can be marked out, but we don’t yet know whether they connect to the others below them. We’ll find out later.
Before we move to the bottom of the puzzle, let’s look at the D which I’ve highlighted. I know I said we aren’t looking at diagonals yet, but this one’s interesting because it’s hemmed in on all sides except two, and one of those is not a valid move. Can you see which? The only possible place we can put a valid line (ie one at least 3 cells long) is to the bottom right. So we might as well put that in now...

Having that diagonal is going to help us by eliminating other possible placements later. For now though, we’ve moved more than halfway into this puzzle, so let’s switch to the bottom and work up from there. By working from outside in, we are making the constraints of the puzzle work in our favour. We’ll just do the bottom row for now.

The first V must go up at least three cells. At this point we can see that the only way to make a valid vertical line with the two remaining Vs in that column is to connect them together plus a cell below, so we can draw that in too.
The first H in that bottom row must be at least three cells wide, but we don’t yet know if it connects to the second, so we’ll just put a bar through that.
The stacked Vs in the penultimate column are connected and must include at least one more cell. The final V is a no-brainer because it’s hemmed in above by the D.
Now we can look at the last H and the four remaining Vs.

The first two Vs must be connected. If we draw in the H, which has to be three cells wide because it’s hemmed in on both sides, then we can see that the V in the third column up must connect to the one above it we already drew in - there’s nowhere else for it to go.
That leaves one V in the fourth column, and because of the diagonal we put in earlier, we know it must be three cells high.
We can go back and look at the two cells I’ve highlighted in blue. These cells are now cut off from the rest of the puzzle – they can’t be reached by any possible diagonals. There are only two of them, so they can’t form an independent vertical either. The only way we can fill them is to connect them to the verticals above and below, so we’ll do that now.

At this stage we have marked off all the H and V cells, and filled in all our quick wins. We even managed to sneak a diagonal in there. Where next? Well, if we examine the remaining empty cells, we can see that almost all of them could be part of several different lines. For example, the top-right cell could form part of the horizontal line to its left, or it could be a diagonal. There’s a block of six empty cells near the middle towards the right – they are full of potential. They could be two horizontal lines, or parts of diagonals, or possibly even part of a vertical in one case.
The cell highlighted in blue is a different case though. It can’t be a horizontal because it’s hemmed in that way, and it can’t be a vertical because it’s only got one free cell below it. It must be a diagonal, and there’s only one direction we can draw a valid line from it. Let’s draw that in.

There are a few ways we can advance from here, but we’ll stick close to the edges because of the built-in constraints. The highlighted D could be drawn in two ways – from its top-left to bottom right, or it could form the bottom of a diagonal going up and to the right (both possibilities highlighted). Can you work out which is the correct line? It has to be the one going up and to the right, because if we went the other way, we would be locking off the cell immediately below the D. So we can draw in the correct diagonal, and complete the H on the bottom row as well.

This gives us another constrained cell (highlighted). There’s only one way we can draw a line on that, and that’s by going up and to the right diagonally.

We don’t know if that diagonal is three or four cells long, so we’ll just draw three for now. (Note: If we think about two moves ahead, it’s pretty easy to see it must be four cells long. The fourth cell could potentially be part of a horizontal line, but that would cut off a cell below it. We’re keeping things simple here and not thinking too far ahead, so we’ll just draw it three cells long for now.)
Working methodically back up the puzzle, we have a D (highlighted) on the right that can only go one way, so we’ll add that next.

There’s a pair of Ds that only have one place to go, so we’ll draw that line in.

Still working our way up, we’ve got another highlighted cell with only one way to go – another diagonal. We’ll draw that one in too.

If we draw our attention to the cell highlighted in blue, we can see that with this latest diagonal in place, it can no longer form part of a horizontal line with the cell to its left, because it would only be two cells wide. So that cell must be a diagonal, no other option. We can draw that in, and at the same time connect that orphaned H to the existing 3-cell horizontal to its left.

Phew, nearly there! We only have two cells remaining. The very top right must be part of the horizontal line to its left, because that line isn’t long enough yet (all lines must be three or four cells long).
The final cell on row four must be an extension of the diagonal - no other option.

That’s it - we've solve the puzzle!
Ready to have a go yourself? We’ve put together a taster of four puzzles for you, including the example above. You can download and print the PDF below. Solutions are included, but no cheating!
Download Our Line Segment Taster
We include Line Segment in Puzzle Weekly from time to time. Puzzle Weekly is our free weekly puzzle magazine – find out more, and get your copy, here.
Hidato is a logic puzzle invented by Gyora Benedek, a scuba-enthusiast mathematician who says he was inspired by watching the complex paths of fish while diving. There are numbers, but don’t worry – like Sudoku, they’re just symbols – there’s no mathematics involved!
In a hurry? Jump to: Rules / Tips / Worked Example / Video Tutorial / Download Free Puzzles / Books
The goal of Hidato is to fill the grid with consecutive numbers that connect horizontally, vertically, or diagonally. Here is a small sample Hidato puzzle:
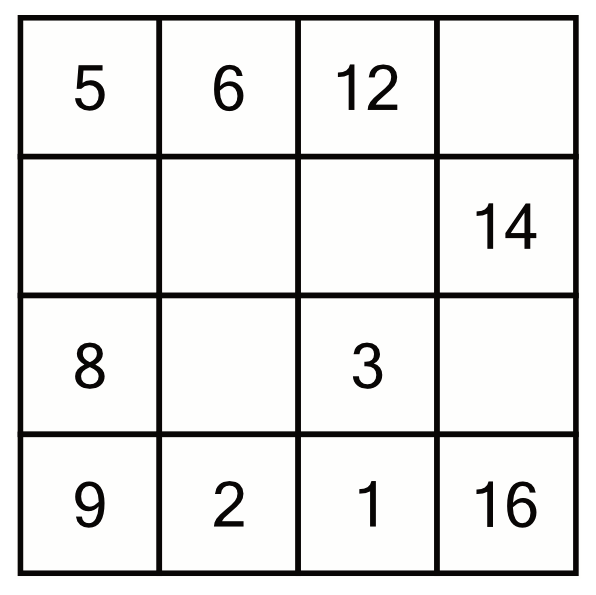
The rules of Hidato are very simple: fill in all the missing numbers in the grid such that they connect consecutively from smallest to largest, touching horizontally, vertically, or diagonally. In other words, starting at 1, it must be possible to travel to 2, then 3, then 4 and so on, by moving between touching squares.
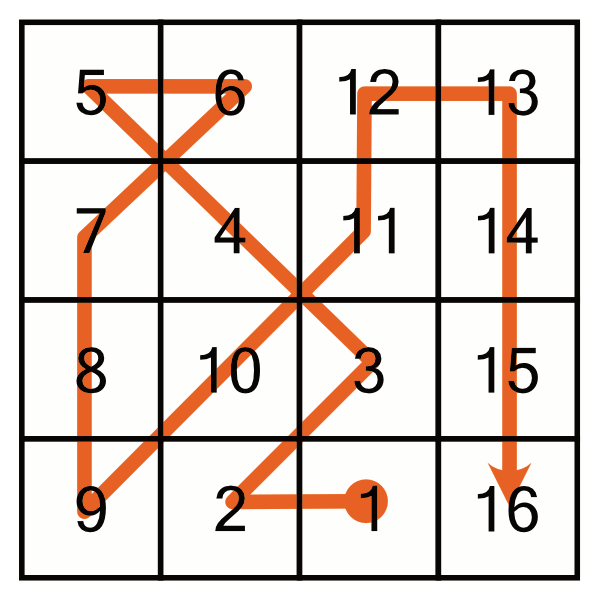
Here’s what our small sample puzzle looks like once it’s solved. We’ve overlaid the arrow to make it easier to see the path from 1 to 16:
Every puzzle has a single and unique solution. They are solved using a process of elimination. Here are some tips to help you, and then we’ll look at a worked example.

Here’s a bigger puzzle, though still an easy one. We'll work through step by step. If you want to print it out to play along, it's part of our Taster PDF you can download at the bottom of this page.

We’ll start at number 1, because starting at the beginning is as good a place as any for easy level puzzles. We know we need to place the 2 and the 3 somewhere (the next pre-filled number being 4). Starting from the 1, there are three cells available for the 2.
Although cell A touches the 1, we cannot possibly put the 2 in there, because we can’t get from there to the 4 in one cell. So the 1 goes in either B or C.

We could put the 2 in B and the 3 in C like this. At first glance this looks good. But there’s a problem. Can you spot it?
The problem is that to get from the 9 to the 11 we know we will have to put the 10 in cell B. So the 2 cannot go there.

It has to go in cell C, like this.

Now we have an easy run, using the same logic to fill in numbers all the way up to 19. You may notice that the 12 appears to have two possible placements, but only one is valid because we cannot block the path between 27 and 29.
We are faced with a choice for where we put the 20: cell A and cell B. It’s very easy to work out which must be the answer. The next printed number is 24, so that’s where we are headed. If we put the 20 in cell B, it won’t be possible to reach 24, it’s too far. So the 20 must go in cell A

There’s another choice here. 21 could conceivably go in A or B – both let us get to 24. We don’t know which it is yet, so we’ll have to skip ahead.

Counting up from the 24, we can get all the way to 33 with no decisions to make.
After the 33, we are faced with a choice, where to put the 34, in A or B? Again, the answer is simple because cell A is the only possible path between the 41 and the 43, so we must put the 34 in cell B, leaving A free for the 42.

Once we’ve done that, we’ve got a clear run all the way to 49. We’ve already completed more than half the puzzle!
It’s not immediately clear whether we should place the 50 in cell A or B – either would work. Instead of worrying about that, let’s skip ahead.

Counting from the 53, we can add in numbers taking us all the way to 67. The 68 could go in cell B or C. Looking around that area, we can see that we need to put the 73 somewhere, and maybe that goes in cell C, but it doesn’t have to, so we cannot use that to determine where the 68 goes.

Let’s look and see if there are any other numbers we can definitely place. 79 is easy to spot.

From there, we can keep counting backwards, placing the 76, 75, all the way down to 71.

Now we know that cell C must contain 70...

That means cell B must contain 68, which means A must be the 50 we couldn’t decide about earlier.
Now we can go back and fill in the rest of the cells – they are all easy. Can you do it? If you want to check your answers, have a look at the Hidato Taster PDF below – it’s got a few puzzles for you to try including this one, along with the solutions.
Ready to have a go yourself? We’ve put together a taster of four puzzles for you, including the example above. You can download and print the PDF below. Solutions are included, but no cheating!

You can get 120 fab Hidato puzzles over seven levels of difficulty in Puzzle Weekly Presents: Hidato. With one puzzle per page, there's plenty of space for notes and working out. Plus all the solutions are in the back so you can quickly check your answers.
We also publish Hidato puzzles in Puzzle Weekly from time to time. Puzzle Weekly is our free weekly puzzle magazine – find out more, and get your copy, here.
Tents is a logic puzzle hailing from the Netherlands. It’s a nifty little spacial awareness teaser that’s quick to learn and great fun to solve.
In a hurry? Jump to: Rules / Tips / Worked Example / Video Tutorial / Free Puzzles / Books
Here’s an example puzzle – a very small one:

We are playing on a grid with numbers on the outside, and circles in some of the cells. These circles represent trees, and our objective is to place tents such that every tree has a tent associated with it. There are, of course, some rules to follow.
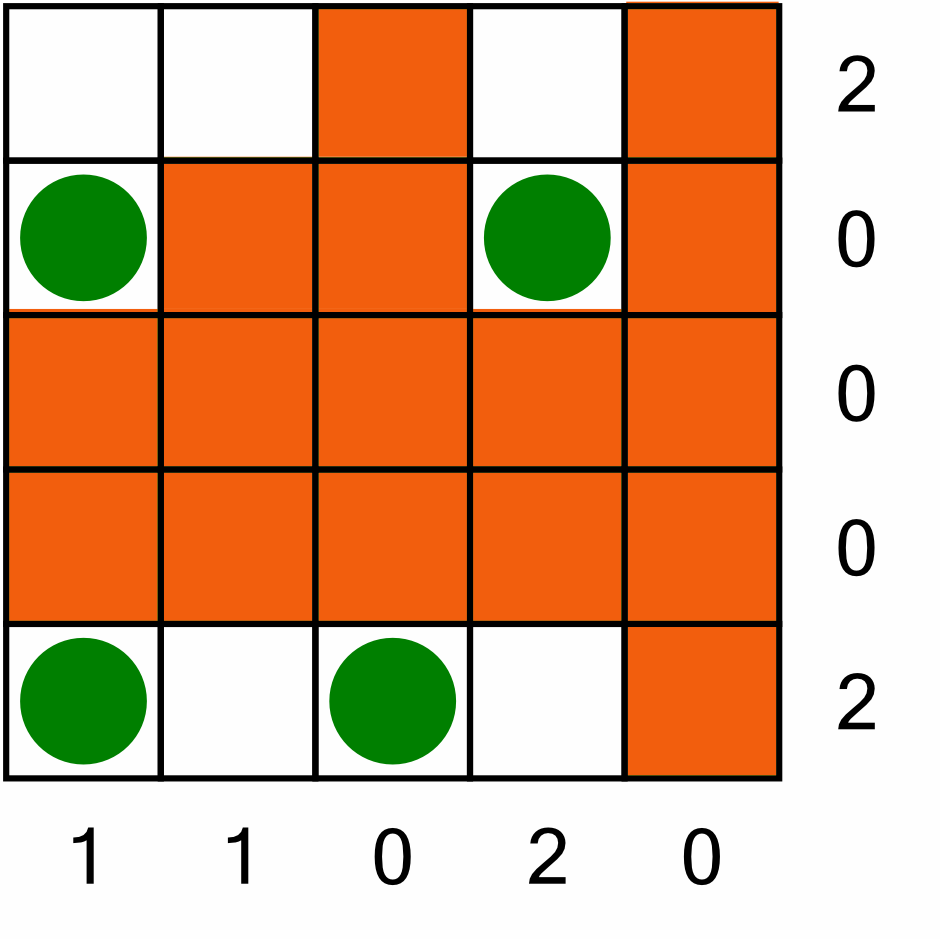
Here’s what our example puzzle looks like once it’s been solved:
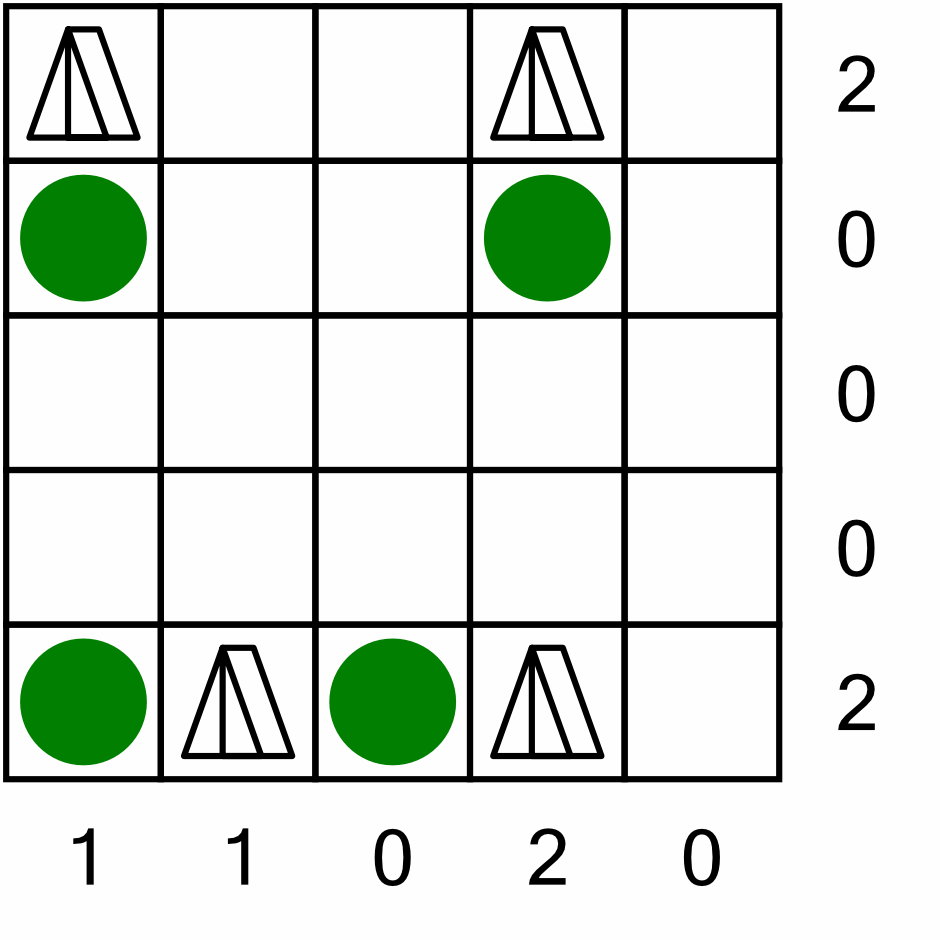
This small example is made particularly easy because of the five 0s on the outside. These reduce the possible positions of the tents to almost one for each tree:
Not every puzzle is this simple! Most have fewer 0s. Indeed, as the puzzles get harder, some rows and columns are not labelled at all.
Solving a Tents puzzle is all about eliminating places that the tents cannot be placed. Here are some tips to get you started, then we’ll work through an example of a full-size puzzle (below).

Here’s a full-size puzzle. If you want to download and print a copy to play along, this puzzle is included in our Tents Taster PDF that you can download here.

Let’s begin by blocking out the 0 row, as we know it cannot contain any tents.
Straight away, that gives us the position of our first tent (marked by the blue box). The tree in that box only has one available cell adjacent to it into which we can place a tent. Let’s draw that in, then block out the cells around the tent.

Now we have two more places to put tents (the blue boxes again). With the blocked out cells, these trees only have one remaining adjacent cell each. Let’s fill in the tents and block out the cells around them.

To make it easier to see what we’re doing, we can put crosses through the trees that have their tent in position. We can also cross out completed rows and columns. One of the tents we’ve just placed has complete a column, so we can cross it off and block out the rest of its cells.
We’ve got a new place to put a tent, right in the bottom corner. We’ll draw that in, and block off that completed column.

This gives us two more positions. The 2 halfway up the right hand side is easy to spot because there’s only one adjacent cell next to it. But what about the 1 in the bottom left? That has a cell above and one to the left. How do we know in which one to place our tent? Simple: the row above the tree is labelled with a 4, and there’s only one valid place we can put a tent to complete that row.

Those placements let us block off lots more cells, complete a column, and gives us a whopping five more positions (all marked with blue boxes above)! Filling those in gets us a long way...

You now know everything necessary to complete the rest of the puzzle – can you do it? To give you a head start, I’ve marked the next known tent position with a blue box again. To check your solution, have a look at the Taster PDF (linked below).
Ready to have a go yourself? We’ve put together a taster of four puzzles for you, including the example above. You can download and print the PDF below. Solutions are included, but no cheating!

Want some top-quality Tents puzzles? We have you covered! Puzzle Weekly Presents: Tents is a collection of 120 puzzles set over seven levels.
Or why not get an instant hit and download our dual-format PDF book, Puzzle Express #7: Tents! You'll find 70 brand new puzzles over seven levels of difficulty. With sections for printing and on-screen solving, you can do the puzzles however you prefer.
We include Tents in Puzzle Weekly from time to time. Puzzle Weekly is our free weekly puzzle magazine – find out more, and get your copy, here.
Hundred is a numerical puzzle that involves strategically placing digits in a grid to achieve specific sums in each row and column. The puzzle is played on a 3x3 or 4x4 grid. Here’s an example Hundred puzzle:
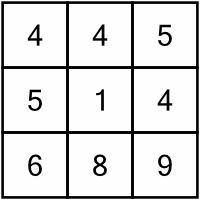
As you can see, the cells are already filled with digits. Your task is to add extra digits into some or all cells in such a way the the sum of the numbers in each row and each column equals 100.
You can add digits before or after those already in a cell. So for example a 7 could become 17 by adding 1 in front of it, or 71 by putting the 1 after it.
There are no restrictions on how often you can use digits, and all the digits from 0 to 9 are on the table.
Here’s what the example puzzle looks like once it’s been solved: