As 2025 draws to an end, so does Puzzle Weekly. Sadly this will be the last issue we publish. It's been a blast, and we hope you've enjoyed some of the fun along the way.
Before we leave you though, there's still this final issue, with Suguru, Hidato, and Shirokuro to enjoy, along with all the usual features including:
Thank you for being part of the Puzzle Weekly family. From all the team, we wish you a very happy 2026.

Merry Christmas! Don't let your brain atrophy over the festive break, keep it ticking over with Sudoku, Star Battle, and Creek. You'll also find all the usual features inside, including:

We have a brand new puzzle for you this week: Doors. And as if that wasn't enough spatial fun, Mazes are back after a long break. Plus, Calcudoku, and all the usual features including:

This week's magazine is strong to the finish, and it didn't even eat its spinach! There's a bit of a Popeye theme going on – all is explained inside. Also inside this week you'll find Killer Sudoku, Number Cross, Shikaku , and all the usual features including:

Enjoy the start of a new month with a new puzzle: Futoshiki. It has Sudoku-vibes, and a rather unique clue and constraint system, using inequality symbols to help you determine digit placements. Also in your favourite free puzzle magazine this week: Hitori, Kakuro, and all the usual features including:


Have you tried Speedoku? It’s our new daily puzzle, and you can play it right here on this site, for free, now: click here to try!
Speedoku is a Sudoku-style puzzle built for speed. There are only nine digits to place on the little 3x3 grid. The clues? The numbers in the diamonds – they show you the sums between some of the adjacent cells.
Seasoned puzzlers should be able to solve Speedoku in under a minute. There’s no need to make notes or write in candidates; sure, it would help, but where’s the fun in that? Speed is the name of the game, and you have to keep all the options in your head as you fill the grid.
When you’ve solved it, hit the Share button to brag about your score and challenge your friends and family to try to beat you. And then come back tomorrow and see if you can solve the next one even faster.
We hope you enjoy Speedoku!
Sudoku has evolved and become, triangular? And star-shaped? Oh yes, meet Hoshi! It's a fab variant of an old fave, and just one of the puzzles in this week's free magazine. We've also got Hashiwokakero (Bridges), Line Segment, and all the usual features including:

Doors, sometimes also called Seethrough, is a spatial awareness puzzle played on a square grid. Although there are numbers involved, it’s not a math puzzle (beyond simple counting).
In a hurry? Jump to: Rules / Tips / Worked Example / Download Free Doors Puzzles / Books
The objective of the puzzle is to ‘close’ certain doors between rooms so that each room opens onto a set number of others. This is done by drawing lines between cells. Here’s what a very small, simple Doors puzzle looks like:
Here’s what the above example puzzle looks like once it’s been solved:
These puzzles are solved through simple logic, mainly just counting. The logic and process might be straightforward, but the puzzles can initially look a little daunting as there are lots of numbers and no closed doors to start you off. The key is not so much to look for which doors you must close, but which must remain open. By forcing some doors open, you eliminate places where you can close others.
Here are some tips to help you get started. Below, we will work through a whole puzzle from start to finish, putting these tips into practice.
Let’s solve a puzzle from start to finish, so we can see some of these techniques in action. This example is not intended to show the best or fastest way to solve the puzzle, only to demonstrate methods that can be used.

This is the puzzle we are going to solve. It’s a small, easy puzzle. Smaller, in fact, than our usual Level 1 puzzles. But a regular puzzle would make this example too long and unwieldy, and a little puzzle is sufficient to see the solving techniques in action.

The first move is easy: as we have two 1s next to each other, we know there must be a door closed between them. If that door was open, then every other door surrounding those 1s would have to be closed, which would isolate them from the rest of the grid, and that’s not allowed by the rules. So this door must be closed.

Now let’s turn our attention to this corner. Corners are obviously more constrained as they only have two doors. Why look at this corner in particular? Because it’s the largest number in a corner. We need to see five rooms, and we can only look up and to the left. Either direction will only show us a maximum of four rooms each (it’s actually fewer because the 1 in the vertical direction, and the 2 in the other corner, both ‘block’ us), so we know we are going to have to look at rooms in both directions if we are to meet the target. Therefore we know that both the doors to this cell must remain open. We can mark those in on the grid, so we know not to close them later.

I’ve marked those doors open with the small green lines. We can do something similar here with this 6. At first glance, it looks like we can see a maximum of four rooms looking vertically (upwards). However, the 2 at the top of that column means we couldn’t open all the doors between it and the 6. We don’t know if the 2 will see any rooms in that column – it could see the 6 and the 4 below it, or just the 6, or nothing at all in that column. But we do know that we cannot have doors open all the way between our 6 at the bottom, and that 2. So the most rooms we can see vertically is three. That means to see our target of 6 rooms, we are going to have to leave all three doors open. Again, we’ll mark them in to remind us.

Let’s keep looking for forced openings. Another obvious place to look is this 6. Aside from the one we just looked at, it’s the biggest number on the board. However you look at it, we’re going to have to leave the bottom door open if we are to reach the target. There are various combinations in which one of the other three doors may or may not be closed, but we don’t know which is correct yet, so we’ll just mark in what we know for sure: that bottom door is going to have to stay open.

Now we’re going to have a look at this corner 3. Again, we’re rather constrained because we only have two doors. We are further constrained in that below that 3 is a 1, so if we leave the door between them open, we must close all other doors on the 1, shutting off that column as a source of rooms to view. We are further constrained by the 1 in the top row. If we left all the doors open between the 3 and the top 1, we would be fulfilling the criteria of the 3, but we would bust the 1 (it would be able to see 3 rooms!) These constraints, taken together, allow us to solve this cell. We must be able to see the two cells immediately to the left, and the cell below. We can draw in the openings, close the required doors, and strike through that 3 so we know we’ve solved it…

…like this. With the two doors we’ve closed, that 3 can now only see the required 3 rooms.
Closing those doors has some knock-on effects we need to deal with. Firstly, this 1. It’s looking at the 3, so we must close the remaining door to the left.

The 1 is completed so it can be struck off.
The 2 is also complete, because we can see the two threes to its right, as the interconnecting doorways are forced open. So we must close the remaining door, looking downwards.

We’ve solved most of this top corner, but what about this 3? It can see two rooms (left and right), so it must keep its bottom door open to look at the 4, but it must not look any further. That means we have to close the bottom door of the 4.

With only one door remaining open, we can solve this 4. It can see one room above, so it must be able to see all three to the left. We’ll mark those doorways as open, and strike through the 4 as complete.

Looks like we’ve just solved this 6 into the bargain! We’ll mark the highlighted doorway between the 4 and the 5 as open.

We can solve this 3, because with the open doors to the left and right it can already see three rooms. We need to stop it seeing any more, so have to close the top and bottom doors.

The 2 and the 1 can also be solved. The 1 already is – it’s only got one door left open! And the 2 must have its bottom door open, and we have to close the one beyond it (the bottom door of the 4)…

…which coincidentally also solves the 4.
I’m going to return to the bottom of the puzzle now, and look at this 2 in the corner. If we leave the door to the right open, we’re going to have a problem as all the other doors further right must stay open and we’d see far too many rooms. So we must close the right-hand door, and we must force open the two doors to the top so we can see enough rooms.

Not only has that solved that 2, it also completes this 6 because it’s now reached its target number.

…and it lets us solve this 3 – we must close the top door.

They’re dropping like flies now. The 4 is solved already. The fact it must open onto the 1 above it means we can shut the other doors on that 1 and mark it as complete.
The 5 is also solved, and we can mark the doors above it as open, which will help solve the other rooms.

Both of these 2s are done, and we can close the other door on the top one.

We can solve this 4, because we know the 1 to its right must open on to it. With the doors at the top and bottom of the 4 already forced open, it has reached its complement of visible rooms, so we can close the left-hand door.

And that’s it! Even though we haven’t struck through them, all the other rooms are actually solved now.
It might look like it took a lot of effort to solve such a simple puzzle, but that’s because we broke it down into very small steps. As you get comfortable marking doors open and seeing where the forced openings then require doors to close, the puzzle flows beautifully. If you want to try some yourself, keep reading for some freebies…
Ready to try some Doors / Seethrough puzzles yourself? We’ve put together a sample pack of four grids for you – a couple of easy ones, and a couple that are more challenging. Download the PDF below. Solutions are included so you can check your results.
Click Here To Download The Taster PDF
Ready for even more Doors? We’ve got you covered!
Puzzle Weekly Presents: Doors is a collection of 120 puzzles set over seven levels of difficulty. Grab a copy here.
What's this? Another brand new puzzle in your favourite free weekly puzzle mag? Oh yes, welcome, Noodle! Also this week, Aquarium, Skyscrapers, and all the usual features including:

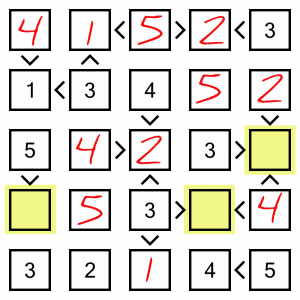
Futoshiki is a number-based puzzle that shares many similarities with Sudoku, but adds additional clues in the form of inequality symbols.
In a hurry? Jump to: Rules / Tips / Worked Example / Download Free Futoshiki Puzzles / Books
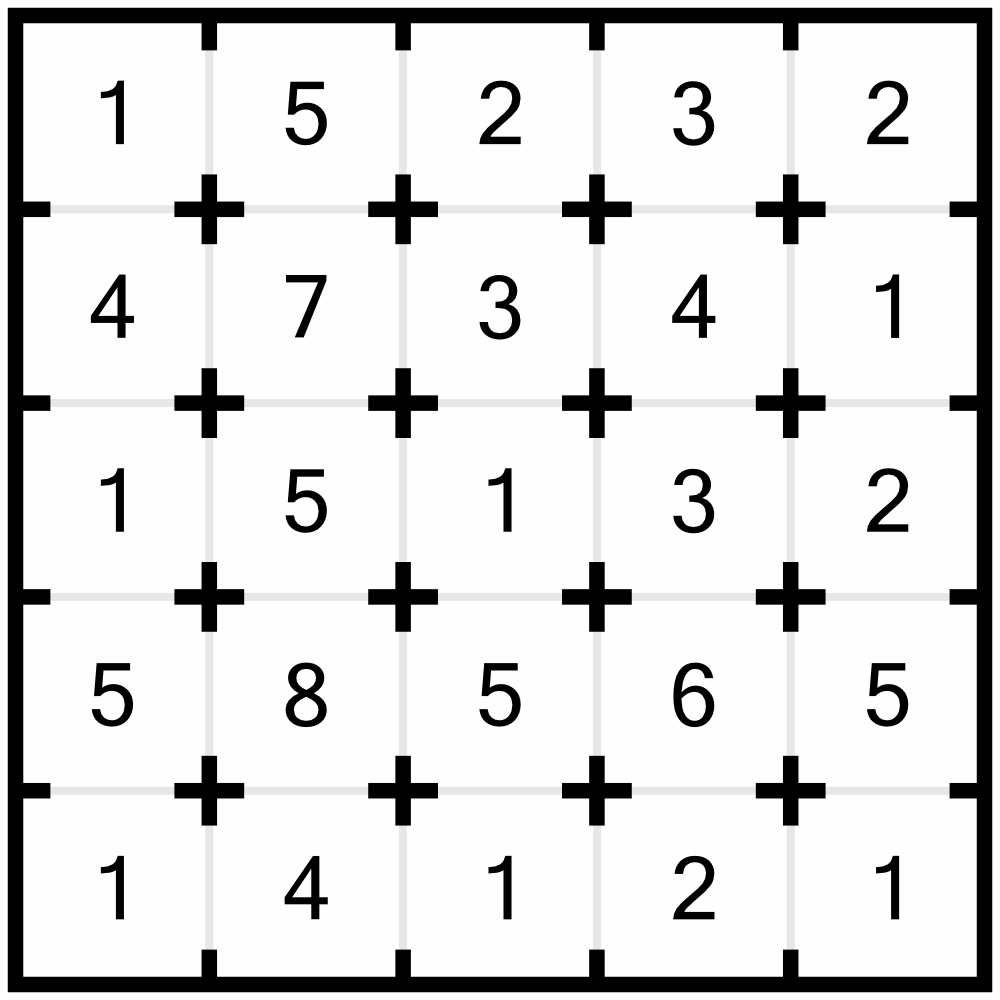
Here’s what a small Futoshiki puzzle looks like:

The rules are pretty easy to understand:
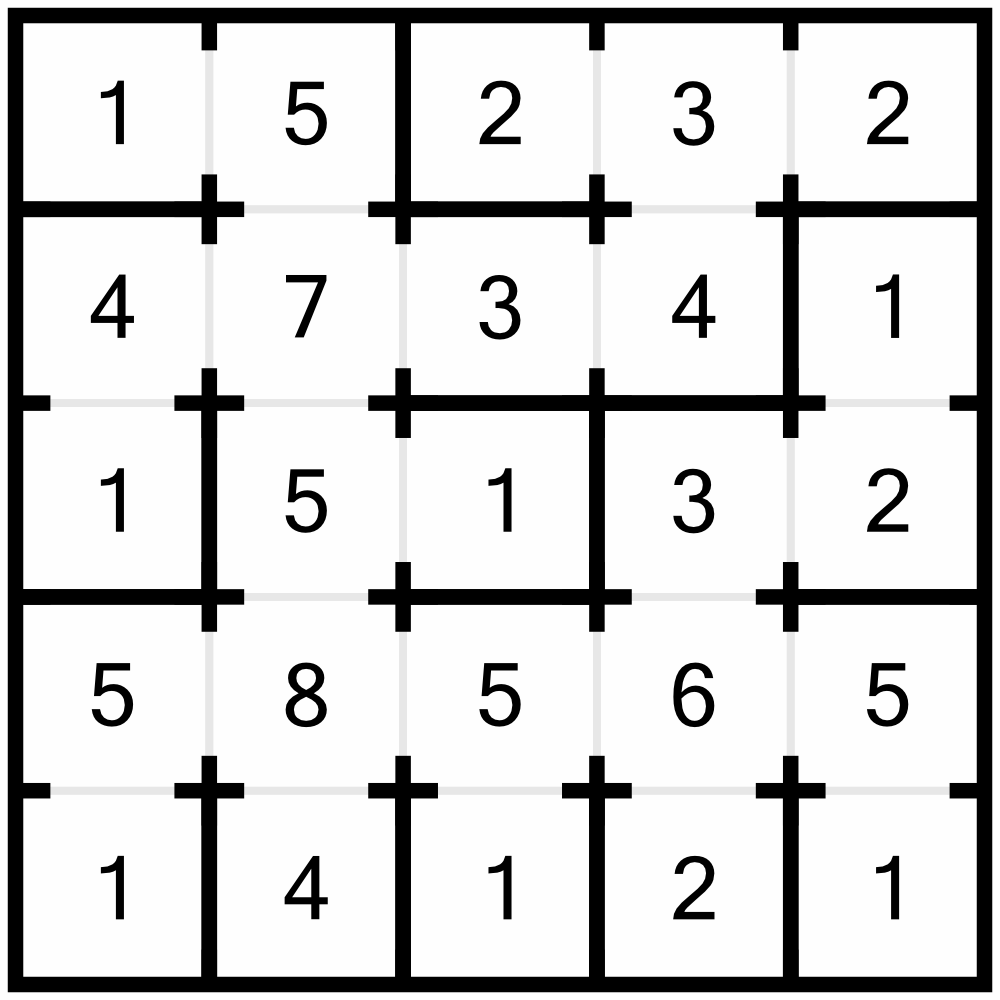
Here’s what the earlier example looks like once solved:
Simple Futoshiki puzzles can mostly be solved using basic Sudoku methods, in other words, elimination based one row and column intersections.
Anything beyond the most easy puzzles requires us to look at the inequality symbols, though. Here are some tips to help you get started:
As puzzles increase in difficulty, you’ll need to combine techniques to narrow down possible cell contents, and that’s when notes come in handy.
Theory is all well and good, but there’s nothing like putting pen to paper and solving a real puzzle, so let’s do that now. We’re going to work on an easy level 1 puzzle so that this example doesn’t become too unwieldy, but it will show the basic techniques we can use to solve Futoshiki. Please bear in mind the objective here is to demonstrate techniques, not to solve the puzzle in the most efficient way possible.
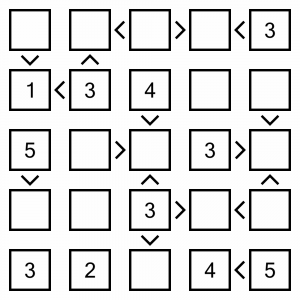
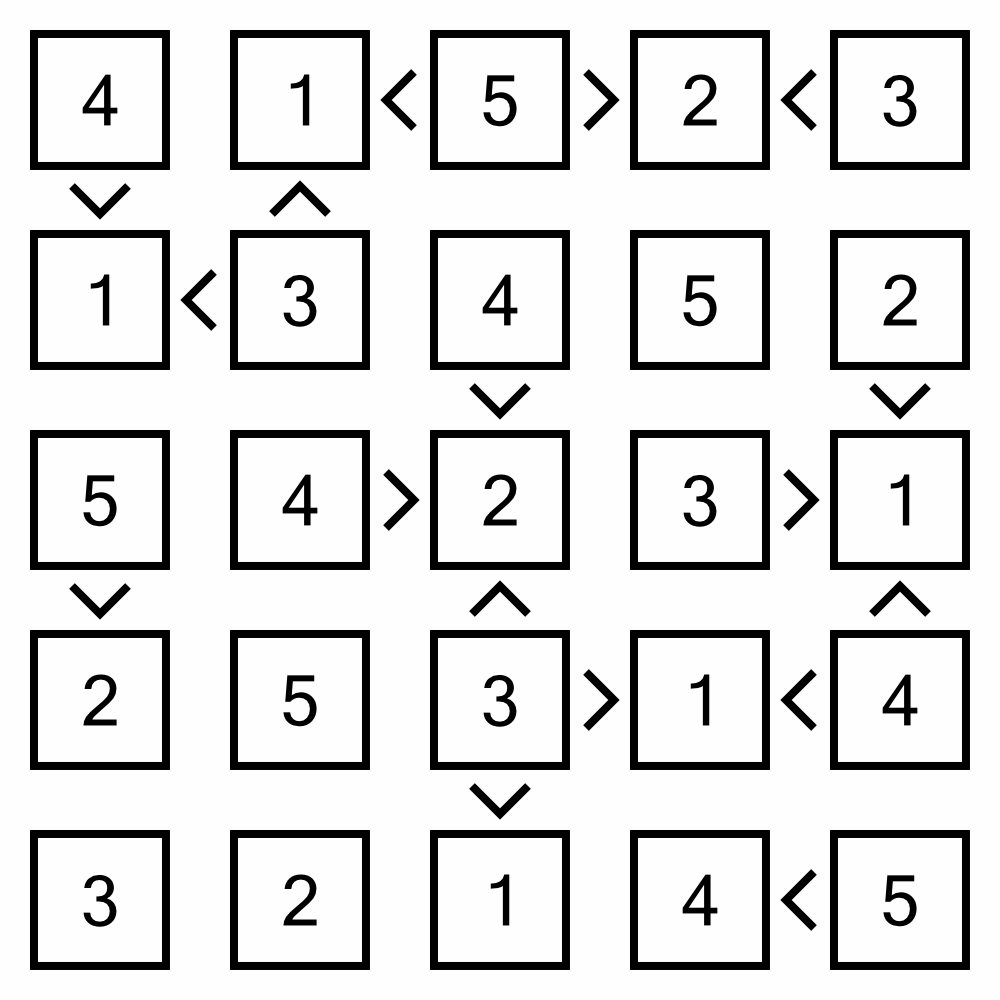
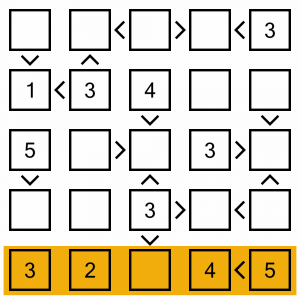
This is the puzzle we are going to be solving. It’s a simple level 1 puzzle that will adequately demonstrate the approach we can take to solving.
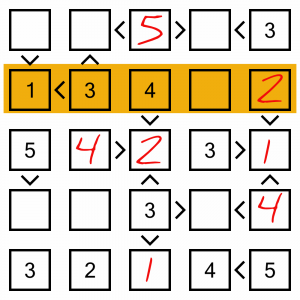
The easiest of easy wins on this board is this row at the bottom. It’s only missing one digit, so it’s a real no-brainer! We can put a 1 in here.

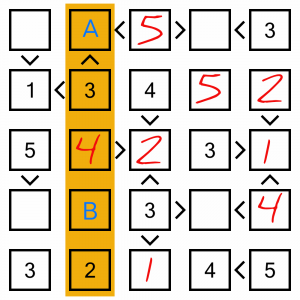
The 1 we’ve just placed is going to help us solve the middle cell in this column. That cell requires a digit that is smaller than 4 and smaller than 3. The only numbers that fit the criteria are 1 and 2, and seeing as we just placed the 1, we know that can’t be it! So we have to put a 2 in here. And seeing as there’s only one other empty cell in the column, we know that will have to contain the 5.

In this row we are missing a 1 and a 4, and we have two cells ready and waiting. Cell A says it contains a number bigger than 2, so we can’t put the 1 in there, it has to contain the 4, and the 1 goes into B.
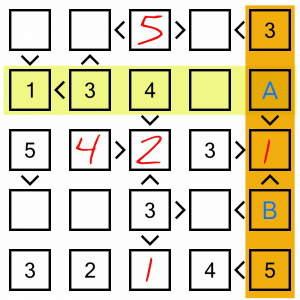
In the last column we need a 2 and a 4. If we look at the row that intersects with cell A, it already has a 4, so that cell can only contain the 2. The 4 will have to go in cell B.
There’s only one empty cell left in this row, so that’s our 5.
How can we solve this column? Well, we’re missing a 1 and a 5. According to our inequality symbols, cell A contains a number smaller than 3, so it must contain the 1. That leaves the 5 in cell B.

This is a very easy puzzle, so there are loads of ways of figuring out the last few cells. Let’s look at the top row. We’re missing a 2 and a 4. Cell A must be bigger than 1, so that doesn’t help us. But cell B must be smaller than 3, so the 1 must go in there, leaving the 4 to go into cell A.
There are only three empty cells remaining, and each one is the final empty cell in its column, so they require no effort to fill…

That’s it, all done. I did say it was an easy one! It might be simple, but these kinds of eliminations are at the heart of how we solve Futoshiki puzzles. By combining them in their different forms, and cascading implications between rows and columns, we can solve all but the most complex of puzzles without resorting to candidate notes. If you want to have a go yourself, keep reading for a free taster pack to download.
Ready to have a go yourself? We’ve put together free taster pack with a couple of Level 1 puzzles, and a couple of harder ones, too. Download the PDF below. Solutions are included so you can check your results.
Click Here To Download The Taster PDF
Would you like even more Futoshiki? We’ve got you covered!
Puzzle Weekly Presents: Futoshiki is a collection of 120 puzzles set over seven levels of difficulty. Grab a copy here.