Stitches is an intriguing logic puzzle that involves ‘stitching’ together different regions of the board. The puzzle is played on a square grid divided into variously shaped regions.
In a hurry? Jump to: Rules / Tips / Worked Example / Video Tutorial / Download Free Puzzles / Books
This is what a small puzzle looks like:
Here is what the earlier example puzzle looks like once it’s been completed:
Stitches puzzles are solved through logical deduction and elimination. Here are some tips to help you get started, and then we’ll work through a sample puzzle below.
When solving these puzzles, don’t just look for stitches that you can place immediately. Though there may be some, there won’t be enough to complete the puzzle in anything except the most simple levels. Instead, you will need to eliminate places where stitches cannot go, and work out where stitches must start or end (endpoints).
Begin with the easy wins – regions which have a neighbour where there is only a single place to make a connection. These are often (though not always) one cell wide regions on an edge.
Look for extreme values. If a row or column has a ‘0’ as a clue number, you can eliminate all the cells within that row or column. Conversely, if a row or column has a clue number that matches the width or height of the puzzle, you know you must fit a stitch endpoint into every cell in that row or column. You won’t know where those endpoints connect yet, but putting them in will reduce your options later.
Eliminate cells where you know it’s not possible to place a stitch. For example, if a column has a clue number of ‘1’, you know it cannot have any vertical stitches (because that would put two endpoints in the column), only horizontal ones. This enables you to eliminate some cells within the column.
Look for forced placements. Sometimes, even if you cannot determine all the stitches within a row or column, you will see a cell that must contain a stitch no matter what because it’s necessary to meet the clue number.
Keep an eye on how many endpoints you’ve placed in each row and column. As soon as a row or column has reached its count, you can eliminate all the other cells within it.
In larger, more complex puzzles, it can be helpful to shade in different regions in different colours. You probably don’t need to shade them all in, but if a region is sprawling across the grid, filling it with colour can make it much easier to see where you need to make connections, and where connections have already been made.
Remember to look for consequences. Each time you eliminate a cell or place an endpoint, it can have knock-on effects that open up a route to advance further.
It can help to cross off row and column numbers outside the grid as you complete them.
We will work through an example of a Stitches puzzle from start to finish, as a way to cover the techniques above. Although there is only one valid solution to a Stitches puzzle, there may be many different paths to reaching it. So please remember that this isn’t intended to show the definitive way to solve it, it’s just one possible way.
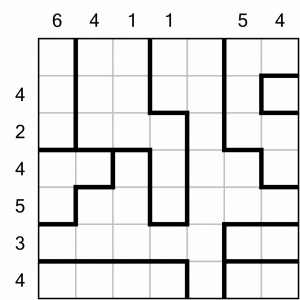
This is the puzzle we will be tackling. It’s a Level 1 grid, so can be solved with basic techniques; there’s no need for extensive chains of logic.
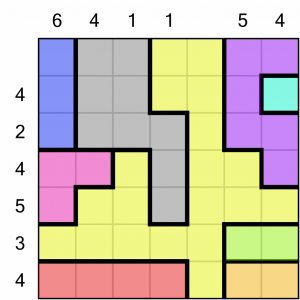
I’ve coloured in the different regions to make it easier to see them. Normally this is not necessary on such an easy puzzle, but it will help in this example as I reference the difference parts of the grid.
This grid is seven cells wide, so we can quickly check the clue numbers to see if there are any 7s. If there were, we know we could fill a row or column with stitch endpoints, but in this case we’re not that lucky. Neither are there any 0s among the clue numbers, so we cannot fully exclude any rows or columns.
However, we do have a horizontal line on an edge – the orange region in the bottom right corner. It only touches the yellow region in a single place, so we know we can place a stitch there straight away. This is a nice easy win that gives us a good starting point in the puzzle.
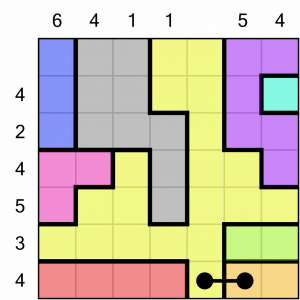
With that stitch added, we now only have one place where we can connect the orange region to the green one above it (because any given cell cannot hold more than a single stitch).
We’ll draw that in next.
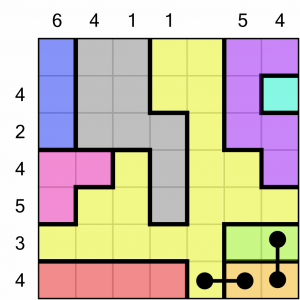
This leaves only one free cell in the green region. It has to connect to the yellow region – the only other region that touches it. Stitches can go horizontally or vertically, so there are two possible places we could connect to. Although we don’t yet know which one it will be, we do know that we can place a stitch endpoint in the only remaining cell in the green area, so we’ll do that now. While we’re at it, we will place an endpoint in the single-cell light blue region, because that has to connect to the purple one surrounding it somehow.
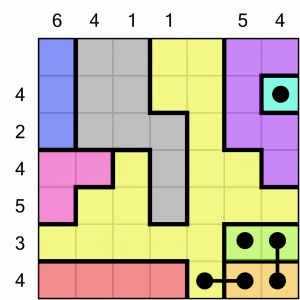
There are two more easy-win stitches on this grid. One is the another horizontal edge region - the dark blue one in the top left. That can only connect to the pink region below in one place. The pink region can also only connect to the grey region in one place. We can draw both those stitches in next.
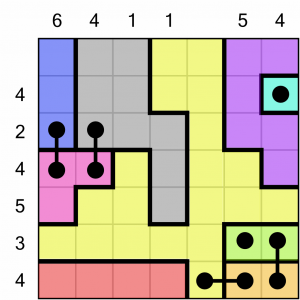
We can observe that the row with the clue number ‘2’ has two stitches in it. That row is complete. We can eliminate all the other cells in the row, which will help reduce our options for stitch placement later on.
We can also see that the pink region now only has one free cell remaining, but like the green region earlier, it could connect to the yellow region either horizontally or vertically. No matter that we don’t know which, we can draw in the endpoint anyway.
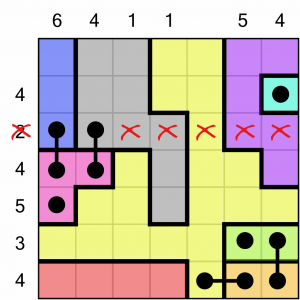
Drawing in endpoints even when we don’t know where they will connect is useful. Indeed the one we’ve just added to the pink region is going to let us put in another stitch. The left-most column has a clue number of ‘6’. We already have three endpoints in that column. We know that we will add one more in the blue region at the top (to connect it rightwards to the grey one), but that means we still have to find somewhere to place two more endpoints. The only way we can do that is to stitch together the yellow and red regions at the bottom of the column.
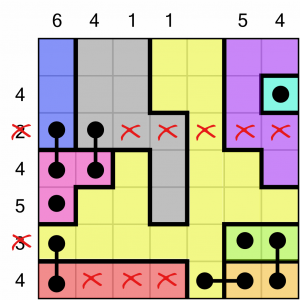
Putting that stitch in has completed the row with the clue number of ‘3’, so we can eliminate further cells in that row.
We can eliminate the other cells in the red region because we don’t need to make any more connections there.
With that new stitch in place, we also now know where to connect the endpoint we added to the pink region earlier - it has to go to the right.
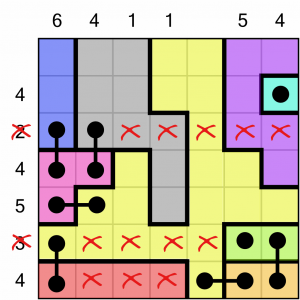
The eliminated yellow cells mean we can connect up the endpoint in the green region…
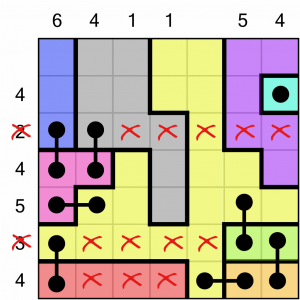
…like this.
We’ve got three endpoints in the row with the ‘5’ clue number, so we need to place two more. The only way we can do that is by stitching together the yellow and grey regions horizontally within that row. We don’t know whether we’ll go left or right from the grey cell, but we do know we can place an endpoint into it, and eliminate the last yellow cell in that row.
We can further deduce that because the yellow and grey regions will be connected in the ‘5’ row, there will be no connections between those two regions in the ‘4’ row above, so we can eliminate those cells too.
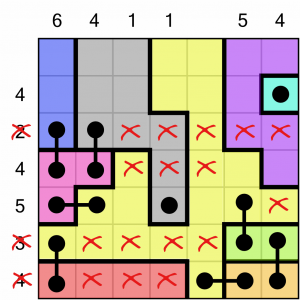
Eliminating the cells in the ‘4’ row means we must connect the yellow and purple regions in that row – it’s the only way to get four endpoints into the row.
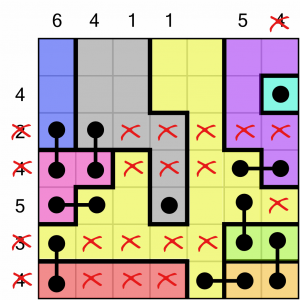
The rightmost column has a clue number of ‘4’, and now it has its full count of four endpoints. That tells us we have to connect the light blue region to the purple one by stitching to the left.
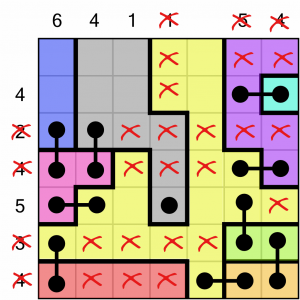
That’s completed the ‘5’ column, which means we can eliminate a few more cells. We’ll also tidy up the ‘1’ column which we completed earlier by eliminating the last remaining cells.
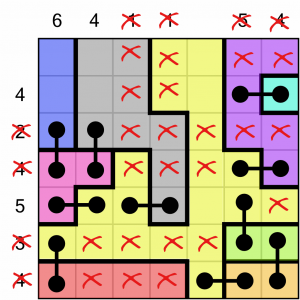
We’ve only got two stitches left to place to complete the puzzle. Can you work them out?
The first is the grey region connecting to the yellow one. We can work out whether the stitch goes left or right because we still have a column with a clue number of ‘1’ that needs a stitch. There’s only one place we can put it.
The last stitch connects the dark blue region to the grey one. There are two places the stitch could go, Either one would fulfil the ‘6’ and ‘4’ column clues, but only one will fulfil the ‘4’ row clue, so that’s where it has to be.
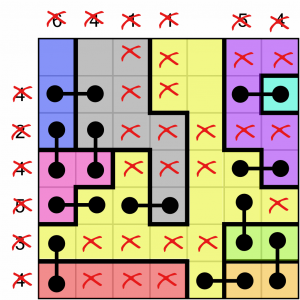
That’s it, all done. How did you get on? Did get ahead of me and finish before reading the whole example? Are you ready for more? Then read on.
We’ve put together a taster of four puzzles for you, including the example above. You can download and print the PDF below. Solutions are included, but no cheating!
Ready for more quality Stitches puzzles? Look no further! Puzzle Weekly Presents: Stitches is a collection of 120 puzzles over seven levels of difficulty. With one puzzle per page, even the biggest grids have plenty of space to breathe.
We include Stitches in Puzzle Weekly from time to time. Puzzle Weekly is our free weekly puzzle magazine – find out more, and get your copy, here.
You can also find Stitches in our Jumbo Adult Puzzle Book – which happens to include more than 500 puzzles of 20 different varieties.